• Home
  • About
  • LIFE
  • HOME
  • FOOD

The . Thome . Home .

Sweet Potato Quinoa Burgers

January 3, 2020 by Abby Thome

Sweet Potato Quinoa Burgers

This post is in collaboration with Heinen’s. As a Heinen’s Contributor I am thrilled to bring you all such incredible recipes that will become staples in your home!

Hearty, healthy and will truly become your go-to for lunch and dinner throughout the busy work week!

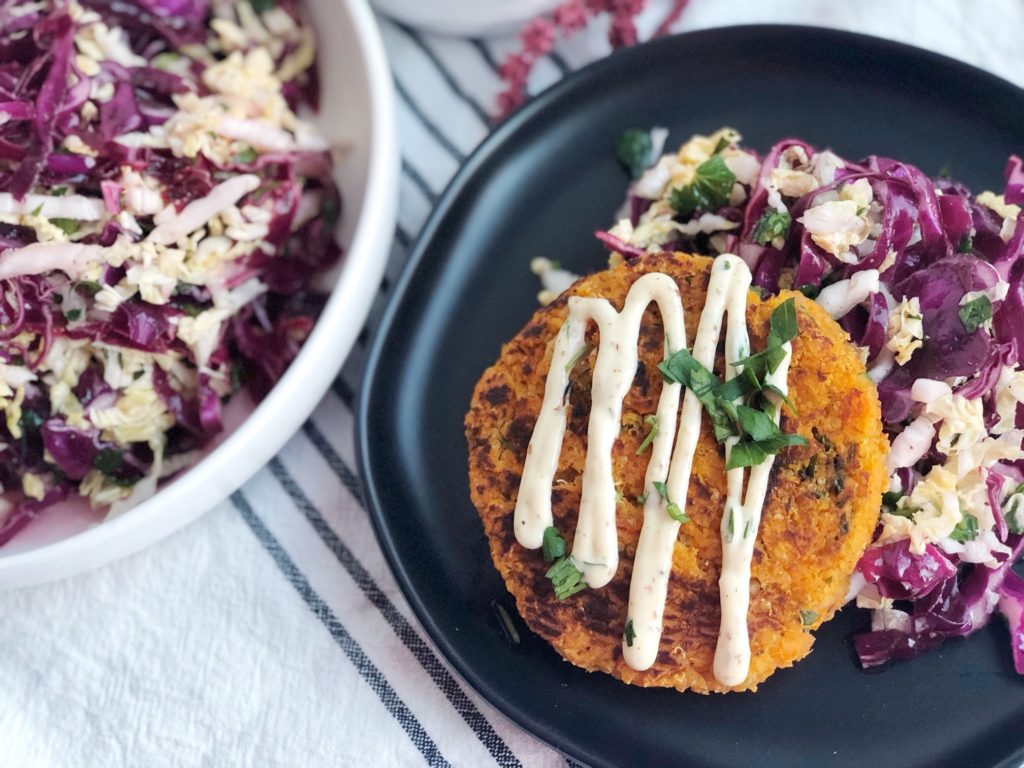
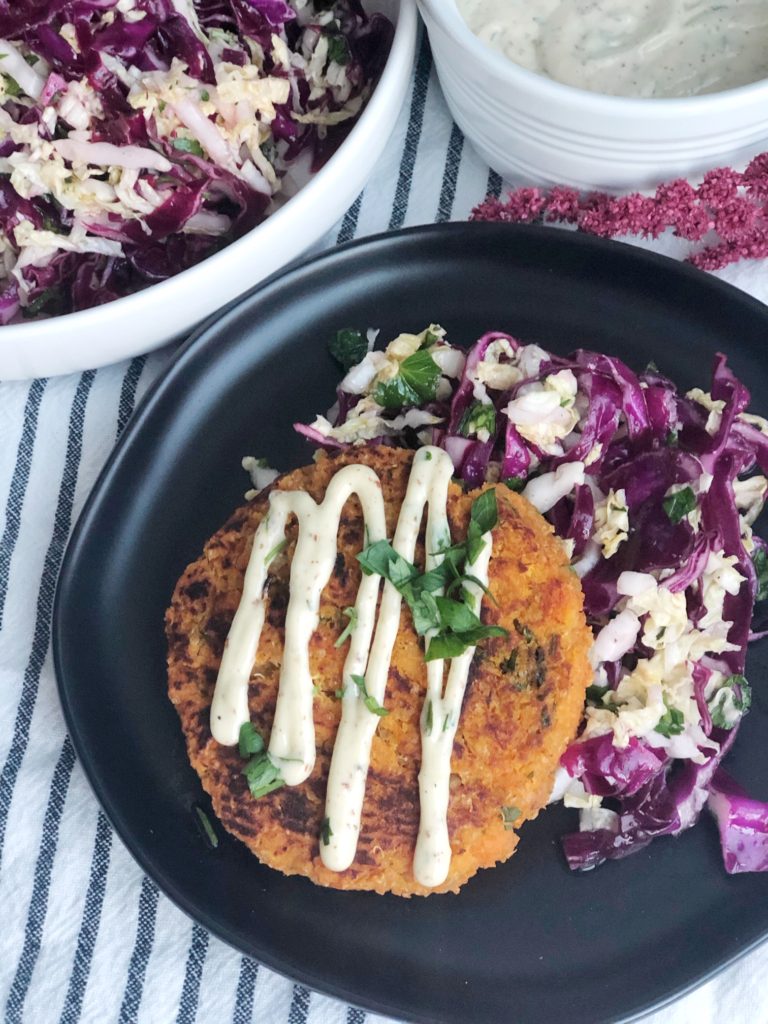
After the holiday heaviness of eating, nothing tastes better than a meal that is light and bright.  Whether you are vegetarian, or simply looking for a hearty substitute to meat a few nights a week, these Sweet Potato Quinoa burgers can be used in a multitude of dishes.  These substantially-sized patties keep their shape while cooking, and can be stored in the fridge to make putting together a nutritious meal that much easier.  Roasted sweet potatoes are mashed together with paprika-seasoned quinoa, cannelini beans, spices and a few binders.  Shaped and placed onto a baking sheet, the sweet potato burgers are baked for 30 minutes and then pan seared to completion.  

Baking the sweet potato burgers prior to pan searing is KEY to drying out the patties slightly and help keep their shape.

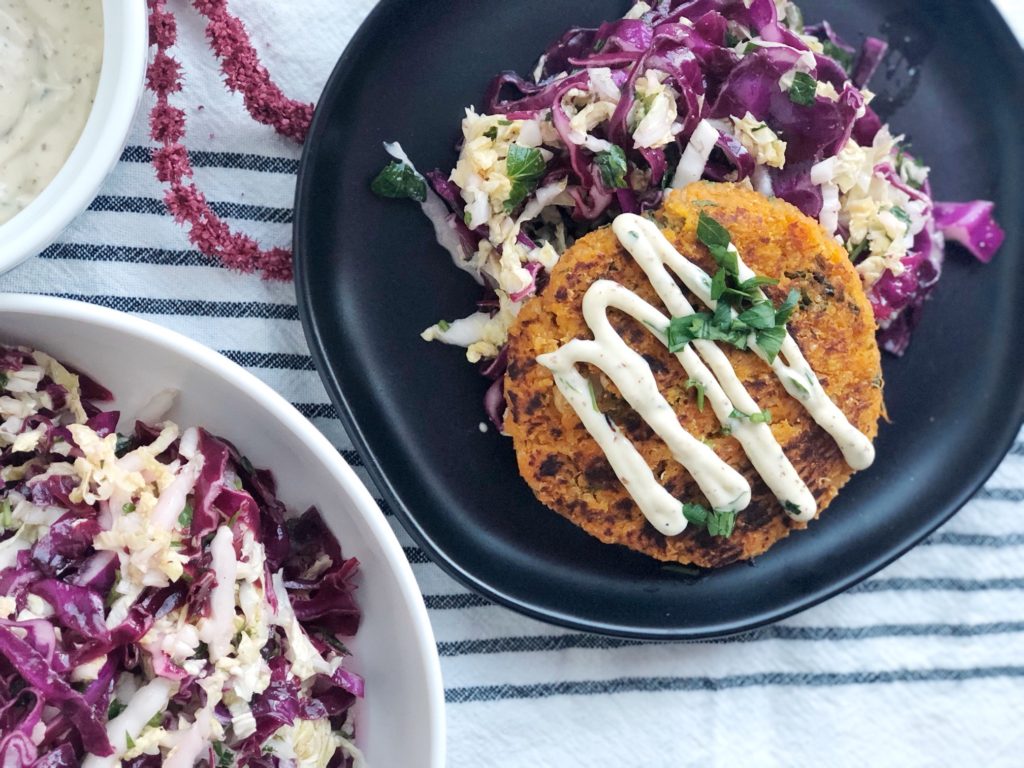
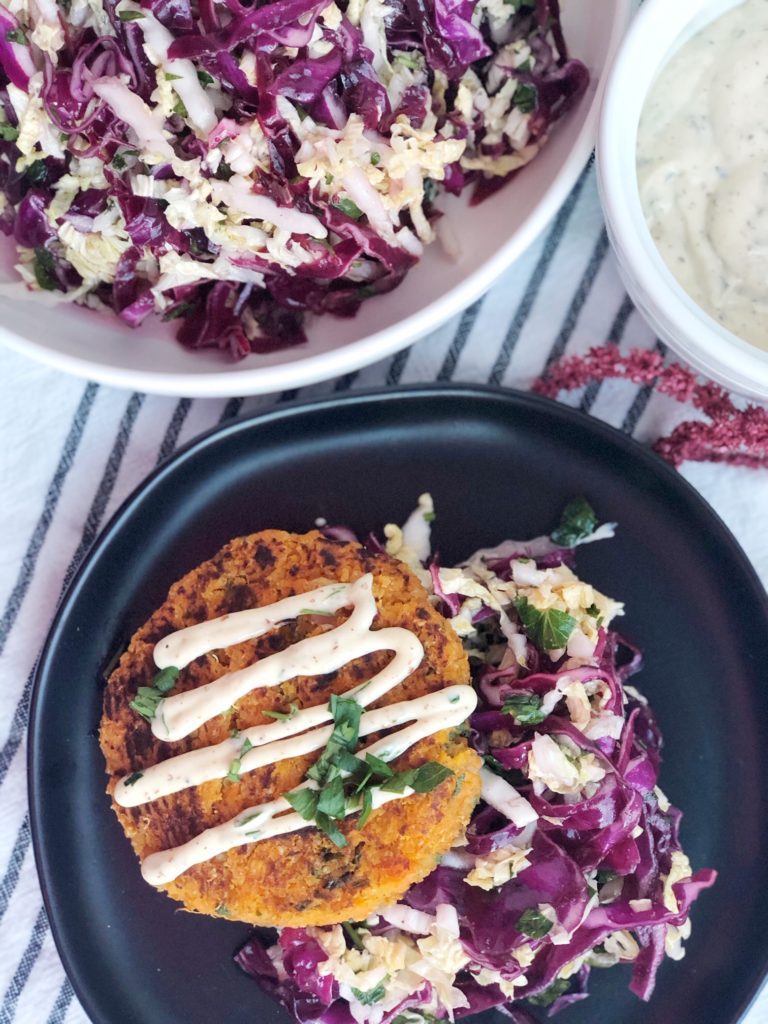
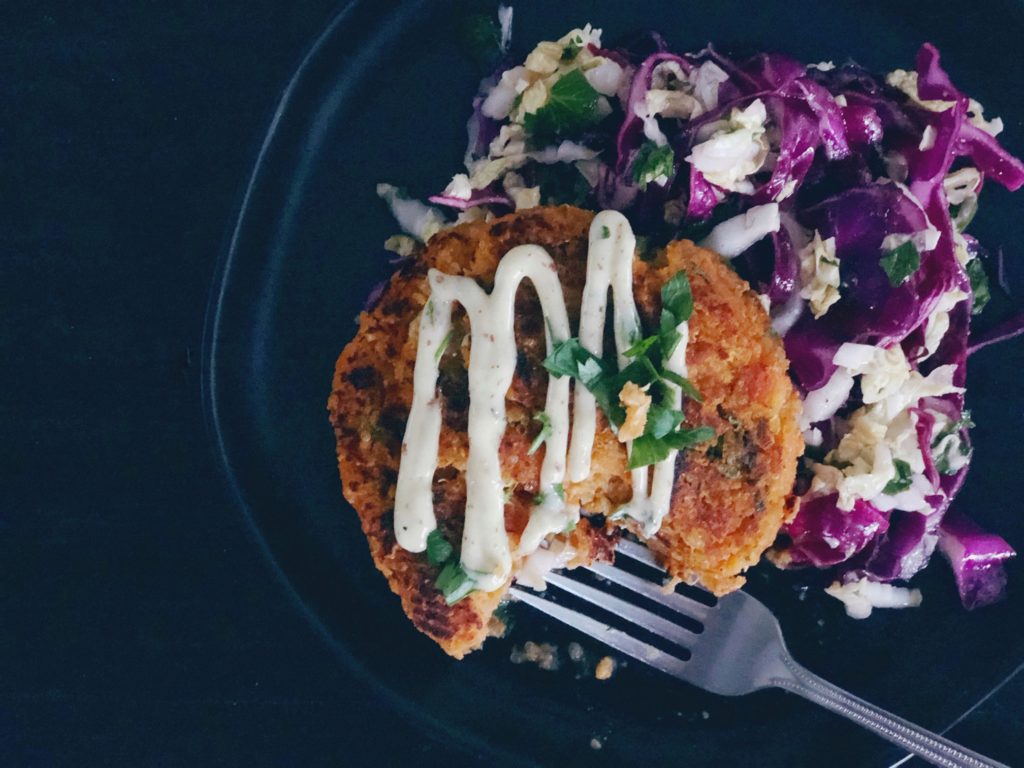
Serve on a classic hamburger bun to replace the traditional beef “go-to”.  Crumble and add to a tortilla shell that is smeared with guacamole, and top it with a tangy slaw and creamy dressing.  Or, like in this recipe, place the sweet potato quinoa burger onto a bed of Napa cabbage slaw.  One that is tangy, sweet and salty.  Finished with a dijon aioli, and you have a bite that is so flavorful you will be completely hooked on adding these burgers to your weekly dinner rotation!

Sweet Potato Quinoa Burgers

4 cups roasted and mashed sweet potatoes (roughly 6 small sweet potatoes, or 3 large)

1 15oz can Heinen’s cannelini beans

2 eggs

1/2 cup almond flour

1 1/2 tsp garlic powder

1 tsp paprika

1 tsp salt

1/2 tsp pepper

:: FOR THE QUINOA ::

To cook Quinoa: 1 cup quinoa + 2 cups water + 1 tsp paprika + 1/2 tsp garlic powder  This will make roughly a little more than the 2 cups of quinoa that this recipe calls for!

You will roast the sweet potatoes first, and while those are roasting you can make the quinoa!

1. First you will roast the sweet potatoes.  Preheat oven to 375*

Place sweet potatoes onto a baking sheet, and with a fork, poke a few holes into each potato.  

Bake at 375* for 45-60 minutes, or until sweet potatoes are cooked all the way through and tender.

2. While the sweet potatoes are roasting, it is time to make the quinoa. In a pot, add one cup of quinoa and two cups of water.  Stir in 1 tsp paprika and 1/2 tsp garlic powder.  Bring to a boil, reduce to simmer with lid on until all liquid is absorbed.  Check quinoa package for timing (usually 10-15 minutes(

Once the sweet potatoes and quinoa are ready, let them both cool for 10 minutes so they are easy to handle.  

1. Peel the skins off of the sweet potato, toss the skin out and place peeled sweet potatoes into a large bowl

2. Add 2 cups of the cooked quinoa to the bowl

3. Rinse and drain one can of cannelini beans, add the beans to the bowl as well

4. Next, add two eggs, 1 tsp paprika, 1 1/2 tsp garlic powder, 1 tsp salt, 1/2 tsp pepper and 1/2 cup almond flour. 

5. Stir everything together until the sweet potatoes are smooth and all ingredients are distributed evenly.

Pre heat oven to 375* line two baking sheets with parchment paper

1. Scoop 1/2 cup of the sweet potato mixture into a mound onto the baking sheet.  Use your hands to push down mixture into a patty shape.  Each patty will be approximately 1/2 inch thick and 3 1/2 inches wide

2. Bake at 375* for 30 minutes

To finish the sweet potato quinoa burgers, once they have cooked for 30 minutes, simply pan sear each side of the patty for 2 minutes on each side in a nonstick pan that is coated with butter.  Be gentle, these burgers are fragile up until the point of searing.  Remove from pan, and enjoy right away or let cool and store in an airtight container to add to wraps, sandwiches or salad throughout the week! 

Napa Cabbage Slaw

2 cup napa cabbage, shredded

2 cup purple cabbage, shredded

1/2 cup parsley, chopped

4 Tbsp apple cider vinegar

1 Tbsp extra virgin olive oil

1/2 Tbsp kosher salt

1/2 tsp pepper

1/2 tsp garlic powder

1 Tbsp sugar

Toss together all ingredients in a large bowl, store in fridge until you are ready to serve.  Best served within 3-4 hours of making.

Dijon Aioli

1/2 cup mayo

4 Tbsp extra virgin olive oil

3 Tbsp dijon mustard (Dick’s Horseradish Mustard is fantastic!)

1/2 tsp garlic powder

1 tsp kosher salt

1/4 tsp pepper

1 Tbsp parsley, chopped

Stir together all of the ingredients listed above, store in an airtight container in the fridge for up to 3 days.  


Filed Under: Bites, Our Bites

Savory Sausage + Hashbrown Quiche

December 29, 2019 by Abby Thome

Savory Sausage + Hashbrown Quiche

This post is in collaboration with Premio Foods Sausage. Thank you for supporting the brands that help support our blog!

Whether you enjoy it at breakfast or brunch, quiche is the ultimate knock off of an omelette that satisfies every growling belly.

Let’s chat quiche for a second, here. Quiche to me is the breakfast version of what pizza is when it comes down to the limitless variety of versions. Crust or no crust. Sweet or savory. Vegetarian or meat lovers. Eat it cold or hot. Quiche is not only insanely delicious, it is a fantastic make-ahead dish that you can simply slice and enjoy every morning throughout the busy work week.

My boys request it often. Sometimes I’ll make quiche into bite-size portions using a muffin tin. Other times I simply dump everything into one 9×13 pan, making the prep time even faster!

This quiche in particular is packed with Premio Foods Sausage, that I took out of its casings and crumbled it as it carmelized away in a sauté pan. Adding a handful of peppers and spinach gives this dish the green it needs to balance out the rich pork and creamy hash brown crust.

Drooling, yet? I thought so – let me teach you how to make it!

Ingredients:

5 @premiofood sausage links 

2 peppers, diced

3 cup spinach, chopped

3 Tbsp parsley, minced

12 eggs

1 1/2 cup milk

1 tsp garlic powder

1 tsp salt

1/2 tsp pepper

30 oz bag frozen shredded hashbrown

1 Tbsp butter

Step one! Create the hash brown crust…


To make the crust: Preheat oven to 375* Take a rectangle baking dish (9×13) coat the entire dish with butter. Press the frozen hashbrown into the bottom and sides of the pan – creating a “crust”. Bake at 375* for 20 minutes until softened.  Remove from oven and use the back of a measuring cup to press the warmed hashbrowns into the pan harder to seal the crust good! It will look like this …

While the hashbrown crust is baking – you will get the fillings going!

In a sauté pan over medium heat –

  1. Squeeze the pork out of the sausage casing into the pan and crumble with a spatula.  
  2. Cook over medium heat for 5-7 minutes until nice and browned.  
  3. ADD the peppers, spinach and parsley
  4. COOK for an additional 3-5 minutes to soften peppers.  TURN HEAT OFF
  5. In a large bowl, whisk the eggs, milk, garlic powder and salt + pepper
  6. POUR the sausage filling over the hashbrown crust, spread out evenly 
  7. POUR egg mixture over the sausage layer 
  8. Sprinkle top with shredded cheddar cheese

Time to cook this beauty!

BAKE at 400* for 25-30 minutes until the quiche has set and eggs are cooked through! It should have ZERO giggle when you shake it 🙂 

Once cooled, store in the fridge. Enjoy, you guys! This is a good one!!

Filed Under: Bites, Our Bites

Vegetable + Wild Rice Soup

December 16, 2019 by Abby Thome

Vegetable + Wild Rice Soup

Hearty, creamy, packed with vegetables and herbs – this soup is perfect for the upcoming winter season.

Vegetable and wild rice soup that is made in under 90 minutes? Why, yes, you heard me right. The most comforting, hearty soup to warm you up on these frigid winter days. Just a few simple ingredients, and two bags of Uncle Ben’s “Ready Rice” and you my loves will have a delicious soup just screaming for a crusty bread for dipping.

A key ingredient to this soup is the entire head of roasted garlic that is added to the soup. It is SO simply to do this!

Take an entire bulb of garlic – turn the bulb of garlic to its side and slice the entire top (just the tips) off of the garlic bulbs.  Place onto a large square of foil, exposed bulbs facing up and cover with olive oil (1 to 1 1/2 Tbsp olive oil) Fold up the foil around the garlic tightly.  Bake at 350* for 60-90 minutes on a baking sheet.  Take out of oven and let cool before you squeeze out the softened bulbs of garlic to add to the soup.

This is a BIG batch of soup – BUT, let this be known, it freezes beautifully if you omit the rice in what you are freezing. So, you would make the entire recipe up until adding the rice, remove what you are wanting to freeze and simply add rice to the pot of what you will be consuming that night. To freeze, let the soup cool completely, pour into a gallon freezer ziplock bag and lay flat in the freezer for easier storage! When you are ready to enjoy, simply break the soup apart in the bag with your hands, add it to a pot, simmer until it has warmed through and then add the bag of rice! Voila!

NOW – let’s make the soup!

VEGETABLE + WILD RICE SOUP

1 Head of Garlic, roasted (instructions below)

2 medium onions, diced

1 bunch of celery, cut into 1/4 inch pieces

3 lb carrots, cut into 1/4 inch round discs

3 Tbsp Better Than Bouillon Vegetable Base

Tbsp olive oil

1/4 cup flour

2 32oz containers of chicken or vegetable broth

32oz water (use empty broth container to measure)

1 bunch green onion, cut into 1 inch chunks

1 handful flat leaf Italian parsley, minced

2-3 cups chopped organic kale

3/4 cup half and half

2 Tbsp flour

Salt and pepper to taste

2 bags of Uncle Ben’s ready rice, Long Grain + Wild 

  1. Over medium-high heat, in a dutch oven or large pot, add all of the onions, carrots and celery with a few tablespoons of olive oil.  Stirring every few minutes, let the vegetables cook down
  2. After 25 minutes or so, once the vegetables have softened and the bottom of the pot has little brown bits.
  3. ADD the 3 tablespoons of better than bouillon base, tablespoon of olive oil and 1/4 cup of flour.  Stir everything together for 2-3 minutes to let the flour cook down. 
  4. ADD the two containers of broth, and an additional 32oz of water to the pot.  Good pinch of salt and pepper, give it a good stir and let simmer over medium-low heat for 30 minutes.
  5. ADD the roasted garlic bulbs, green onion and parsley.
  6. Continue to simmer for an additional 30 minutes.
  7. Once your soup has simmered for 60 minutes, add the chopped kale and give it a good stir.  
  8. IN A SEPARATE BOWL: whisk together the cold half and half and the 1/4 cup of flour.  Make sure you have zero clumps of flour
  9. ADD this slurry to the soup, stir and simmer to thicken 5-10 minutes.
  10. ADD two bags of Uncle Ben’s Ready Rice the Long Grain + Wild Rice
  11. Stir, let simmer over LOW heat until you are ready to enjoy! 

This soup is fantastic if you add rotisserie chicken to it, as well. I hope you love this recipe as much as we do! Make sure to tag me in all of your Thome Home recipes on instagram @abby_thome

Filed Under: Bites, Our Bites

Christmas Morning Cinnamon Rolls

December 12, 2019 by Abby Thome

Christmas Morning Cinnamon Rolls

Cinnamon Rolls that are so easy to make, you will never pop another cardboard tube again!

Before those little feet run down the stairs Christmas morning, you turn on the tree lights to really set the scene for their sweet little impatient faces and grab your phone to hit RECORD!

Before you say give the little ones the “GO!” Run to your fridge to pull out the cinnamon rolls you made the night before to let rise while for thirty minutes while the presents are opening.  Put the cinnamon rolls in the oven, pull out the frosting you made the night before and by the time the kids are done picking up their wrapping paper scraps, you will be frosting home made cinnamon rolls that will just add to the morning magic!

Making cinnamon rolls from scratch is so satisfying, you’ll wonder why you ever popped a cardboard tube open to enjoy this breakfast treat.  My favorite part of this entire process is that you make everything the day before.  Once your cinnamon rolls are sliced, and placed onto a baking sheet you place them into the fridge until you are ready to pull them out to rise one last time before you bake.  Make the frosting the day in advance and you will have a breakfast that may be more memorable than the presents given that morning! OR if making the frosting seems like that’s one more step you do not feel like doing – use store-bought cream cheese frosting. I have done this many of times and it is delicious! You can still spread it on when the rolls are warm!

ACTIVATE THE YEAST

1 1/2 cup warm water + 2 envelopes of quick-rise dry yeast + 1 tsp sugar

FOR THE DOUGH

1 1/2 cup buttermilk

4 eggs at room temperature

1 cup sugar

2 tsp kosher salt

2 tsp vanilla

12 Tbsp unsalted butter at room temperature

8 to 8 1/2 cup of unbleached all-purpose flour 

For the FILLING

1 1/2 sticks melted unsalted butter

2 1/2 cups brown sugar

Ground cinnamon 

1. First and foremost, you will activate the yeast.  In this step you simply add two packages of quick-rise yeast to warm water, and a bit of sugar to “feed” the yeast.  Give it a stir, and let it stand for 5 minutes while you prep the remaining ingredients for the dough.  The yeast will “bloom” and become frothy.

2. In a large bowl, with a handheld mixer, mix together the buttermilk, eggs, sugar, salt, vanilla and butter until all ingredients are fully combined and batter is light and fluffy (2-3 minutes)

3. ADD the bowl of yeast, water sugar to the large bowl with batter.  Mix together for an additional 30 seconds until just combined.

4. ADD half of the flour (4 cups) to the batter, and mix until it is nearly incorporated.  Add remainder of flour.  If the dough is far too sticky to work with, add the additional 1/2 cup, you can add up to an additional 1/2 cup leaving you with 9 total. 

5. Sprinkle flour onto your countertop, pour dough out, sprinkle a bit more flour on top of the dough and start to knead the dough for 2 minutes until dough becomes more smooth and firm.  

6. Place back into the bowl, and cover with a kitchen towel for 90 minutes for the dough to rise.

In this amount of time, the dough will expand to 2x its size.  Once the 90 minutes it up, you are ready to roll out the dough!

1. On a well-floured surface, place the cinnamon roll dough down, it will naturally expand and you can push it down into a rectangular shape that is 2 or so inches thick. 

2. Flour a rolling a pin, and sprinkle the top of the dough to ensure the pin will not stick before rolling.

3. Starting in the center of the rectangle, you will begin to roll in a cross-like pattern.  With gentle pressure, roll dough up, down, left and right until you are left with a nearly 3 foot long x 2 feet wide elongated rectangle of dough that is 1/8 inch thick.

4. Melt the butter, and pour over the entire rectangle of dough.

5. Spread 2 cups of brown sugar with your hands over the butter, helping the brown sugar to stick to the butter.

6. Carefully sprinkle ground cinnamon across the entire top of the brown sugar.  Dusting the entire surface of the brown sugar.

NOW WE ROLL! 

  1. Using both of your hands you will roll the dough into a very long, snake-like roll.  Here is how you do it!
  2. Start in the bottom left corner, working left to right (long ways) roll 1/2 inch section over onto itself, gently pinching as you go to let the first roll stick – do this the entire length down 
  3. Now, work your way back gentle rolling in another half-inch of dough onto itself again, rolling tightly, working inch by inch as you work your way down the row.  Once you are on your third trip you’ll finally have a more rope like shape that makes rolling much easier!
  4. Continue to tightly roll the dough, left to right, right to left until you are at the end.  Finish rolling intentionally with the last edge to remain seam side down until the rope. 

NOW WE SLICE!

  1. With a very sharp knife, you will slice the cinnamon rolls into 2 inch sections.  Simply slicing the log of dough, left to right into 2 inch sections.  
  2. BUTTER a baking sheet and place cinnamon rolls onto the baking sheet
  3. Cover with clear wrap and place in the fridge for the morning to let rise one more time, and bake.

You can absolutely skip waiting overnight, and let the rolls  rise for 30 minutes, and bake at 350* for 25 minutes or until golden brown.  

If you are making the overnight version – 

In the morning, remove the baking sheet from the fridge and let the rolls sit out at room temperature for 30-45 minutes to let rise one more time.

Bake at 350* for 25 minutes, or until golden brown.  

Frost when warm if you prefer gooey cinnamon rolls, or frost when slightly cooled for a thicker frosting. 

Cream Cheese Frosting

1 stick unsalted butter at room temperature

8oz cream cheese at room temperature 

2 1/2 cup powdered sugar

1 tsp vanilla

1 Tbsp milk if needed 

To make frosting:

With a handheld mixer, in a large bowl, mix together all ingredients for 3 minutes, or until the frosting is light and fluffy.  Add 1 tbsp of milk if you need the frosting to be thinned out.  Use immediately on warm cinnamon rolls, or place in an airtight container in the refrigerator until ready to use (3 days maximum)


Filed Under: Bites, Our Bites

Ramen Noodle Bowls with General Tso’s Cauliflower and Roasted Broccoli

December 11, 2019 by Abby Thome

Ramen Noodle Bowls with General Tso’s Cauliflower and Roasted Broccoli

**RECIPE CHANGED A SMIDGE!* made easier

This post contains an affiliate link, in which if you purchase I receive a small commission from your purchase. Thank you for supporting the Thome Home blog!

First and foremost, if you are new here I am going to apologize right off the bat. My fly by the seat of my pants personality pushed me to share a recipe on Instagram stories last night that I was testing, and the people spoke. They want the recipe. And guess what? I have one, ONE horrific dark picture to share with you all and I am a bit mortified. I like beautiful pictures of food, but if I am being honest, this meal was so damn good that I will sacrifice my photography to share this recipe with you all, tonight.

So, you’re welcome.

And, again, I’m sorry.

4 cups broccoli florets

1 head of cauliflower cut into florets

2 Tablespoon extra virgin olive oil

Pinch of salt for broccoli

6 packages of Ramen Noodles WITHOUT the seasoning packet

1 Tbsp Better Than Bouillon Paste, chicken version or vegetable

1 tsp garlic powder

1 bunch of green onion, cut into inch-long chunks

1/2 tsp pepper

1/2 cup general tso’s sauce (or your favorite sauce)

Feel free to adjust the amounts in this recipe, it is VERY flexible (amount of broccoli/cauliflower and ramen is enough to feed 5) This is the general so’s sauce I use!

  1. Pre heat the oven to 350* 
  2. Line a baking sheet with foil and spritz with non stick spray 
  3. Place broccoli + cauliflower onto the baking sheet
  4. Drizzle both with one tablespoon of olive oil
  5. Add a pinch of salt to the broccoli + cauliflower
  6. Toss cauliflower with sauce of choice, we use general tso’s
  7. Bake both at 375* for 25-30 minutes 
  8. *You can also chop the cauliflower, add it to a saute pan with the sauce oven medium heat for 25-30 minutes while the broccoli roasts. This will too give it the yummy sticky sauce to coat the cauliflower!

While the vegetables are roasting, BOIL water for Ramen Noodles 

  1. Add Ramen Noodles along with the better than bouillon base, garlic powder, pepper and green onion.
  2. Boil until noodles are tender, and cooked through
  3. Remove noodles from the broth, and add to bowl for serving!
  4. IF YOU PREFER A SOUPY RAMEN, simply keep the liquid used to boil, and add the better than bouillon to the water to season!

Remove broccoli and cauliflower from oven, set to the side.

Assemble as you wish! Add broccoli + cauliflower to the bowl with ramen.

I like to put together everything side by side.  Noodles, broccoli and cauliflower.  I drizzle everything with a bit of sriracha and sesame seeds – if you are feeling feisty add a fried egg on top to really take this dish over the edge!

Here is the better than bouillon paste I use, and adore! It comes in beef and vegetable too! This is just for reference, it is WAY cheaper in stores. I buy a huge container of it at Costco for less than $6

Filed Under: Bites, Our Bites

Snickerdoodle Cookies

December 2, 2019 by Abby Thome

Snickerdoodle Cookies

Soft, chewy snickerdoodle cookies that will leave you speechless.

There, I said it. I may be cocky when it comes to my cookies, but when it comes to the recipes I share here it is because they are tried and true. For over five years this snickerdoodle cookie is one of the most requested cookie for me to make during the holiday season. But, let’s face it – snickerdoodles can be eaten all year round.

You’ll notice that apple cider vinegar is used in this recipe. Do not panic! Trust me, the apple cider vinegar is an incredible substitute for the traditional cream of tartar ingredient and creates the chewiest, fluffiest cookies!

Pre heat oven to 350* Line two baking sheets with parchment paper

Let’s BAKE!

Snickerdoodle Cookies

2 sticks unsalted butter at room temperature

2 eggs

1 tsp vanilla, or maple syrup 

1 1/2 cup sugar

1 tsp kosher salt

2 tsp apple cider vinegar (or cream of tartar)

2 3/4 cup flour 

1 tsp baking soda

  1. With a handheld mixer, mix together the butter, eggs, sugar, vanilla, apple cider vinegar and salt until light + fluffy (2 minutes)
  2. Add flour, and baking soda 
  3. Mix together until everything is incorporated and cookie dough comes together 

If you are feeling frisky, you can add cinnamon chips, white chocolate chips or caramels to the dough as well prior to rolling. Whatever floats your boat, babes.

READY TO ROLL!

  1. First, mix together 1/2 cup sugar + 2 tsp of cinnamon

Roll ping-pong size balls of cookie dough, and roll the cookie balls into the cinnamon sugar to coat. 

  1. Set onto a baking sheet that is lined with parchment paper
  2. Bake cookies @ 350* for 10-13 minutes. Just until the bottoms are barely golden, and the tops have bubbled a bit.  Do not over bake!
  3. Let cookies cool on a wire rack, and enjoy! 

Filed Under: Bites, Our Bites

Chewy Chocolate Caramel Chunk Bars

December 2, 2019 by Abby Thome

Chewy Chocolate Caramel Chunk Bars

The ultimate chewy chocolate chip cookie recipe, look no further!

Over the years, I have tried dozens, if not close to hundreds of cookie recipes. Always hoping for that ONE recipe that will end my hunt for the perfect version of that particular cookie. This, my loves is it. The best Chocolate Chip Cookie recipe, the only one you’ll ever need!

Chewy centers, crisp edges, loaded with chocolate … endless options.

Whether you roll traditional cookies, or bake this dough on a baking sheet for cookie bars, you can add your own little twist by omitting or adding other candy pieces into the mix! (Think caramels, m&m’s, peanut butter chips)

Chewy Chocolate Chip Cookies

2 sticks melted unsalted butter 

1 cup sugar

1/2 cup packed brown sugar 

2 tsp vanilla 

2 eggs

3 cups flour

1 tsp kosher salt

1 tsp baking soda 

1 cup chocolate chips of choice

Pre heat oven to 350* Line two baking sheets with parchment paper

  1. Mix together butter, sugar, vanilla + eggs with handheld mixer until light and fluffy (2 minutes or so)
  2. Add flour, salt, baking soda and mix until all ingredients are fully incorporated and cookie dough has formed
  3. Mix in chocolate chips 

For traditional cookies:

  1. Roll 1 1/2 Tbsp worth of dough into small balls, or use a cookie scoop – place onto prepared baking sheet
  2. BAKE @ 350* for 9-12 minutes or until centers are barely set
  3. Let cookies cool and set on wire rack

For Chocolate Chip Bars:

(As seen in the picture, once I pressed the dough into the pan, I simply cut baking caramels in half and pushed them into the dough prior to baking. Let your freak flag fly and add anything you’d like to spice up your cookie bars!)

  1. Press dough into a parchment paper lined 8×11 baking sheet. TIP: Use the bottom of a measuring cup to press down dough evenly
  2. The dough will not reach to the ends of the pan, so simply leave 1/2 inch on each side without dough – it will spread while baking!
  3. BAKE @ 350* for 20-25 minutes, just until top is slightly golden and puffy
  4. Remove from oven and let cool 30+ minutes before slicing 

Filed Under: Bites, Our Bites

Not Your Mama’s Hanky Panky’s

November 5, 2019 by Abby Thome

Not Your Mama’s Hanky Panky’s

This post is in collaboration with Heinen’s. Thank you for supporting the brands that The Thome Home loves so much!

Holiday appetizers that are elevated to wow, and yet simple enough that any home cook can make!

November is here and the holiday entertaining will be in full spin before you know it. Appetizers are a must for any gathering. They keep guests engaged and their bellies just full enough until the main course arrives. I do my best to ensure that I have enough appetizers for each guest to enjoy 1-2 bites per appetizer.

There are “appetizer essentials” that I personally believe need to be at every gathering.

A small cheese board, with nuts, berries, and a variety of cheese and crackers. Along with a vegetable platter with two dips, think green goddess dressing and hummus. Having these two essentials is a great way change up the ingredients for different seasons. Always keeping your guests guessing as to what may be set out at your gatherings.

Give this girl a block of cheese and the appetizer opportunities are endless.

Are you ready for an appetizer that instantly spins you back in time to your parents kitchen as a child during the holiday season? Who remembers the infamous “Hanky Panky”? Little squares of pumpernickel bread, piled high with melted cheese and mild sausage.  Baked and served warm, this cheesy blast from the past bite was a party staple.  So, why would I take a good thing and switch it up? Well, folks.  Because, it can be better.  Let’s face it.  A boxed giggly name-not-mentioned cheese leaves room for substantial recipe development that I could not keep my entertaining hands off of! 

Two new Hanky Panky recipes, that are definitely not your mama’s, but will quickly became a modern day appetizer that guests will rave about.  

For each recipe, you will need ONE package of Pumpernickel Party Bread (12oz package)

First up, Lobster Mac n’ Cheese Hanky Panky

lobster Mac n cheese hanky Panky

Lobster Mac n’ Cheese Hanky Panky

1lb Heinens packaged, ready to go Lobster Meat

2 cups whole milk

1 1/2 cup small shell pasta

1 cup gruyere cheese, shredded

1 cup Heinen’s extra sharp white cheddar, shredded

4oz cream cheese, quartered

2 Tbsp chopped chives

1 Tbsp unsalted butter

1 tsp Kosher salt

1/4 tsp Black Pepper

This is a one pot Mac n’ Cheese, that is such a breeze!

In a medium sauce pan, over medium heat, stir together the milk and pasta shells.  Let simmer for 8 minutes until the pasta is aldente. Remove pan from heat. Add the cream cheese, shredded cheeses, butter and seasonings.  Stir until the cream cheese has melted, along with the shredded cheese. Gently stir in the lobster meat.

Pre heat oven to 350*. On a baking sheet, set down the pumpernickel bread squares.  Scoop 1 1/2 tablespoons of the Lobster Mac n’ Cheese on top.   Bake for 10-12 minutes, just until the toasts get a bit crisp and everything is warmed through.  

lobster Mac n cheese hanky Panky

Next up, a blue cheese and bacon hanky panky with cranberry compote that will blow your mind …

blue cheese and bacon hanky Panky

Blue Cheese + Bacon Hanky Panky with Cranberry Compote 

1 cup Heinens extra sharp white cheddar, shredded

4oz cream cheese

4oz crumbled blue cheese

1 1/2 cup cooked, crumbled bacon

1/2 cup mayo

1/4 tsp kosher salt

Pinch of black pepper

In a medium size bowl, with a handheld mixer, simply mix together the cream cheese, shredded cheeses, mayo and seasoning until thoroughly combined.  Gently fold in the crumbled bacon.  Set cheese spread into fridge, while you make the cranberry compote.  You can also make this cheese spread the day before, and store in an airtight container in the fridge. 

Cranberry Compote

12oz cranberries, fresh not frozen

Zest of one orange

1 cup fresh squeeze orange juice 

1 cup sugar

1 tsp kosher salt

Pinch of black pepper

In a small sauce pan, add all of the ingredients listed above.  Bring to a gentle boil, and then reduce to simmer for 15-20 minutes.  Remove from heat, and let cool. You can make the cranberry compote the day before, simply let it cool completely and store in an airtight container in the fridge.  

Preheat oven to 350*

On a baking sheet, set down the pumpernickel bread squares.  Spread one tablespoon of the blue cheese bacon spread onto each toast.  Bake at 350* for 10-12 minutes, just until the cheeses melt and the pumpernickel toasts slightly.  Remove from the oven, and scoop a dollop of the cooled cranberry compote onto each piece. 

blue cheese and bacon hanky Panky

Serve immediately, enjoy! 

Filed Under: Our Bites

Kitchen Makeover with Nuvo Cabinet Paint

October 28, 2019 by Abby Thome

Kitchen Makeover with Nuvo Cabinet Paint

This project is sponsored by Giani Granite. The paint used for this project was gifted. Thank you for supporting the brands that The Thome Home loves so much!

Kitchen makeovers are expensive! With Nuvo Cabinet Paint you can transform your kitchen cabinets for under $200!

It’s true! A little elbow grease and Nuvo Cabinet Paint, you too can makeover your kitchen cabinets giving your kitchen the transformation it deserves for under $200! We all know that the kitchen is the heart of the home, and there is nothing worse than when you are just truly unhappy with the esthetic of the space.

When my brother and sister-in-law purchased their home this past spring, they were well aware that the kitchen was not a project they would be able to financially take on right away. Buying a home, and doing all the initial improvements is a financial commitment right off the bat. I knew though, deep down just how unhappy they were with their peachy-keen kitchen. Every piece of decor they added to the home never looked “just right” as it sat in front of that James and the Giant Peach backdrop.

I asked them about their thoughts on me painting their kitchen cabinets with Nuvo Cabinet Paint.

To not only transform their kitchen beautifully, but to buy them time until years from now when they are ready to tackle a kitchen renovation. They had a few questions that I was happy to answer, as we have lived with our Nuvo Cabinets for nearly 3 years –

  1. Whats the wear and tear like? Will the paint actually hold up to the day-to-day chaos in the kitchen? Believe it or not, YES! If your cabinets are properly stripped + primed, you will be so impressed to see how durable this paint is. I use disinfecting wipes and sprays on them weekly!
  2. What do you do when a piece chips away? Well, simply enough, take a piece of sanding paper with a light grit and go over the area that has chipped. Then take the paint, and give it a few good coats to cover up the spot!
  3. Do we have to sand?? Surprisingly, NO! Nuvo Cabinet Paint does recommend a light sanding. However, with a great deglosser and 2-3 coats of primer you are ready to go without the mess of sanding!

They said YES!

The second they agreed (and were really excited!) I was over the moon to jump start this project! We headed to Giani Granite site to admire all of the colors they had to offer in their Nuvo Cabinet Paint line. Their kitchen has a ton of natural light, so we knew right away we wanted to add a little bit of depth with color to add contrast to not only the ample light, but to compliment their beige tile.

Picking the right colors…

Earl Grey and Titanium Infusion were the winners! The homeowners have beautiful taste in home decor, and I knew they would appreciate a modern and clean look in their kitchen. A crisp white cabinet up against a rich grey was the perfect combination to erase the peach and bring in their style! They also chose new hardware, as the previous knobs were silver and did not fit the vibe they were going for. Shopping for hardware on Amazon proved to be such a success and kept the cost down! These are the pulls we chose, in a variety of sizes to compliment different cabinets.

Let’s discuss the step-by-step process to painting your kitchen cabinets!

  1. Remove ALL cabinet drawers and fronts, you can keep the hinges on!
  2. Take off ALL hardware, regardless if you are replacing them or not. Place hardware and screws in a ziplock bag.
  3. Put all drawers and cabinet fronts in a separate room that is covered in tarps! We utilized the garage –
  4. Balance all cabinet fronts on Dixie cups – this makes it extremely simple to keep them off of the ground and easy to catch drips!
  5. Use a deglosser, I used on all cabinet bases, fronts and drawers. Apply a tablespoon or so to the rag, and rub down the cabinets in a circular motion. It takes a tablespoon or two for each front and back of the cabinets. I did this process twice to ensure I removed all grime from the cabinets.
  6. TAPE EVERYTHING OFF! Whether it be walls that meet the side of the cabinetry, appliances that are close to where you are painting, flooring at the base of cabinets, or the interior of the cabinets that you are not painting. Make sure you tape off properly, which will make painting a breeze when you are not worried about getting paint in the wrong places.
  7. Next up! PRIME! I used Zinsser Primer. 2-3 coats on every surface. Yes, even the backs of the cabinet fronts.
  8. REMOVE PAINTERS TAPE Once your cabinets have been primed 2-3 times. This will make sure you do not continue to add layer after layer of paint, and then take of layers once you remove.
  9. Put fresh tape up! You are now ready to apply the Nuvo Cabinet Paint.
  10. Follow directions on the Nuvo paint can. I applied 3 coats to every surface.
  11. For the cabinet fronts, it is best to paint all 3 coats of the back at once – and then flip and paint the fronts. Make sure when you are painting the cabinet fronts that there is not any painting dripping down the corners. To prevent drips, use the mini paint roller provided by Nuvo and roll the outer edges after each coat. This will soak up any excess!
  12. Take off ALL Painters Tape, before you let the paint set overnight. Use a straight razor to cut along the side of the tape if it seems to be “stuck” from paint drying.
  13. Once all of your cabinets have had 3 coats of paint, and everything has set overnight to dry, you are ready to reassemble!

Ready to see the transformation?!

Can you even handle it?! Their kitchen instantly went from a 90’s peach epidemic to a clean and modern space that they will enjoy for years to come!

I could not wait to get my hands on their pantry! Extra long pulls and crisp white cabinetry made what once was an eye sore a beautiful addition to their kitchen!

The home owners were convinced that they would have to replace the white laminate counter tops during this process. After one coat of the Earl Grey their fears diminished as they realized the contrast actually complimented the once-hated countertops.

The process is extremely simple! And yes, a bit time consuming.

This makeover took me a total of 5 days, 4 hour shifts each day. I did it all by myself, so it just goes to show – YOU can do it! It’s crazy to think that one weeks worth of work and a kitchen is completely transformed on a dime!

Filed Under: Home, Our Projects

Holiday Gift Guide for Toddlers

October 17, 2019 by Abby Thome

Holiday Gift Guide for Toddlers

The perfect holiday gift guide for toddlers, with all tried and true toys!

This post contains affiliate links. By shopping these links, I receive a small commission on your purchase. This is no additional cost to you! Thank you for supporting The Thome Home blog and all that I share here!

Yikes – I spoke the words. HOLIDAY!

Bottoms up babes, it’ll be here before you know it. If you are anything like me, you prefer to be as prepared as possible when it comes to shopping. Nothing grinds my gears more than spending the weeks before the big day scrambling the stores to find what I need.

I notoriously go above and beyond during this time of year. From entertaining to gift giving, I love seeing the smiles and joy that truly lights up this end of year season. I’ll be showcasing a multitude of gift guides over the next few weeks. From toddler, teen, grandparent, spouse etc … ALL items from Amazon, because during the hectic holidays convenience is key!

Let’s talk toddler toys!

When creating this list of toys, I wanted to make it really personal. It’s easy to surf the web and look through the newest and hottest toys to add to this list. BUT – will your kid actually play with them? These toys have been in our home for the past year or more and are consistently played with. Affordable and fun – add these to your amazon cart with these links STAT before they all hike up in price when the shopping craziness starts!

  1. Cookie Monster Numbers – I have been waiting months for this set to come back into stock! Max LOVES the Elmo alphabet version (#4) Grab it now before it is gone! Buy it here

2. It’s tea-time all the time in The Thome Home. Any toy that sparks imaginary play for hours I am here for. This musical tea pot never disappoints as Max and I cheers away the morning hours before lunch! Check it out here!

3. Time for your check up babes! Your little ones will loose their minds over this doctors kit. Max particularly likes to fall to the floor dramatically with a cough requesting to see the doctor, daily. Grab it here!

4. For over two years this Elmo Alphabet toy has been a favorite of Max’s. I love how these cases fold up to take on the go, and how the letters click into place so it makes for easy clean up ( not having to worry about everything falling out like most puzzles! ) Get it before it is gone!

5. We all scream for icecream! This darling icecream set by Melissa and Doug quickly became a staple in Max’s play day. The scoop is magnetic, as well as the icecream scoops, making stacking the flavors extra fun and easy for the little ones! A great motor-skills toy! Buy it here!

6. Toddlers are wild, let’s face it. And with that extra zest in their step, they are constantly destroying everything around them! This brand, Green Toys is one of my favorite additions to our play room. We own nearly every truck and car, boat and airplane. You can bring them outside, let them get dirty and rinse them right off. They are amazing and so durable! Check them out here!

7. “You’re a TOY!!” – Oh Woody. This nostalgic movie hit the screen again, with Toy Story 4 and it was Max’s first movie theatre experience. These little figures go perfectly with the RV Camper listed below – so so cute! Buy the set here!

8. Let’s go on a trip! A RV Camper that unfolds into the cutest camp site! Pair this RV with the mini figures above + get ready to lay on the ground and utilize all of your best Toy Story voice impressions! Check it out!

9. Last, but definitely not least, are these awesome reusable puffy sticker sets. Puffy stickers are easy to grab, and the scenes to place them in are absolutely darling! Max’s favorites are the barn and the pirate world! Bring them in the car, on a plane, or even for a quiet afternoon! Buy a set here!

Get shopping, babes!

You can grab ALL of these gifts and hide them away before they inflate in price, and even worse, sell out!

Filed Under: Our Life Tagged With: holiday

  • « Previous Page
  • 1
  • …
  • 9
  • 10
  • 11
  • 12
  • 13
  • …
  • 67
  • Next Page »

LETS BE SOCIAL

  • Email
  • Facebook
  • Instagram
  • Pinterest

Articles

Categories

Archives

Heinens

Visit The Thome Home 's profile on Pinterest.

Recent Posts

  • Pork Schnitzel
  • It’s time to book your vacation with Oasis Vacations!
  • Oasis Vacations at Ocean Isle Beach, North Carolina
  • JUS-ROL Crescents
  • Back to School Safely
  • Chicken Tender Charcuterie Board
  • Lillie’s Q Spicy Cheddar Sausage Pizza Bagel
  • Max’s Bedroom

Copyright © 2025 · Tasteful theme by Restored 316