• Home
  • About
  • LIFE
  • HOME
  • FOOD

The . Thome . Home .

Show Me Your Cans.

March 25, 2013 by thethomehome

Show Me Your Cans.

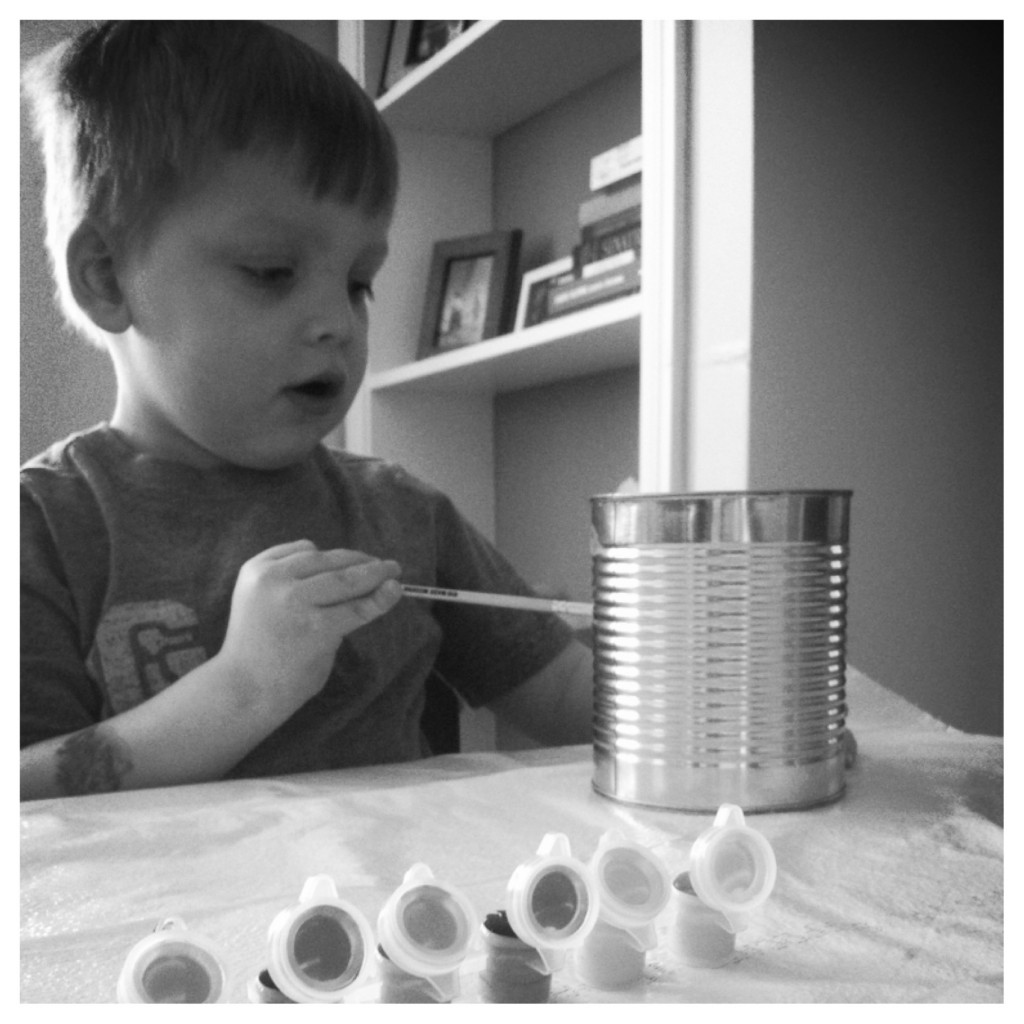
I was going to go to Home Depot and buy two pots for the kids to paint for the planting project ( to many “p” words there.) Then dinner time came around, and I had two left over tomato sauce cans waiting to go into the recycling bin.  Bada-bing! Free. No errand needed.  Couldn’t of set it up better.

So, we painted those instead.  And I must admit, they are super cute and just the right size to start some seeds in.  Now I wish I thought of this sooner, because a few of these lined under my window sill would look quite cute for a starter herb garden.

Brody and Owen had a good time with these.  I think any kid who gets their hands on a paint brush has a good time.  It was a perfect 30 minutes of busy work for these two.  Which stumbled beautifully into bath time, which led to endless giggles of trying to get t-shirts over the giant noggins my boys were blessed with.  Followed by the glorious noise of Dad’s car pulling up into the drive.

Best. Noise. Ever.

image-50

image-51

image-52

image-53

image-54The cans are nice and dry and ready to be filled with whatever the kids pick out the plant.  Might need to do a few of my own as well to add near our kitchen window, a little sign of spring is needed around here!

image-55

Filed Under: Our Projects

Pecan Pie Thumbprint Cookies

March 21, 2013 by thethomehome

Pecan Pie Thumbprint Cookies

IMG_3739Oh mama.  How these cookies have gotten around.  Seriously, these cookies bring just as much pleasure to people than a 40-year-old virgin getting a happy ending in a massage parlor.  Did I just say that?  They are unreal.  The kind of cookie that tastes so good, you purposely chew slower to enjoy every bite. Hands down the favorite cookie in our  house, and of many guests we’ve had here.  I am sure by now, you all know of the blog Annies-Eats, and the delicious recipes she posts each week.  When this cookie was posted, I knew I had to make them.  Annie’s recipes are always fool-proof, and packed with flavor.  Hats off to you Annie for creating this drool worthy bite! After making these a few times, the only thing I decided to omit was the caramel drizzle.  Go for it if you’d like, but I thought the sweetness over shadowed the rest of the cookie. Dan always calls dibs on a few of these before I give them to others as gifts.  I don’t blame him, nothing beats an evening with a pecan pie cookie, Dan and I on the couch, HGTV, a glass of wine (who drinks milk?), and a happy ending.  I think I crossed a line… does that make you uncomfortable?

JUST EAT THESE 🙂

INGREDIENTS:

For the dough:

  • 1 cup (2 sticks) unsalted butter @ room temperature
  • 4 oz cream cheese @ room temperature
  • 1/2 cup sugar
  • 1/2 cup brown sugar
  • 1 Tbsp vanilla
  • 1/2 cup pecans, finely chopped
  • 1/4 tsp salt
  • 2 1/2 cup unbleached, all-purpose flour

For the filling:

  • 1/4 cup melted unsalted butter
  • 1/4 cup sugar
  • 1/4 cup light corn syrup
  • 1 large egg yolk
  • 2 tsp vanilla
  • pinch of salt
  • 1 cup chopped pecans

DIRECTIONS:

Pre heat the oven to 350* Line two large cookie sheets with parchment paper

Start by making the dough.  With a handheld electric mixer, mix together the butter and cream cheese until light and fluffy.  Add in the sugars, mixing for another minute or so.  Add in the vanilla, and blend.  Slowly incorporate the pecans, salt and flour until the dough just comes together.  Cover the bowl with clear wrap, and chill in the fridge for 30-60 minutes.

In the mean time, whip up the filling.  In a medium bowl, simply whisk together the melted butter, sugar, light corn syrup, egg yolk and vanilla.  Add a pinch of salt, and pour in the chopped pecans, stir to evenly coat the pecans.

Once your dough has chilled, remove it from the fridge and get ready to assemble your cookies! Roll approximately 2 tablespoons of dough in your hands, creating a ball, and place the ball onto your cookie sheet.  Each cookie about 1 1/2 inches apart.  Once your cookie sheets are full, it is time to create the thumbprint.  Using your thumb, or like Annie (from Annies-Eats) creatively came up with, using a wine cork, push down into the center of the cookie creating a well for the filing (1 inch in diameter).  Fill each and every cookie hole with your filling, and bake for 16-18 minutes at 350* until the bottoms are nice and lightly golden.

Cool cookies on a wire rack, and store in an airtight container until ready to serve! If you’d like the caramel drizzle to add.. check it out on the link below.

Recipe from:Pecan Pie Thumbprint Cookies | Annie’s Eats

Filed Under: Nav Right

Picture This.

March 16, 2013 by thethomehome

Picture This.

Ever stop in the midst of a crazy day and just attempt to take in a moment?

I find myself doing that ALL the time lately. Taking it a step further, and making it more official with a picture. I cannot stop photographing everything.

I am itching to get a new camera this summer…

For now, these pictures will do. Catching cute moments of the boys playing nicely together. Watching them sit and read books with their grandparents. Or even snapping a picture of Owen in my favorite sweater of his. All of these pictures just warm me up inside. So any time of day, when we’re having a rough moment, I try to picture this. Always remembering that the good stuff is minutes away and just to breathe through the rough ones!

image-47

image-46

image-42

image-43

image-44

image-45

photo-26

image

Hope you all have a nice weekend!

Filed Under: Our Life

Toddler Bites

March 14, 2013 by thethomehome

Toddler Bites

Who knew toddlers could fight napping SO much? Even when their eyes look so overdone, and the yawns keep coming right and left. They. Still.  Fight. It.

I’m telling you, I’d give anything to have someone tell me to go to bed and get some rest.

An entire day without one second of shut eyelids.  By 3:00, they had ants in their pants.  They were cranky one second, and trying to fall asleep on the kitchen rug the next.  And as tired as I was too, I knew it was time to put my “super mom” cape on and keep them busy for the next four hours until bed time.  So, why not make a mess and try out a new recipe?

Sweet potato crackers.  I stumbled across these on the ever so loved Pinterest.  And while ours look nothing like the original recipe, nor did they taste much like a “cracker,”   they were still delicious and the kids gobbled them up.  To me, they were a mix between a cracker, and a pizza crust.  More chew, than a crunch.

The process of making these were much more fun than I anticipated.  Brody loves rolling dough, and Owen goes bananas when he gets the go ahead to eat something (allergy baby).

IMG_3978

This dough is very sticky.. so make sure you flour well!

IMG_3977

Owen got the approval to eat the left over mashed sweet potato

IMG_3976

Didn’t skip a beat

IMG_3986

Sure, blow the flour everywhere. Who doesn’t love cleaning?

INGREDIENTS:

  • 1 1/2 cup unbleached all-purpose flour
  • 2 1/2 tsp baking powder
  • 1/2 tsp salt
  • 1/2 – 1 tsp cinnamon
  • 3 Tbsp water (more if needed)
  • 1 cup mashed organic sweet potato
  • granulated sugar to sprinkle on tops

DIRECTIONS:

Pre heat the oven to 350* Line two large cookie sheets with parchment paper

The day of, (or night prior like I did) take a large organic sweet potato, and poke holes into it with a fork.  Roast it in the oven at 400* for 35-50 minutes until it is fork tender.  Let it cool, scoop the insides out, and mash together with a fork.  If you do it the night prior, place it in an airtight container, and keep it in the fridge.

In a large bowl, mix together the flour, baking powder, cinnamon, salt, water, and mashed sweet potato.  Until it begins to form a ball.  You will need to get your clean hands in there and start kneading the dough to encourage its formation.  This is where you may need to add additional water, I added another tablespoon.  Place the dough on a well floured surface, add a little more flour to the dough, and continue to knead until the dough feels smooth.  Roll out a large circle, or rectangle, about 1/8 inch thick.  Cut whatever shape you like.  Place each bite onto the prepared cookie sheets.  Take a shallow bowl of water and dab your fingers into the water, dabbing each bite to wet the tops slightly.  Sprinkle each piece with granulated sugar.  Bake in the oven for 8-10 minutes until the bottoms are slightly golden.

photo-25Adapted from:

Sweet Potato Toddler Crackers – Gluten Free on a Budget

Filed Under: Nav Right

Carrot-Cake Cupcakes & Easter Plans

March 13, 2013 by thethomehome

Carrot-Cake Cupcakes & Easter Plans

IMG_3972Easter is weeks away.  We usually host Easter Sunday at our house, and plan to do the same this year.  Now that Brody and Owen are both at great ages to start understanding and remembering holiday traditions I am extra excited to come up witha few more things this year.  Last year, their Nana hid plastic eggs filled with goodies around our backyard for an easter egg hunt, and that was super cute.  This year, with finding out that Owen’s egg allergy is still standing strong I thought it would be fun to implement some non traditional things to do easter weekend as well.  A few ideas I have bouncing around my head…

1. Paint a pot, and plant something for spring.  No need to get fancy here.  I just want to see their cute little hands covered in paint, slathering up a planters pot in colors and teaching them how to tend to their own tiny garden.

2. The one tradition that sticks out the most of course would be dying eggs.  Can’t do that with Owen, and I would hate to leave him out of the process.  SO, I think we’re going to purchase to blank tee shirts, and either have them paint, or tie dye their shirts.   May not be eggs, but it would be cute to see over the next few years how their artistic ablities change.

3. Do something kind for others.  Teach the littles about giving, and showing some love to some important people.   I’ve had this urge to bake (surprise surprise) or cook something up for some local’s in town, so that will be done Easter weekend as well.  Of course, posts about all these adventures will follow!

BACK TO THE CUPCAKES!! This recipe is from Martha… can’t get away from that woman 🙂 But,it is a recipe I have been making for years, since Brody was an itty bitty.  The recipe is for mini cupcakes, but I just fill up a cupcake pan and it makes 12 perfect delectable cupcakes.  The carrot cake is beyond fluffy and flavorful, and the cream cheese frosting is a sweet tooth’s dream.  We omit the raisins, and add a pinch of nutmeg to the cake batter.

INGREDIENTS:

  • 1 cup sugar
  • 2 eggs
  • 1/2 cup vegetable oil
  • 1/2 tsp vanilla extract
  • 1/4 cup buttermilk
  • 1 1/2 cup unbleached all purpose flour
  • 1 tsp cinnamon
  • Pinch of nutmeg
  • 1 tsp baking powder
  • 1/2 tsp baking soda
  • 1/2 tsp salt
  • 1 1/2 cup grated organic carrots
  • FOR THE FROSTING
  •   (1) 8oz package of cream cheese at room temperature
  •   1 stick unsalted butter at room temperature
  •   1 Tbsp maple syrup
  •   1/2 tsp vanilla extract
  •   2 cup powdered sugar

DIRECTIONS:

Pre heat the oven to 350*  Line a cupcake tin with 12 cupcake liners

In a medium-size bowl, whisk together the sugar, eggs, oil, vanilla and buttermilk.  Set aside.

In another bowl, whisk together the flour, cinnamon, baking powder & soda, nutmeg and salt.

Add the dry ingredients to the wet in two batches, and mix until just incorporated.  Add all of the grated carrots and stir gently until they freckle all of the cake batter.  Fill each cupcake cup just shy of 3/4 full.  Bake for 17-19 minutes or until an inserted toothpick comes out clean.  Let them cool completely before frosting them.

To make the frosting, whip all of the ingredients together with a handheld mixer until light and fluffy.  Liberally frost each cupcake, the more the merrier 🙂

Recipe tweaked from: Carrot–Cake Mini Cupcakes – Martha Stewart Recipes

Filed Under: Nav Right

Sunday Pot Roast

March 11, 2013 by thethomehome

Sunday Pot Roast

We hit the jack pot again this weekend.  Signs of spring time are teasing us here and there, and we are doing our best to take what we can get.  Because, of course, it is was 70* yesterday, and will be snowing in a few days here.  Whomp. Whomp.

I had a dear old friend of mine email me for a pot roast recipe a week ago, and I knew I had to share it with the rainy months approaching.  Now, we eat meat in our house, don’t get me wrong.  But red meat, is extremely rare.  Can’t tell you the last time I have bought it.  We tend to do ground turkey, and chicken if we eat meat.  SO.  Going to our local butcher’s and buying this behemoth was fun and nauseating all at the same time.  I cannot pin point a time in my life where meat started to turn me off so much.  Not sure if it is the fear of cooking it? I am a freak about things being raw and just touching it with my hands, or its juices touching my countertops.  Sanitizing my entire kitchen during and after the cooking process becomes a job.

We went to the butcher shop with the kids, and bought a nicely marbled piece of prime  boneless chuck roast (4 1/2 pounds) and brought it home to cook the next day.  My recipe is a combination of how my mother had always cooked hers, and a smidge of tips from Ina Garten combined with mine.  Most pot roast recipes call for beef consume, or a bullion cube, and the sodium count in those are so high it’s disgusting! SO.  I made up my own little mix to add to the pot, with a similar profile of flavors.  It turned out amazing! The main complaints I always hear about people making pot roast is that theirs always turns out dry and bland.  This is FAR from those two descriptions.  The meat was beyond moist, and the flavors hit you from every angle.  For all of you red meat lovers, this will knock you socks off! I got it started early in the afternoon, it takes around 3 1/2 hours to cook.  In the mean time we played outside and worked up an appetite.  I kept thinking about our mothers, and grandmothers while making this.  These “slow cooked” meals were frequent growing up, and while they sit in the oven half the day, it still tasted like a lot of TLC went into this dish!

image-37

INGREDIENTS:

  • 4-5 pound prime boneless beef chuck roast
  • (1) 16 oz bag of organic carrots, chopped into chunks
  • (1) 16 oz bag of organic celery, chopped into chunks
  • 2 cup organic onions, chopped
  • 5 garlic cloves, minced
  • 2 cup organic red wine
  • 1 cup organic vegetable stock (you can use beef, or chicken – I thought there was enough “beef” flavor already in this dish)
  • (1) 28 oz. can organic plum tomatoes and it’s juices
  • (1) small bundle of thyme & rosemary
  •  ( Replacement for bullion cube….)
  •     Few tablespoons of soy sauce
  •     Few tablespoons of worcestershire sauce
  •     Heaping tablespoon of Dijon
  •     (2) 6 oz cans of tomato paste
  • Few springs of green onion, chopped, for garnish

DIRECTIONS:

Pre heat the oven to 325* Prep a dutch oven on your stove top with 2 Tbs of Extra Virgin Olive Oil

First, start by chopping your vegetables.  Chop the carrots, celery, onion and garlic and set aside in a bowl.

Second, put your dutch oven onto medium high heat and get the olive oil ready.  Take your chuck roast and pat it dry with a paper towel.  Next, season the roast liberally with salt and pepper.  Then take flour, and dredge the roast in flour, shaking off all excess.  Place the roast down into the dutch oven and sear the side for 4-5 minutes. Continue to do this for ALL four sides, 4-5 minutes each.

Once your searing stage is complete, take the roast out and place it on a baking sheet.  Pour a few more tablespoons of olive oil into your dutch oven, and pour in all of your vegetables you chopped.  Add a pinch of salt and pepper.  Let the veggies cook for 10-15 minutes until they tenderize slightly.

Next, pour the red wine over the veggies, add a pinch of salt and pepper again and bring the wine to a boil.  Once boiling, add the can of plum tomatoes, and chicken stock.  Scoop out the tomato paste into the pot, along with the soy sauce, worcestershire, and Dijon.  Stir to combine, adding another small pinch of salt and pepper.  (Seasoning each layer of the dish) Lastly, add your bundles of thyme and rosemary, and place the seared pot roast into the dutch oven.  You can spoon some of the juices and veggies on top of the roast.  Bring it all to a boil, and then place the lid onto the dutch oven.

Place the dutch oven into the oven at 325* for 2 1/2 hours.

Lower the heat to 250* and continue to cook for another hour.

Once the pot roast is cooked, remove the roast and set it aside.  Scoop out as much vegetables as possible, and put into a serving dish.  With the juices that are left, pour them into a blender if you want a smoother gravy.  Blend until smooth and return it to the pot.  If you do not mind the gravy chunky, just turn the heat on medium/low and bring it to a simmer.  In a small bowl, mix together 2 Tbsp butter and 2 Tbsp flour.  Add this to your sauce to make your gravy and stir until it thickens, on medium/low heat.  It only takes a few minutes.  Slice your pot roast as you like, and pour your gravy over top.  Dinner’s Ready!

We served our pot roast with our favorite Dill Potatoes, want the recipe? Here ya go!

image-40

INGREDIENTS:

  • 1/2 bag of organic golden potatoes
  • Few Tablespoons of Extra Virgin Olive Oil
  • Granulated Garlic
  • Dried Dill
  • Salt and Pepper

DIRECTIONS:

Pre heat the oven to 375* Line a large baking sheet with foil, and non stick cooking spray

Wash, and cut your potatoes into quarter chunks.  Lay them into one layer onto your baking sheet.  Liberally drizzle with the olive oil.  And then, do the same with the dill, garlic, salt and pepper.  Toss all together with your hands, and place the potatoes in the oven for 45-50 minutes, tossing half way through the cooking process.

Filed Under: Nav Right

Birthday Boy.

March 8, 2013 by thethomehome

Birthday Boy.

IMG_1587

Brody turned four last week.

My little boy is FOUR!

YIKES.

Attachment-1

A surprise pregnancy that evolved into the biggest blessing in our lives.  This little boy has SO much life in him.  He is extremely passionate about everything, and everyone.  He wears his heart on his sleeve and really wants to bring out the best in others.  I love what a great big brother he is, even when his buttons are pushed 100x a day, he still loves on Owen more than picks on him.  His love of learning, and golf are at an all time high.  He is learning to write his letters, and his vocabulary is unlike any toddler I know. We had a birthday bash for him this past weekend, and it is always the best feeling to be surrounded by people who love your kids as much as we do.  We are certainly blessed to have Brody in our lives.  He has made us better people, better parents, and most of all, SO PROUD to call him ours.

Attachment-1

B-mac.  Mommy and Daddy love you SO much! More than the moon and stars.  I hope each year as you grow you feel just as much love back, as you give.

photo-23

Filed Under: Our Life

Lemon Blueberry Yogurt Bars

March 6, 2013 by thethomehome

Lemon Blueberry Yogurt Bars

image-33I love lemons.  I love lemons.  I love lemons, hey-hey-hey-hey.  If I could zest my way through every meal, I would.  Dan is not as big of a lemon fan as I am, but I have snuck  it into meals that he has yet to complain about.  Lemon is the best natural enhancer to SO many dishes.  The amazing blog, SmittenKitchen, and the woman behind it all – Deb, has a plethora of recipes to sift through.  It would take days to get through them all.  I purchased her cook book for my mom this past Christmas, and find myself looking through it over and over.  All of her food pictures are beautiful! Makes me wish I knew what I was doing when it comes to photographing food! anyways.  This lemon blueberry yogurt loaf of hers is just the right combination of sweet and tart.  I used a 9 x 13 cake pan instead of a bread loaf pan because that is all that I have. ( I really need to re-stock my kitchen.)  I used greek yogurt, and it turned out so light, and moist, and delicious.  We only have a few pieces left, since we gave some to my parents for breakfast today.  But, I am excited to keep this recipe as a staple, and start switching up the flavors.

INGREDIENTS:

  • 1 1/2 cup unbleached flour + 1 Tbsp to coat the blueberries
  • 2 tsp baking powder
  • 1/2 tsp salt
  • 1 cup plain greek yogurt
  • 1 cup sugar ( + 1 tsp for later use )
  • 4 eggs
  • The zest of 2 lemons (squeeze out 1/4 cup of lemon juice and set aside)
  • 1 tsp vanilla extract
  • 1/2 cup vegetable oil
  • 1 – 1 1/2 cup frozen ( or fresh ) blueberries

DIRECTIONS:

Pre heat the oven to 350*  Line a 9×13 baking dish with parchment paper, and grease it with butter or cooking spray

In a medium bowl, whisk together the flour, baking powder and salt.

In another bowl, whisk together the yogurt, sugar, eggs, lemon zest, vanilla and vegetable oil.

Add the dry ingredients to the wet, and stir just until incorporated.

Toss your blueberries with 1 Tbsp of flour, to help them from not sinking (mine still did : more than likely because they were frozen) and gently fold the berries into the batter.

Pour the batter into your baking dish, and bake at 350* for 30 minutes, or until an inserted toothpick comes out with few crumbs attached.  Let the cake cool for 10 minutes.  In the meantime, take the 1/4 cup reserved lemon juice and add a tsp of sugar, and stir.  Then, once the cake has sat for 10 minutes, brush or gently pour the lemon/sugar juice over the entire cake.  Let the cake cool completely before slicing, and store in an airtight container, or in its original dish covered with foil.

image

Adapted from: lemon yogurt anything cake | smitten kitchen

Filed Under: Nav Right

Sunshine.

March 5, 2013 by thethomehome

Sunshine.

It was a chilly March day yesterday, but the sun beams were in full effect.

We bundled up and made the best out of the afternoon, until we couldn’t handle the cold any longer.

picstitchpicstitch-1

picstitch-3

picstitch-2

image-32

image-31

Picking up sticks along the way,  to make bird houses of course.

Crunching acorns with their tiny feet, and giggling so hard it was contagious.

Flicking dirt like it was going out of style.

And ending the afternoon with a nice warm bubble bath.

We needed a day like that.  Thank you sunshine.

Filed Under: Our Life

Lemon Sandwich Cookies

March 4, 2013 by thethomehome

Lemon Sandwich Cookies

IMG_3838 These cookie sandwiches are perfect to add to your spring/summer cookie list.  They have a delightful crunch, and the cream cheese filling helps mellow out the brightness from the lemon.  I brought these to a girls night a few weeks ago, while we watched the Bachelor (highlight of my week), and they were loved by all.  Thank you Martha Stewart, (or your worker-bees) for sharing such a fabulous, sweet bite!

INGREDIENTS: (Makes 3 dozen) 

  • 2 sticks unsalted butter (at room temperature)
  • 1 cup powdered sugar
  • 1 Tbsp lemon zest
  • Juice of 1/2 of a Lemon
  • 1/2 tsp salt
  • 2 cup unbleached flour
  • 2 Tbsp granulated sugar for sprinkling
  • FILLING
  • 4oz cream cheese (at room temperature)
  • 1 Tbsp lemon zest
  • 1 – 1 1/2 cup powdered sugar

DIRECTIONS:

Pre heat the oven to 350* Line two large cookie sheets with parchment paper

In a large bowl, with an electric mixer, mix the butter, powdered sugar, lemon zest, lemon juice, and salt together.  Slowly add the flour, the dough will become stiff, so finish incorporating it with a wooden spoon.  Pour out the dough onto a piece of plastic wrap, and flatten into a disk approximately 1/2 inch thick.  Let the dough chill in the fridge for 1 hour (Martha says you can chill it for up to 3 days in advance)

Once your ready to roll the dough, take it out of the fridge and place the dough on a lightly floured work surface.  Roll the dough to 1/8 thickness, (let the dough warm up a bit if your dough seems to crack easily) and begin cutting your shape.  I used a small circle cutter for a nice small bite.  Place each cookie 1 1/2 – 2 inches apart on the cookie sheet, sprinkle the tops with sugar and bake for 15-20 minutes.  Re-roll your dough as needed, cutting more cookies out, until you have used all of the dough.  Watch these carefully, check the bottoms at 15 minutes.  You want the bottoms to be barely golden.  They will brown quickly after 15 minutes.  Transfer the cookies to a wire rack to cool completely before adding the filling.

To make the filling, in a medium size bowl, using an electric mixer, simply mix all three ingredients until light and fluffy.  Take a tablespoon or so of filling, and spread onto one cookie, place another cookie on top and voila! Delicious lemon sandwich cookies for your next gathering.

Barely tweaked from: Lemon Sandwich Cookies – Martha Stewart Recipes

Filed Under: Nav Right

  • « Previous Page
  • 1
  • …
  • 59
  • 60
  • 61
  • 62
  • 63
  • …
  • 67
  • Next Page »

LETS BE SOCIAL

  • Email
  • Facebook
  • Instagram
  • Pinterest

Articles

Categories

Archives

Heinens

Visit The Thome Home 's profile on Pinterest.

Recent Posts

  • Pork Schnitzel
  • It’s time to book your vacation with Oasis Vacations!
  • Oasis Vacations at Ocean Isle Beach, North Carolina
  • JUS-ROL Crescents
  • Back to School Safely
  • Chicken Tender Charcuterie Board
  • Lillie’s Q Spicy Cheddar Sausage Pizza Bagel
  • Max’s Bedroom

Copyright © 2025 · Tasteful theme by Restored 316