• Home
  • About
  • LIFE
  • HOME
  • FOOD

The . Thome . Home .

Homemade Graham Crackers

February 6, 2013 by thethomehome

Homemade Graham Crackers

IMG_3750

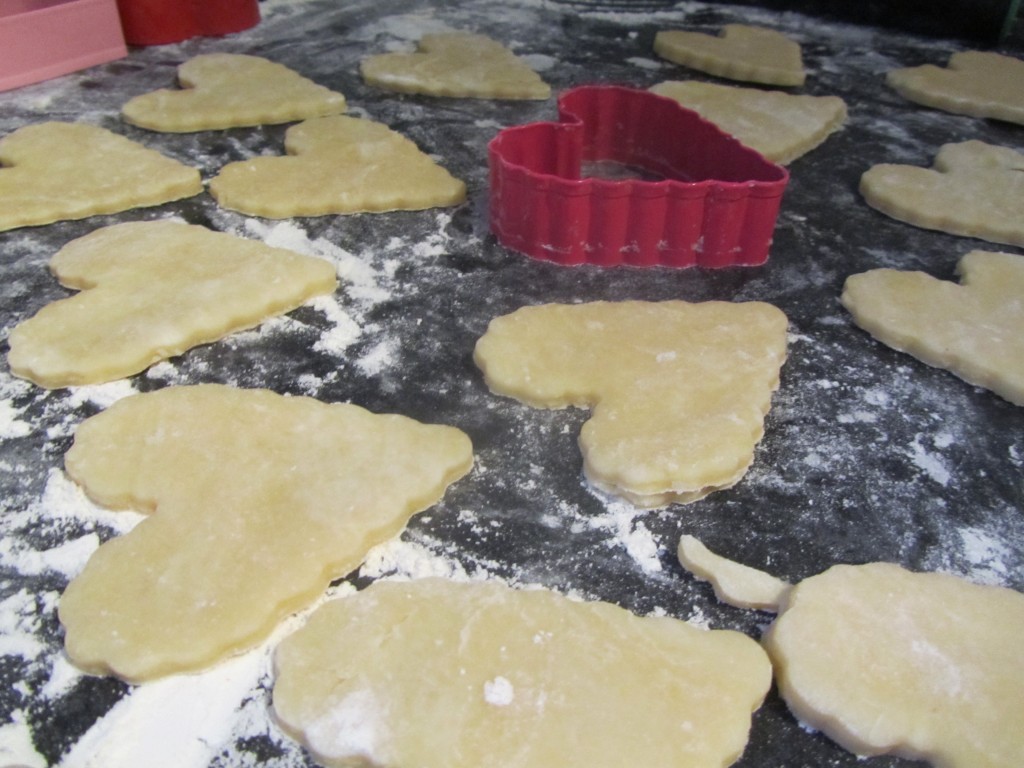
I’ll take a chance on anything homemade if it’ll save me time and money in the long run.  These graham crackers were a hit among our boys, and rightfully so.  It is so nice to whip up a batch of these and keep them throughout the week for a simple snack.  I keep half in the fridge to stay fresh (up to two weeks), and the others are always in my diaper bag for a quick healthy snack on the go.  Best part of all, this dough is extremely fun to make and the kids have a ball using cookie cutters to make different shapes.  Add drizzled chocolate, or fill two cookies with marshmallow fluff.  Whatever floats your boat.  I am just thrilled to have this recipe on hand and not the box version in my cupboard filled with icky preservatives!

IMG_3754

INGREDIENTS:

  • 1 cup unbleached white flour
  • 1 1/2 cup whole wheat flour
  • 1/2 cup brown sugar
  • 1/2 Tbsp cinnamon
  • 1 tsp baking soda
  • 1 tsp salt
  • 1/2 cup COLD, cubed butter (or non-dairy butter, earth balance is what we use)
  • 1/4 cup applesauce
  • 1/4 cup honey

DIRECTIONS:

Pre heat oven to 350* Line two cookie sheets with parchment paper

In a large bowl, whisk together the flour(s), brown sugar, cinnamon, baking soda and salt.  Using a handheld mixer, add the cubed butter and mix just until the butter in tiny bits throughout.  Now, add the applesauce and honey.  Here, the dough will take on a more wet look, but still be extremely crumbly.  Set the mixer aside, and knead the dough using your hands inside the bowl until the dough comes together.  Pour the dough out onto a well floured surface and start rolling! You’re looking for a 1/4 inch thickness.  Cut whatever shape you desire and place onto your baking sheet.  If you want your crackers to turn out crisper, poke a few holes into each cracker.  We like ours soft and chewy so we leave them as is.  Bake for 12-14 minutes, until the bottoms are barely golden.  Set onto a cooling rack and let cool completely.  Eat them up, or place them into an airtight container.  Store in the fridge for maximum time freshness!

Adapted from : http://weelicious.com/2010/09/01/graham-crackers/

Filed Under: Nav Right

Sweet Pastry Dough

January 30, 2013 by thethomehome

Sweet Pastry Dough

IMG_3690

Days like today I wish I was in the middle of the woods somewhere picking berries, admiring the puffy clouds, day dreaming and sipping lemonade out of a mason jar.  Instead I am waist deep in laundry, trying to organize bills, getting dinners prepped and in the freezer for future meals and attempting to keep my kids from throwing each other off the couch.  All I want to do is lock myself in a closet so I can sit and eat a sandwich without half of it being eaten by little munchkins.  A few months ago Dan and I were watching Jamie Oliver’s cooking show, and we were cracking up watching him in the middle of the woods making a dish on a tree stump. (not kidding) Not your average cook’s set up.  However, Jamie’s fresh, rustic way of cooking is extremely appealing to me.  And days like today I wish I had a kitchen set up in the middle of the woods to clear my mind and stir up some grub in silence.  This motivated me to look through of Jamie’s cook books I stumbled across this Sweet Pastry Dough and knew I had to try it.  I will be the first to admit I have never made pie dough from scratch.  Food processors are always recommended for the easiest route, and I do not have one.  But Jamie’s simple approach with using forks to cut the butter (I ended up using my fingers) was so easy I knew it would be a winner.  It did not let me down.  Not only was this dough ridiculously easy to throw together, but the flavor was outstanding.  The chunks of butter throughout the dough guaranteed a flaky pastry, and the lemon that is zested within brightens the entire dough up.  DELIGHTFUL! I decided to cut heart shapes, and fill them with tiny diced apple mixed with cinnamon and sugar.  We dropped them off to family and they were a hit.  The fillings (like any “pie”) would be endless, and I am sure by the end of next week I’ll be tempted to try some new ones.

IMG_3696

PASTRY DOUGH RECIPE:

Recipe excerpted from JAMIE AT HOME by Jamie Oliver. Copyright (c) 2008. Published in the U.S. by Hyperion. All Rights Reserved. www.jamieoliver.com

FILLING:

  • 2 medium apples, diced into small cubes 
  • tsp of Lemon Juice
  • 1/3 cup Sugar
  • 1 tsp ground cinnamon
  • Have a small bowl of water set aside, to help the pie dough layers stick together

Egg Wash:

  • 1 egg + 1 tsp of water
  • A few tablespoons of granulated sugar to top the pies

DIRECTIONS:

Pre heat oven to 350* Line two large baking sheets with parchment paper

Peel, slice and cube your apples.  Place them into a bowl with your lemon juice, cinnamon and sugar, mix well and set aside.  Have a small bowl of cool water ready as well.

Once your pastry dough has chilled for an hour your ready to roll it out to cut your chosen shape.  Flour your work surface before you start rolling.  Roll the dough to 1/8-1/4 inch thickness.  I had a TON of hearts, with lots of scraps so I rolled the scraps together and placed them back into the fridge until I was done assembling the pies.  Take one heart, and dip your finger into cool water, tracing the edge of the heart.  Place 1 tsp of apple filling into the center of the heart, and then place a second heart on top pressing down to seal it.  Place on your baking sheet, and continue assembling until your baking sheets are full.  Before placing them into the oven, make your egg wash and brush the hearts with it.  Slice a few slits, or poke a few holes into the pies to aid in venting while baking, and sprinkle a little bit of granulated sugar on top.  Bake at 350* for 15-20 minutes, or until the bottoms are slightly golden.  Place on a wire cooling rack to cool.  Once cooled, put pies into an airtight container.

*While my first batch baked in the oven, I brought out my scraps of dough and rolled out another set.  The dough is extremely forgiving so do not through out the scraps!

IMG_3703

Filed Under: Nav Right

That’s a Wrap 2012

January 28, 2013 by thethomehome

We’re so excited! Our little blog is getting a little facelift for 2013.  We’ll be working on it over the next month or so.  We have the ability to post videos now, so you’ve been warned.  From house projects to funny moments with the boys, we are excited to have something else beyond our words to share with you.  We posted our yearly “end of the year” video last christmas for you guys, and this year we upgraded our blog to be able to post video clips directly to our page.  Upgrading the blog was an easy decision.  To us, it is the perfect way to keep friends and family up to speed with what’s going on in our lives.  More importantly, it’s the ideal way for us to write and keep track of everything happening in our life.  We have only been blogging for a little over a year now, and we already look back on posts and reminisce.  I can’t wait to see what it’ll be like for the kids twenty years from now to be able to sift through their childhood this way.  Blogging is common now-a-days … and like all fads I am sure at some point it’ll die off.  Is it corny to say that we’ll be bloggers for life? We love doing it.  So it’s safe to say thethomehome will be continued for many years to come.

Here is our video collage from 2012

Filed Under: Our Life

Simply the best Brownies

January 23, 2013 by thethomehome

Simply the best Brownies

IMG_3637_1

It doesn’t take much to win over my heart.  I’m not a girl who swoons for jewels, or fancy shoes.  It took Dan about 3 years of dating and X amount of necklaces and rings later to realize they were lost and not worn and a big waste of $$ in my book.  The only bling I adore is earrings.  Wish I had more. (Insert hint to hubby) Back to the point.  It is truly the simplest form of thoughtfulness that melts my heart.  So if a friend or family member is down in the dumps, or they have helped us out in any way, I do what I know best…BAKE.  Nothing says “cheer up” or “thanks” quite like a fat stack of cookies, or  freshly frosted cupcakes.  These brownies have been my ultimate brownie recipe all of last year.  Had to whip them up once more yesterday and switch them up a bit, and I have to tell you they would make a perfect valentines treat for someone you love.  I hope you make these… and give them (or a few) to somebody else.  It’ll stick like glue and small gestures like this really let people know your thinking of them.  And since I haven’t blogged in over a month, this recipe will be my gift to you.  These moist, rich, and chewy brownies with a subtle crunch to the crust are delectable. Enjoy each bite!

INGREDIENTS:

  • 1 1/4 cup flour
  • 1 tsp salt
  • 2 Tbsp cocoa powder
  • 11 oz Chocolate Chips (milk chocolate/semi-sweet/dark..pick your favorite)
  • 1 cup butter (2 sticks)
  • 1 tsp instant coffee granules
  • 1 cup white sugar
  • 1 cup brown sugar
  • 5 eggs @ room temperature (leave them out for about 10-15 minutes)
  • 3 tsp vanilla

DIRECTIONS:

Pre heat oven to 350*. Cover a 13 x 9 baking dish with parchment paper.  Have enough parchment to come up 2 of the sides (helpful in lifting the brownies out once cooled)

In a small bowl, whisk together the flour, salt and cocoa powder.  Set aside.

In another small bowl, whisk together the white and brown sugar.  Set aside.

In a microwave safe medium size bowl.  Put the 2 sticks of butter, and chocolate chips in, and place in the microwave for 30 seconds.  Take out and stir.   Place it back in for an additional 30 seconds at a time until the chocolate chips are ALMOST melted.  (takes about 3-4 times) Finish by stirring, letting the heat of the bowl melt the rest of the chocolate chips.

Next, add in the bowl of sugar(s).  Mixing till combined.  In a measuring cup, whisk together the 5 eggs and then add them to the chocolate mixture as well, folding until the eggs are one with the chocolate.  Last but not least, FOLD in the flour mixture.  Do not over mix, just stir until the chocolate has absorbed the flour/cocoa powder/salt.

Pour the brownie mix into your parchment lined baking dish.  Bake at 350* for* 25-30minutes. (time updated on 2/3/15) or until an inserted toothpick comes out with  few crumbs attached. They are done!  Let them cool for 45 minutes.  You can lift the brownies out of the pan with the parchment paper and set on a countertop, making it a lot easier to cut them! Enjoy them as is, cover them with frosting, or a scoop of ice cream.  Store in an airtight container, or in back in the pan covered with foil.

IMG_3646_1

Adapted from : THE BAKED BROWNIE via BrownEyedBaker

Filed Under: Nav Right

Carrot Cake Cookies

December 7, 2012 by thethomehome

Carrot Cake Cookies

image-17

Cookie baking is in full swing.  I, for one, could not pick a favorite cookie if you asked me to.  No matter what the season, some cookies just hit the right spot.  These carrot cake cookies may not be your first recipe to jump to during the holiday season, but I’ll give you the nudge to give them a try.  They. are. SO. delicious.  The cookie itself bakes up fluffy and light, and the cinnamon cream cheese filing adds a nice sweetness to the subtle spice in the cookie.  Add these to your list of cookies to bake and you will be sure to impress your guests.  I personally think it’s a nice switch up.  Soft, sweet, and one is just enough. Maybe.

INGREDIENTS:

COOKIES:

    • 1 cup (2 sticks) of unsalted butter (at room temperature)
    • 2 cups unbleached all-purpose flour
    • 3/4 cup packed light brown sugar
    • 3/4 cup granulated sugar
    • 2 large eggs (at room temperature)
    • 1 1/2 teaspoon pure vanilla extract
    • 1 teaspoon baking soda
    • 1 teaspoon baking powder
    • 1/4 teaspoon salt
    • 1 1/2 teaspoon cinnamon
    • 1/2 teaspoon ginger
    • 1/2 teaspoon nutmeg
    • 2 cups old-fashioned rolled oats
    • 1  cup grated carrots (I used a micro-plane so the carrot itself was super fine)

Cinnamon Cream Cheese Filling:

  • 8oz of cream cheese (at room temperature)
  • 1 stick of room temperature unsalted butter
  • 4 cups of powdered sugar
  • 1/2 tsp vanilla
  • 1 tsp of cinnamon

DIRECTIONS:

Preheat oven to 350*

Line two baking sheets with parchment paper

In a medium size bowl, whisk together the flour, baking soda, baking powder, salt, cinnamon, nutmeg, and ginger.  Set the bowl aside.

In a second bowl, with a mixer, cream together the butter and sugars until light and fluffy.  Add the eggs and vanilla until everything is incorporated.

Slowly add the flour mixture into your wet, until the ingredients are just combined.  Do not over mix your batter! Last but not least, add in the cup of grated carrots and oats and stir to combine.

Chill the dough for 1 hour in the refrigerator.  I used a small cookie scoop for the dough, or you can measure out a tablespoon or so and roll it into a ball.  Place them 2 inches apart onto your baking sheet and sprinkle with granulated sugar on top.  Bake until the bottoms are slightly golden (11-15 minutes) Mine were pulled out at 11 and they were perfect! Transfer cookies to a wire rack to cool completely before you add the filing!

Cinnamon Cream Cheese Frosting:

In a medium-sized bowl, with a mixer, beat together the butter, cream cheese, and vanilla.  Once light and fluffy, slowly incorporate the powdered sugar.  Once everything is smooth and whipped add the cinnamon.  Once cookies are cooled, place a dollop onto the center of one cookie and press down with another.  Voila! Place finished cookies in an airtight container.  Enjoy!

Barely Adapted :

Quickfeetgoodeats.com

Filed Under: Nav Right

Blue-Eyed Babes

December 4, 2012 by thethomehome

Blue-Eyed Babes

Yesterday was a surreal 60 degree day in December.  IN CLEVELAND.  It was FANTASTIC.

I had a successful day full of baking and cleaning.  And we had a great afternoon outside to get some much-needed fresh air.  It was so nice to play outside for a bit before we are stuck inside for the winter.  These blue-eyed babes of ours just kept me smiling all day.  They were SO good yesterday.  They hardly fought, they shared their toys, and they ate their dinners in full.  It was truly a Christmas miracle.  Maybe it’s our new “Elf on a Shelf” that is influencing their good behavior? At first I just did not want to spend 30$ on the tiniest “toy” ever.  But, most of the families we know have one, and Brody was catching on.  So we had to jump on the band wagon.  “Reindeer” is our new elf’s name and he has been a fun addition to our house.  Here are some cute pictures of the boys playing, and getting along, had to capture the moment!

image-15photo-4image-16

Filed Under: Our Life

Still Transitioning…

November 30, 2012 by thethomehome

Still Transitioning…

When we purchased our house nearly 3 years ago come this holiday, we were simply smitten by the house.  At first glance, most would walk in, and ask their realtor “What were you thinking showing us a house in this state?”  But for us, it was an old, cringe worthy piece of work.  As for most home owners, we definitely underestimated what NEEDED to be done, and what we WANTED to be done.  We had 3 months to flip, and we succeeded.  Three years later and nearly everything has changed about the house since we moved in.  The wall colors that we thought we loved, we grew a deep hatred towards.  The decor (and lack there of) was at a definite stand still and what existed was being changed every few months.

Transitioning into a new home is exciting and overwhelming.  Overwhelming in that you may make decisions based on what you can afford at the moment, not what you particularly like.  Our kitchen counters for instance (first to go on our list this spring).  Cheapest countertops you can buy.  We had a ton of unexpected work that popped up in the kitchen, and our budget dwindled quickly.  Decorating an entire house is not a task to be done overnight.  We learned our lesson.  Unless your on HGTV with a decorator and a hefty budget, having that “look” you dream of for a particular room (or your house as a whole) will take time… lot’s of it.  Truth be told, even if HGTV were to come into our house and do everything for us…  we probably wouldn’t love it as much.

No matter what your budget, purchasing items as time goes makes decorating your home easy and affordable.  So, here we are, three years and lord only knows how many paint cans and holes in the wall later, we are FINALLY at a point where we are feeling satisfied with our hunger to re-do our spaces.  Now we can take each room and make the upgrades we want too.  These past seven months or so our game plan was to put down the paint brushes, and prep to put the house for sale come this new year.  After MUCH consideration (and frustration) we decided to stay a few more years.  Finish growing our family here, and see where life takes us.  We’re waiting to turn the big 3-0 to purchase our second, hopefully-forever-home.  Sitting back, looking at our house and all that we have accomplished at this point is a wonderful feeling.  What’s even better? All the projects we ignored on our To-Do list this year, will be rewritten and ready to be devoured.  Here are some of the simplest projects we have done over the past few months.  We are so excited to get even more cozy here.  Get the decor rolling, and settle into the cracks (literally).  This old house may not be an ideal house for some… but for us… it’s just right.

Remember this ugly pantry door? The first thing you see when you walk into our side door

We painted it black…we will never go back.

The upstairs bathroom walls have been over stimulated by the paint brush, thankfully, we are delighted with the new color…

An easy switch-up was rearranging the art work on our stair landing, now I just have to replace that “boob-like” fixture from the ceiling.  See the boob? I’ll never look at those lights the same way again.

Oh my teeny kitchen.  New paint (you’ve seen) – new appliances – and I painted the white chairs black.  Black is my latest obsession –

That fan in the dining room NEEDS TO GO.  Working on convincing the hub who has a “thing” for fans.

Our nook before…

See what a can of paint can do? I love our new sitting area

Our living/family room has gone through a few changes this month.  Haven’t gotten around to taking great pictures yet.  Brody and Owen trash a room in under 30 seconds, so it’s nearly impossible to capture a clean moment.  So, these will have to do…

Our t.v. is now above our fireplace which allowed us to rearranged furniture in our what we thought was a dreadful rectangular space.  We love the new sitting area, really opened up the entire room.  So glad we got rid of our tv stand, and uncluttered the space even more.

IMG_3372New bamboo roman shades over a few windows, and window treatments have really warmed up the spaces quite a bit! I’ll get better pic’s soon.IMG_3385
IMG_3374

I painted the dining room for the 5th, and final time when Dan was in Texas.  Regretted the light blue the second I put it on the wall last year, but didn’t want to admit to my mistake of changing it in the first place to Dan.  Here’s one wall, and the nice transition it has to our kitchen.

IMG_3301IMG_3302

Oh- and probably the best move we made yet was switching our bedroom with Brody’s.  We had the largest bedroom, and with Owen getting into a big boy bed after the new year we knew we wanted a space they could share together.  Our new bedroom is small, that’s for sure, but it works for now.  Here’s our new space , screaming to be decorated.

IMG_3273That’s it.  All of our rooms have received some tweaking… now we need the official list for all we want to do in 2013.  Can’t wait!

Filed Under: Our Projects

FALL in Love

November 12, 2012 by thethomehome

FALL in Love

Without a doubt fall is a season that for us, goes far to quickly.  For the boys, nothing is better than slightly cooler weather for hours of outdoor play time.  Dan had to go away on business for 3 weeks in October to Texas, which bummed him out to miss the peak of the leaves changing colors.  So, the boys and I were left to soak up the beauty while Daddy sweat away in the Texas heat.  Not gonna lie, had slight  major panic attack moments prior to Dan leaving.  Never quiet realized it was about him leaving, but with a week notice – I freaked out a bit and it was the straw that broke mama’s “I can handle this” swag.  After the first week, I got the hang of “single mommy hood” It wasn’t SO bad after all.  Missed the heck out of him, and looked like a hot mess for 3 weeks of having no break from the kiddos.  When he came back home we were like leeches to him.  He was a hot commodity.  Thankfully while he was away, and when he came back, we took part in every bit of fallish activities we could.  Local fruit farms, leaf piles, baking, pumpking carving… a lot of fun packed into one month.

First week of Daddy away the boys cuddled in bed

Big Eyed Brody

Always chewing on something

Brotherly Love

Revenge

Sweet Cheeks

Bumpy Pumpkins

Hercules

Nature… Robert Goulet style

A picture just isn’t complete without a binky

Zonked

Leaf blowing day

Fall isn’t fall without a little football (at least for Dan)

As I sit here typing this up, it is pouring rain outside… which I am sure in the blink of an eye will turn to sweet snow for us.  Not a big fan of it, but with the holidays right around the corner I am filled with glee.  Already menu planning for Christmas day, and figuring out what desserts will be baked and passed out to family and friends, I love this time of year.  This holiday season I am extremely grateful for my family and friends, blessed to have them here with us today.  Trying my best to not take a day for granted and trying not to get to caught up in the craziness of life.  Taking a moment to truly stop and smell the roses.  Pictures like these, and the moments that make them, make me fall in love even more everyday with my family.  Anxiousness is a department I struggle in daily.  Anxiety is in my blood.  There is no avoiding it.  It’s as natural of a reaction for me, as it would be for a stripper to dive for dollar bills.  It just happens.  Bless my husband, who has always been supportive and helping me find my “zen.” So with that said…  these quotes are always good to have in your back pocket =)

Filed Under: Our Life

Chocolate Chip Buttermilk Scones

November 6, 2012 by thethomehome

Chocolate Chip Buttermilk Scones

Lately, it seems like there are not enough hours to the day.  I have the personality where I do not stop… cannot stop .. and well, do not want to stop.  My days consist of being the stay at home mom (taking care of the kiddos, errands, cleaning, cooking) but for some reason that just isn’t enough.  That to me seems like that should be the basic set up of my day, and I should be able to accomplish more.  So lets just pile up on doing hair, and painting a room for the third time, or “accidentally” chipping off old tile in our bathroom to push us into another project.  For some reason it keeps me more calm, keeps me motivated, and entertains me.  Now baking on the other hand, that is just pure relaxation for me.  These scones are a recipe I stumbled upon on skinnytaste.com  and never got around to making.  Yesterday Owen napped, and I jumped on these.  So glad I did.  “Skinny” scones, that are light, fluffy, and simply delicious.  Took a lazy way out and didn’t change a thing on this recipe, so the link is provided for the recipe 🙂

Click here for the recipe…..

Skinny Chocolate Chip Buttermilk Scones

Filed Under: Nav Right

Granola

November 2, 2012 by thethomehome

Granola

This crave-worthy recipe is a favorite in our household.   It’s practically guilt free.  Oats, almonds, heart healthy olive oil, honey… it’s simply amazing.  Don’t let the almonds hold you back if you’re not a fan.  Any nut will do.  Whether you spoon it up with milk in the a.m., sprinkle it over greek yogurt, or put your grubby fingers straight into your Ziploc bag… you’ll be coming back for more.

INGREDIENTS:

  • 4 1/2 Cups Old Fashioned Oats (NOT the quick-cooking)
  • 2 Cups Almonds (whole, or chopped)
  • 2 Cups Shredded Coconut (Sweetened or Unsweetened)
  • 3/4 Cup Honey
  • 1/2 Cup Olive Oil
  • 2 tsp Cinnamon
  • Pinch of Salt
  • LAST ingredients to add once cooled.. (it’s up to you)  Chocolate Chips, dried cranberries, dates….

DIRECTIONS:

Pre Heat oven to 350* Line baking sheet with parchment paper

In a large bowl, pour in the oats, almonds, and coconut.  Drizzle over the honey and olive oil.. and spices.   Stir together with a spoon, finishing with your hands to make sure everything is kissed by that honey goodness.  Pour over a baking sheet lined with parchment paper.  Bake for 15 minutes — stir it up a bit — bake for another 15-20 minutes or until the granola takes on a golden hue.  Let your baking sheet cool on a wire rack for 1-2 hours before you add your last ingredients.  The granola will continue to cook as it cools, so do not bake it for more than 40 minutes!  Break apart with your hands, and add your final additions.  Chocolate chips are always the winner with us. Store in an airtight container, or in a Ziploc bag for grab n’ go snacks.

Filed Under: Nav Right

  • « Previous Page
  • 1
  • …
  • 61
  • 62
  • 63
  • 64
  • 65
  • …
  • 67
  • Next Page »

LETS BE SOCIAL

  • Email
  • Facebook
  • Instagram
  • Pinterest

Articles

Categories

Archives

Heinens

Visit The Thome Home 's profile on Pinterest.

Recent Posts

  • Pork Schnitzel
  • It’s time to book your vacation with Oasis Vacations!
  • Oasis Vacations at Ocean Isle Beach, North Carolina
  • JUS-ROL Crescents
  • Back to School Safely
  • Chicken Tender Charcuterie Board
  • Lillie’s Q Spicy Cheddar Sausage Pizza Bagel
  • Max’s Bedroom

Copyright © 2025 · Tasteful theme by Restored 316