• Home
  • About
  • LIFE
  • HOME
  • FOOD

The . Thome . Home .

Raspberry Chocolate Crumble Bars

January 20, 2012 by thethomehome

Raspberry Chocolate Crumble Bars

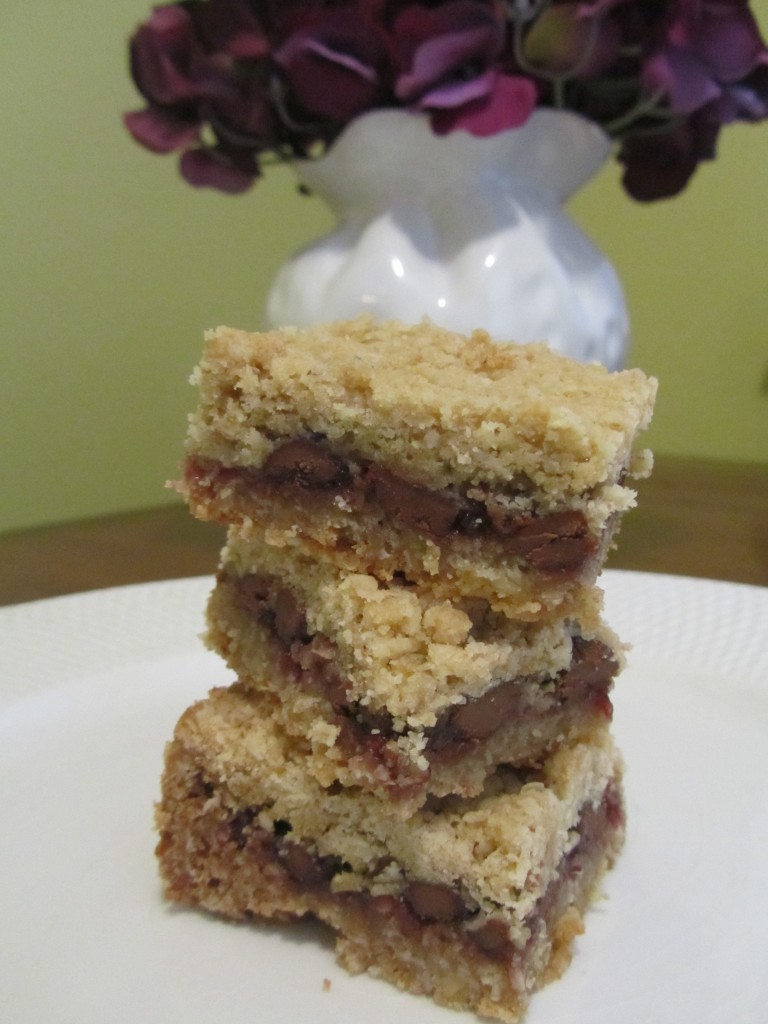
These raspberry chocolate crumble bars are spectacular.  I used a crust recipe from the adorable Kelsey Nixon, and adapted the filling.  Which, after doing, just sent my mind spinning with different filling ideas.  Unlike most treats we make in our house, these we kept at home.  And we are 4 bars short of completing the entire batch.  So undo the button on your jeans ladies and gentlemen.  Have no shame, forget the new years weight loss resolutions, and just indulge! :0)

INGREDIENTS:

  • 2 Cups Flour
  • 1 3/4 Cup Quick-Cooking Oats
  • 1 1/4 Cup Brown Sugar
  • 1 tsp Baking Soda
  • 1/4 tsp Salt
  • 2 1/2 Sticks Unsalted Softened Butter
  • 8 oz Chocolate Chips (whichever kind you like best)
  • 1/4 Cup – 1/2 Cup Raspberry Jam (use what you desire)

DIRECTIONS:

Preheat oven to 350* Line a 9×9 baking dish with parchment paper

In a large bowl, pour in flour, oats, brown sugar, baking soda, and salt.  Give it a good stir to incorporate all the dry ingredients.  Then with a handheld mixer, add your softened butter and mix until the crust is crumbly.  Resembling small clumps of sand.  Press 1/2 of the batter into a 9×9 baking dish, and bake the crust for 10 minutes.  Remove from oven, and smear the raspberry jam all over the crust, and add the chocolate chips in an even layer.  Pour the remaining crust over the filling, and press down to seal the bars.  Place the bars back into the oven for an additional 20-25 minutes, or until it is golden brown.  Let cool for at least an hour, cut into squares and enjoy!

Filed Under: Nav Right

Goodbye 2011 – Hello 2012

January 7, 2012 by thethomehome

Goodbye 2011 – Hello 2012

Blogging –  Something we decided to pick up at the end of 2011, and something that we both wanted to do as a fun activity to do together.  Something to escape with at the end of the night when the boys go to bed.  Over the past few months, however, our dear boys decided that “bed time” means midnight, AND waking up in the wee hours in between.  Colds, allergy issues, stomach bugs, teething, croup, you name it, the boys had it.  Needless to say, blogging has been pushed into the back of our minds.  We hardly had the energy to get dinner on the table, let alone minutes of “free time” to sit and write.  I think every parent experiences “hiccups” in their routines with their children.  Apparently we have the hardest hiccups to cure.  To say this past month has been exhausting is an understatement.  Every morning we wake up, look at each other and do not even need to mutter a word.  “How did you sleep?” is no longer a question when we both look like hell, its obvious we’re whooped.  I know this phase will soon fade away, and people say we’ll look back and laugh.  I sure hope so, because at this point, were running low on humor to break up the tension were feeling.  I even started this very post 5 days ago… and just now finishing it up.  YIKES.

The new year is traditionally a time that people look back upon their year, remember the good times and bad, and make way to a fresh start when the clock strikes midnight.  We have never been into new years resolutions, but like many, we have high hopes for the year ahead of us, and hope that it brings great things.  We love writing notes, or checklists, we make them for everything! Household projects, groceries, and ideas, you can find them everywhere in our house.  I am also a bit of a freak (as is Dan) – our paper is our domain, if there is one doodle, or memo from the other, we start the list from scratch.  What is up with that?! Ha. We are so strange, I guess it’s our thing.  This year we can actually have a combined list, things we would like to achieve by the end of  2012… HERE IT IS…..

PERSONAL GOALS:

  •  Get our darling little men to sleep at night.  We will pull out all the stops, projectors that light up the room, alternating cuddly items, white noise machines, a zillion stories, lullabies, WHATEVER it takes to get these boys out of our beds would be great.
  • Attempt to get our love life back. NO not that.  Just personal time as a couple.  I think we have been on 3 dates since Owen has been born.  One of which was a wedding, and the other 2 were for our birthdays.  Something we must fit into our schedules again.
  • Find a great school for Brody to attend next Fall (Pre school already… Geesh!)
  • GO ON VACATION! Dan has 2 weeks scheduled already, and we are thrilled that they will not be used up with paternity time! No babies this year.. sorry guys! 🙂

HOUSEHOLD GOALS:

  • Create a kid friendly garden for the boys (mainly Brody).  SO excited to have ingredients at hand, and the boys to understand how important/easy/fun it is to cook with fresh ingredients.
  • Finish our basement, we’re half way there.  Pictures to come…
  • Our lovely kitchen, the one room we thought we were content with will be getting a complete overhaul.  New countertops,  back-splash, appliances, repainting cabinets and the walls.
  • Changing the color of our…..HOUSE!…. Super excited about this project, not quiet sure what season we will choose to attempt this one. 🙂
  • The upstairs bathroom project will be a complete DIY attempt at new tiling.  Then of course switching up paint and fixtures.  I am anticipating sweat and tears. haha..

Overall those are the bigger projects, our “bank breakers.”  As always, we work on a tight budget, and the fact that we utilize our own skills saves tons of money.  It is amazing what you can do to your home, with your own hands if you just give it a try.  Yes, there will always be projects that call for professionals to do (John, Dan’s dad) but there are a lot projects every home owner can take on! 2012 is looking to be a great year.  I have made the definite decision to stay at home with the boys, not returning to work until we are done having children.  A difficult decision to make, but Dan and I think it will suite us best.  If the boys keep up with their antics of not sleeping though, I can guarantee they will be the only children 🙂

Here is a video we made to look back on 2011.  Dan surprised me with a video last Christmas and the idea of doing so just stuck.  Hope you enjoy this as much as we did….

http://www.youtube.com/watch?v=HmVv8CWCXmw&feature=youtu.be

Filed Under: Our Life

Holiday Cookie Bars

December 19, 2011 by thethomehome

Holiday Cookie Bars

These cookie bars are so delicious, and so festive for the holidays if I say so myself! Originally, these were supposed to be actual cookies. But after making a few different batches of cookie dough that day, I was short on time, and the boys were losing their patience. SO, pressing the cookie dough into a pan was the easiest solution. Luckily, after all was said and done, these bars turned out to be my favorite holiday cookie so far. They were a huge hit with friends and family. The combination of cranberries, pistachios, and white chocolate chips gave this cookie an array of texture, and bright holiday colors. Another cookie success, and another one added to my list for next year.

INGREDIENTS:

  • 12 Tbsp melted butter
  • 1 Cup Brown Sugar
  • 1/2 Cup Sugar
  • 1 Egg + 1 Egg Yolk
  • 2 tsp Vanilla
  • 2 Cups + 2 Tbsp Flour
  • 1/2 tsp Baking Soda
  • 1/2 Cup Chopped Pistachios
  • 1/2 Cup Dried Cranberries
  • 12 oz (1 nestle bag) White Chocolate Chips

DIRECTIONS:

Preheat oven to 325*

In a microwave safe bowl, melt 12 Tbsp of butter. In a medium-sized bowl, mix together the butter and sugars until light and fluffy. Stir in the egg and egg yolk, ending with the vanilla. In another bowl, mix together flour and baking soda. Add the dry ingredients to the wet. Once just incorporated, add the pistachios, cranberries and white chocolate chips. Line a 9 X 13 baking dish with parchment paper, and spray a light dusting of nonstick spray. Press dough into an even layer and bake at 325* for 25-30 minutes. Or until the edges are golden brown. Let the cookie bars cool for at least 2 hours before cutting into your desired size. Store in an airtight container.

Filed Under: Nav Right

Rosemary Jam Thumbprints

December 16, 2011 by thethomehome

Rosemary Jam Thumbprints

Sticking your thumb into your cookie dough may not sound that appealing.   And for a germ freak like me, I am surprised I did not turn to a random kitchen tool to do the job. Do you ever see food at a gathering and wonder if that person is sanitary in their kitchen? Or am I the only one that pictures people licking their spoons to taste and continuing to stir.  I am probably the only one. Nevertheless, these thumbprint cookies are delicious, and worth wondering if the bakers hands were clean.   A crumbly, buttery, shortbread like cookie mixed with minced rosemary and the jam of your choice.  What are you waiting for?! Wash your hands, or at least your thumb, and get baking! =0)

INGREDIENTS:

  • 3 Sticks of Butter
  • 1 Cup Sugar
  • 1 tsp Vanilla
  • 3 1/2 Cup of Flour
  • 1/4 tsp salt
  • 1/2 Tbsp rosemary, minced
  • (2) 1/4 Cup Jam of Choice  (I used strawberry & apricot)
DIRECTIONS:
Preheat oven 350*
In a large bowl, cream together the butter, sugar and vanilla.  In a separate medium-sized bowl, mix together the flour, salt and rosemary.  Add the dry ingredients to wet, and then let chill in the fridge for 30 minutes.  Once dough has firmed up a bit, scoop 1 Tbs of dough, and roll into a ball.  Place onto a nonstick baking sheet with parchment paper.  Push your thumb into the center of the dough to form a well.  Using a spoon, or a pastry bag fill the well with your jam of choice.  Bake for 15-20 minutes.
Barely adapted from :

Jam Thumbprints Recipe : Ina Garten : Food Network

Filed Under: Nav Right

Chocolate Coffee Crackle Cookies

December 16, 2011 by thethomehome

Chocolate Coffee Crackle Cookies

9 DAYS TILL CHRISTMAS! Every household I am sure is bursting with the smells of holiday baking.  Sugar cookies were as far as I went last season.  Not sure why? Maybe because I was pregnant and exhausted, or I was afraid that I would consume every last cookie I made.  This year, however, has been a different story.  I have a few great cookies that I now know will be a yearly christmas treat.  These crackle cookies have an intense chocolate-coffee combo and stay chewy for days on end.  Watching the transition of a powdered sugar covered cookie ball turn into a festive crackle pattern was quite entertaining.  The secret to a great crackle is using granulated sugar prior to the powdered sugar-coating.  Omit the coffee if you’d like, and skip the granulated sugar step if you dare.  Either way these cookies are sure to please!

INGREDIENTS:

  • 4 Tbs Butter
  • 2/3 Cup Brown Sugar
  • 1 Egg
  • 4 oz melted, cooled chocolate chips
  • 1 tsp. Vanilla
  • 1/2 Cup of Flour
  • 1/4 Cup Cocoa Powder
  • 4 tsp Espresso powder
  • 1 tsp Baking Powder
  • Pinch of salt
  • 1 Tbsp Milk
  • You will need 1 cup of granulated sugar for rolling, and 1-2 cups of powdered sugar for the second coating.

DIRECTIONS:

Preheat oven to 350*

In a microwave safe bowl, melt the 4 oz of chocolate chips (do 30 seconds at a time until the chips have melted, do not overheat!) Let the chocolate cool.  In a medium-sized bowl, cream together the butter, sugar, and egg.  Add the cooled chocolate, and vanilla.  In a separate bowl, mix together the flour, cocoa powder, espresso powder, baking powder, and salt.  Add the dry ingredients to the wet, stir in the tablespoon of milk.  Let the dough chill for at least 45 minutes in the fridge.  Take approximately 1 Tbs of dough, roll into a ball.  Dip the ball into granulated sugar, and then generously roll the ball into powder sugar.  Place onto a non stick cookie sheet, with parchment paper and bake for 10-12 minutes.

Filed Under: Nav Right

Basement Facelift

December 14, 2011 by thethomehome

Basement Facelift

Our beloved wreck of a basement is finally getting it’s much-anticipated facelift. This room was a complete catastrophe when we first purchased our house and we tried our best to push the project off as long as possible. We were hoping to sell the house over the summer, and leave it up to the next owners to do what they wish with it. Of course, with this wonderful house market we had no luck selling and we were the lucky winners of this pricey project. We officially (and literally) broke ground in this project a few months back, having to tear out and re pour the concrete floor. This work was done by professionals, Dan’s father and his crew.

The basement when we bought the house, there was a HUGE crack going the entire length of the basement that we were ignoring. There was no working around it, so we had to replace the flooring.

The first place we started was the ceiling. It was a finished plaster ceiling, but because we wanted to run all new electric, we had to tear out a perfectly good ceiling.

The ceiling torn down

So, after tearing down the ceiling, we then had to figure a way to get rid of it. The first thought was to put it all in garbage bags and then put it on the tree lawn for it to be picked up (too easy). One scoop of the plaster in a garbage bag and it weighed nearly 20 lbs. We then realized we would need way to many garbage bags to get it cleaned up. So we had to think of a plan B…..

The Landfill - so gross.

After getting the ceiling out and driving it 40 minutes to the landfill, the next task was the floor itself. To take the floor out, we had Dan’s dad John, and two of his men tear it out with a jack hammer. Once the floor was out, we ended up replacing the sewer and all of the drainage to prevent any water back up. An issue that we have had pop up a few times since we’ve purchased the home.

the floor gone

Once the floor was out and all the new drainage was put in place, it was time to pour the new floor. The only way to get the cement into the basement was to buggy the cement up the driveway, then pour the cement into the chute through our tiny old basement windows. It was quite the task, and the guys worked so very hard to get it done for us, luckily Brody was home to supervise. :0)

Where we stand now is starting to do the stud work, running the new electric, putting in new glass block windows, and figure out a new fire-place idea (any suggestions?) We will be working on this project over the winter, and hope for it to be done by Brody’s 3rd birthday which is March 1, 2012. This is what the new floor looks like, excuse all the toys/tools all over the place. We have so many projects going on throughout the house everything keeps getting pushed from room to room!

the new floor

The new windows, and a sneak peek at the new lighting ( 6 new ceiling lights total ) love how bright the basement feels now!

Beginning of the stud work. We are always so taken back by John’s handy skills. So far things look great, tomorrow Dan and John will be starting the dry wall. With Christmas only weeks away, we have been really busy. And suddenly our boys have both given up on napping. Either they cannot relax because of the loud work downstairs, or we have boys with endless energy. So, to keep myself sane, I have been making tons of new cookie recipes to share with you and will be doing so today starting with two great treats. Stay tuned!

Filed Under: Our Life, Our Projects

Gingerbread Cake Truffles

December 6, 2011 by thethomehome

Gingerbread Cake Truffles

I know what you are thinking, “Cake truffles? These are just cake pops without sticks.”  Let me tell you, save yourself from buying the sticks and an aparatus to balance them in.  No sticks needed here! These cake truffles by Cooking Channels Kelsey Nixon are sure to be a hit at a holiday party.  I hardly tweaked the recipe, so use Kelsey’s for your guide –

Kelsey Nixon

Recipe courtesy Kelsey Nixon
Had to copy her picture, she is too cute.  If you haven’t watched her show, add it to your dvr list.  Her concept of teaching the “essentials”  helps provide a starting point for any beginner in the kitchen.  The only things I tweaked in the recipe were out of sheer laziness of not wanting to run to the store.  I used maple syrup instead of molasses.  For the frosting it calls for fresh ginger, and I used 1 tsp. ground ginger.  To top the truffles I used sprinkles, well, because they’re much cheaper than pistachios.  For Christmas I will up my cake truffle budget.  They still turned out delicious, but I will definitely use molasses next time to amp up the gingerbread flavor.  Make these ahead of time for Christmas, they stay fresh in the fridge for a few weeks, which makes prepping for a party 100x easier.  I doubled my batch, and ended up with nearly 90 cake truffles.  PLENTY for a crowd.  One bite, you will forget about those stupid sticks. 🙂

Filed Under: Nav Right

Tomato Soup

December 4, 2011 by thethomehome

Tomato Soup

The winter season is upon us, and in Cleveland it seems to be the longest stretch of the year. My mother always makes soup, she has quite a hand at making things taste just right, without needing a recipe. I however, am a recipe girl. I always have some type of source/sources, and tweak what I feel would suite us best.  This is the first time soup has been made in our house, I have never been a big fan of soup.  Maybe it is the slurping, or hunching shoulders as people scoop it rapidly into their mouths that turns me off.  But, my dear husband is a soup man.  So I took one for the team and made this for him, and I think I may have crossed over after tasting this. This tomato soup, is packed full of flavor, hearty, and the best part is the amount of time it takes to make.  If you chose to make it without the meat, it’s ready in 20-30 minutes.  With the meatballs, about an hour.  Get those spoons ready, I will close my eyes, SLURP AWAY!

INGREDIENTS:

  • 6 Carrots, chopped
  • 1 Large Onion, chopped
  • 4 cloves garlic, minced
  • 1/2 Tbsp Red Pepper Flakes
  • 1 Jar Marinara ( any kind, I used Trader Joe’s Tomato Basil )
  • 1 32 oz Container of Chicken Stock ( Or vegetable if you wanted a vegetarian soup )
  • 1/2 bag/box of a small pasta ( I used Orecchiette )
  • Fresh Basil to garnish
DIRECTIONS:
Heat a few tablespoons of Extra Virgin Olive Oil in a dutch oven, add carrot, onion and garlic for 5-10 minutes until onion is translucent.  Add the marinara sauce, chicken stock, red pepper flakes, salt and pepper to taste.  You can leave the liquid as is, since marinara sauce is so thick I took the marinara jar and filled it with water and added that as well.  Use your judgement.  Cover, and let simmer for 5 minutes, then stir in your pasta.  8 minutes later your pasta is done.  Tear fresh basil over soup, mix in.  If you choose to add meatballs, make them before you start the pasta, and cook them in the oven while making the soup.  Remove from oven, and add them to the pot.
  • MEATBALLS: Use 1lb, or less of ground beef.  Make your meatballs as you like, use whatever recipe you have, just make them smaller.  I never measure while making meatballs so I apologize.  We use bread crumbs, salt, pepper, dried oregano, dried rosemary, garlic, and 1 egg to bind.  Roll approximately 1 tsp of meat into a ball, place onto a baking sheet lined with foil, bake meatballs for 20-30 minutes at 350*

Barely Adapted : Recipe courtesy Giada De Laurentiis

Filed Under: Nav Right

Shut The Front Door! Apple _____?

November 30, 2011 by thethomehome

Shut The Front Door! Apple _____?

Shut the front door! Those are the words I murmured as I watched this beauty bake in my oven.  And the same thought came to mind as I was tempted to lock myself away in my house and eat this entire dish.  I have made apple crisp for years, and have never stuck to a recipe, always just made it up as I went.  Which, unfortunately, always led to mixed emotions on the results.  AND THEN THIS.  Not sure whether to call it a tart, or a pie, or apple crisp, but whatever it is, it rocks! The boys and I took a trip to our local fruit farm (pattersonfarm.com) this week which is a must if you are ever in the area.  We love going, their produce is perfection, and their bakery makes you want to tackle your way to the front of the line like it’s black friday.  Our usual items we pick up are their apple fritters (they’re HUGE), apple butter, fresh kettle corn in the fall, and of course bags of apples.  This trip I was out to just grab a bag of apples, and their pink lady apples were beyond crisp and tart, just what I needed.  We headed home, and Brody was upset that we did not see any animals at “the farm” so a few tears and a tantrum later, we made it home to bake.  I wanted to do something different, I was so sick of not being pleased with my crisps in the past.  So, I combined all of my favorite things about apple desserts into one dish.  Making the sugar cookie tart, and letting it cool is likely the most “time-consuming” part, other wise the rest is a breeze.  I had to give more than 1/2 of it to relatives to keep us from eating the whole thing.  Put this on your must bake list!

INGREDIENTS:

Sugar Cookie Tart Crust:

  • 1 Cup room temperature butter
  • 2/3 Cup Sugar
  • 2 1/2 Cup Flour
  • 1/2 tsp Salt
  • 4 Tbsp Milk
  • 2 tsp Vanilla

Filling:

  • 6-7 Medium Sized Apples, Peeled and sliced into thin inch wedges
  • 3/4 Cup Sugar
  • Zest of 1 Lemon & the juice of 1/2
  • 2 Tbsp Flour
  • 1 tsp Cinnamon

Crumb Topping:

  • 3/4 Cup Flour
  • 1/3 Cup Brown Sugar
  • 6 Tbsp Butter (cold)

DIRECTIONS:

Preheat Oven to 400*  For the crust, cream together the butter and sugar until light and fluffy.  Mix in the flour, salt, milk and vanilla until it is crumbly.  When you pinch the dough it should stick together.  Place in your non greased tart pan and bake for 15-20 minutes or until edges appear set.  Let cool while you prepare the filling.  LOWER YOUR OVEN TEMP. TO 350*.

Filling : Peel and slice the apple into thin wedges.  Place in a large bowl, and pour in the sugar, lemon zest and juice, flour and cinnamon.  Mix with your hands and set aside.

Crumb Topping: In a medium bowl, mix together the flour, brown sugar, and butter with a fork until it resembles wet sand, with pea size crumbs.

Once tart has cooled, take about a TBSP. of butter and coat the cookie tart.  This will help the cookie crust from getting soggy from the apple juices while baking.  Pour the apples over the crust.  I left an edge, but feel free to cover it completely if you like.  Pour the crumb mixture over the top and bake @ 350 * for 30-40 minutes or until golden brown.  Check on it half way through baking, if you notice the edges are getting brown fast, tent the edges with foil to protect them.

I placed my tart pan on an upside down cookie sheet for two reasons. Easier removal of the tart, and my oven has been fairly aggressive lately and I did not want the tart to burn!

Leaving an edge on the tart turned out to be a lovely bonus at the end. Pick up the crust and dunk the cookie crust into milk. Amazing!

Source : Sugar Cookie Tart Crust  (I doubled the recipe for my tart pan)  Filling/Crumb Topping was a combination of experience and research.

Filed Under: Nav Right

A Thome Thanksgiving Weekend

November 28, 2011 by thethomehome

A Thome Thanksgiving Weekend

I hope everyone enjoyed their holiday this past week!  We had a wonderful time at our Aunt’s house, where we have been going for Thanksgiving for years now.  Both Dan and I come from fairly large families.  Both of our grandparents are blessed to have TONS of grandchildren, with a list of great-grandchildren that is forever growing.  So, I must say, every holiday is extra special to see all the generations together, continuing traditions, and creating new ones as the years go on.  For the first time this year, Dan and I decided it would be a nice tradition to cut down our tree the day after.  As soon as the kids woke up on friday, we were out the door.  We made a quick black friday stop to pick up a christmas present, then googled the directions to the tree farm only to realize that it did not open until 1! UGH! It was then 8 am, and we had HOURS to kill with the kiddos.  Needless to say we managed, continued the christmas shopping, and even received VIP treatment at chick-a-fila after a Kohls visit, which cracked us both up.  This was the first time in 7, yes, 7 months that we sat down just the four of us, in any food joint to eat with the kids.  Brody is prone to tantrums these days, and Owen is always wanting to nurse, so we would rather cook fresh food and stay home! Maybe we’re like shut-ins, never leaving the house to eat, but we were shocked that a fast food place delivered our food to our booth, gave the kids place mats, refilled our drinks, and supplied mints before we left.  We just about died laughing, saying it was the most romantic date we’ve had in ages.  Five hours later of killing time, we were ready to roll.

“To the forest” our dear Brody was saying as we drove to the tree farm.  He was so excited to watch Dad cut the tree down.  Dan grabbed the saw and the sled, and was shaking his head as he walked over to get me and the boys.  “You don’t even want to know,” he said, “it has been open since 8am.” Just goes to show, call ahead, and do not rely on the internet alone!

Brody was overjoyed when he saw Dan get the sled to pull him on our tree hunt.  Okay, now, these fields are HUGE, and with dragging the kids around town for 5 hours we wanted to make it short and sweet.  Last year, the tree we cut seemed perfect until we got it home and could hardly get it inside our house.  It was massive, and took up way to much space in our living room.  This year, our goal was to not focus on the size as much, just to pick a pretty tree that has great shape, color, and no holes.  Thirty minutes later, we found it, and Dan got to have a lumber jack moment and cut the tree down.

It turned out to be a beautiful day, we almost lost the tree on the car ride home (classic) and pulled over to make some adjustments.  Got it home and realized our tree was super short.  Not sure how we missed that …

OH GOSH, this is too funny.  It looks like Brody could be taller than our tree by Christmas.  Like the new paint color? We love it, more pictures to come.  After decorating the tree and seeing it untied, we have actually grown fond of our short and stumpy tree.  It has personality.

We have more decorations we would like to add, I’m sure I’ll be at Target sometime this week and make it happen.

And the grand finale to our weekend, Brody’s first experience ICE SKATING! We have been anticipating this moment since we found out we were expecting.  Long story short, the Thome family, (my husband and his sisters) were born and raised in a hockey world.  Dan kicked it off starting at 5, and his sister Kristi started at 9.  They both played throughout highschool, travel teams etc.  Kristi even went to college on a hockey scholarship which I think is so cool.  Dan is OBSESSED, his love for the sport is indescribable.  It’s a special bond between his family that dan is eager to pass on to our boys.  I am not a big sports person I must admit.  I do not have the attention span to sit for that long to watch any game, but hockey has grown on me quiet a bit.  So, getting Brody in skates and watching his face light up, had to be one of the best moments we’ve shared as parents with Brody.  He was smitten by the experience, and Dan just glowed.  He was so proud of his boy.  We just might be at the rink every sunday until Brody is old enough for skating classes.  Our little “rink rat” lifestyle has officially begun. =0)

Actually teared up a little at this moment, it was so sweet to see Dan share this moment with Brody.

He stood right up on single blades, (pretty big deal for a 2 1/2-year-old not using double blades)

We went with Aunt Kristi (middle) and friends, Brody was a little taken back at first.

Dan took off skating really fast, holding Brody’s hands, and I, being a mom panicked and tried banging on the glass to tell him to slow down.  Glad no one was around because when you watch a hockey game, and the fans are banging on the glass it seems so effortless.  I think I may have broken my hand trying to get their attention, haha.  Surprisingly Brody did not cry, his face just beamed of excitement.  I then had to come to terms with the fact that my sweet little Brody will one day be checking people into the boards, and may even be missing teeth by the time he gets into college.  Even though that makes me cringe, he was such a natural and my little man was so proud of himself, as we were of him!

Aunt Kristi and Dad were showing off their fancy stops and skating skills, Brody was impressed and kept telling them to make more snow when they stopped and ice sprayed in Brody's face. Too funny to watch!

Few more years Owen 🙂

Look at that grin! On both their faces.  Such a great day, we will forever remember this weekend.  We Cannot believe Brody will be 3 years old come March, every day, every minute we fall even more in love with this little man.  It’s moments like these that we hope our boys will remember.  Most parents say they want to freeze time, that their kids are growing up too fast.  I agree, but watching Brody grow from baby to “big boy” in what seems like seconds, has been the most amazing time in our lives.  Owen has added such a flare to our family, and we cannot wait to watch these Thome brothers rock our world!

Filed Under: Our Life

  • « Previous Page
  • 1
  • …
  • 64
  • 65
  • 66
  • 67
  • Next Page »

LETS BE SOCIAL

  • Email
  • Facebook
  • Instagram
  • Pinterest

Articles

Categories

Archives

Heinens

Visit The Thome Home 's profile on Pinterest.

Recent Posts

  • Pork Schnitzel
  • It’s time to book your vacation with Oasis Vacations!
  • Oasis Vacations at Ocean Isle Beach, North Carolina
  • JUS-ROL Crescents
  • Back to School Safely
  • Chicken Tender Charcuterie Board
  • Lillie’s Q Spicy Cheddar Sausage Pizza Bagel
  • Max’s Bedroom

Copyright © 2025 · Tasteful theme by Restored 316