• Home
  • About
  • LIFE
  • HOME
  • FOOD

The . Thome . Home .

Oatmeal Banana Muffins

November 22, 2011 by thethomehome

Oatmeal Banana Muffins

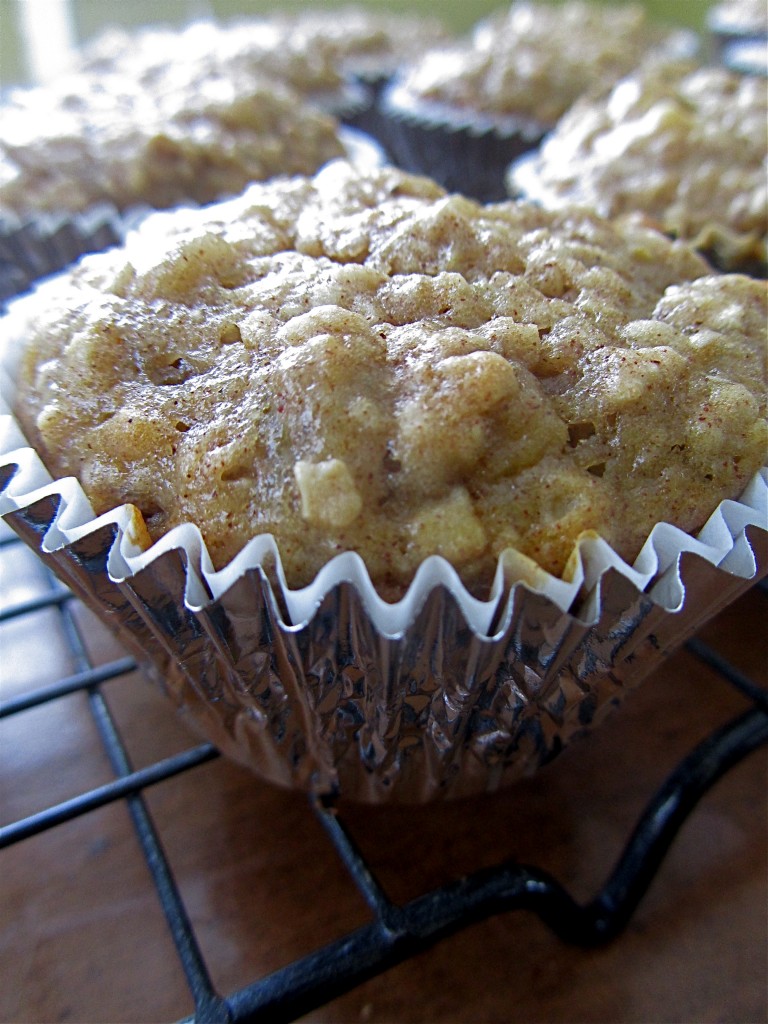
Okay, so it has been a while since I’ve posted a recipe, and I apologize.  Things will be back on track this week.  The recipes I am posting this week are wonderful.  We have been avoiding the grocery store this week, and trying to use up as much of our pantry as possible before the holiday weekend.  Pantry staples I am sure vary household to household.  In our house, oatmeal is in constant rotation.  Brody can slam two packs in a sitting,  and when it comes to quick oats, putting them in muffins or bread adds great texture.  These muffins came about when our bananas were beyond freckled.  Poor things were forgotten about on the counter, and as I was walking them to the garbage I could not find it in myself to waste them.  So, here is the result, a delicious muffin, so moist and packed full of flavor.

INGREDIENTS:

  • 1 Cup Flour
  • 1 Cup Oats
  • 1 tsp Baking Soda
  • 1 tsp Baking Powder
  • 1 Egg
  • 1 tsp Cinnamon
  • 3/4 Cup sugar
  • 1/3 Cup Melted Butter
  • 1 1/2 Cup Mashed Bananas (3-4 bananas)

DIRECTIONS:

Preheat oven to 325*

In a medium size bowl, mix together the mashed bananas, egg, melted butter and sugar.  Add flour, baking soda & powder & cinnamon.  Lastly, incorporate the oats.  Pour into cupcake liners, and bake for 20-25 minutes.

Slightly Adapted from: Oatmeal Banana Muffins

Filed Under: Nav Right

Where It All Stands …

November 17, 2011 by thethomehome

Where It All Stands …

This is our home at the moment.  For some reason we feel like we are standing naked in front of you all and ready to be critiqued.  We by no means are professionals at what we do, in the decorating world or in the cooking world.  We do, however, love everything about it and do our best at it.  You may not like what we’ve done with our house, but that’s okay, you’re not living here :).  These past two years have been a whirl wind for us.  Adding another addition to our family, (Owen), and finishing up our house to put on the market, we feel like we haven’t stopped.  Now that were staying, we feel so much more at ease and excited for you to join us as we complete every last thing on our house bucket list! Here is where we stand …

Front Of Our Home:

Goodbye Bushes ...

KITCHEN:

 Our Nook, we love this area, but we NEVER use it.  Therefore, in the next few weeks we have a few ideas up our sleeves… stay tuned. 🙂

We are slightly embarrassed by this photo.  Between the random fake flowers above our cabinet that we used to stage our house with when it was up for sale, and the army of crap above our fridge, this is just an example of the main thing we struggle with.  STORAGE SPACE! We even added more cabinetry to what we originally had in this space.  Either we do not have enough space or we are turning into hoarders.

Downstairs BATHROOM:

Simple-

DINING ROOM:

Our dining room one week ago

We've learned over the past two years that we have been gravitating more towards cool colors, rather than the warm colors we chose in many of our rooms.

We just painted this last week, yes ladies, girls can paint too! We need art work, light fixtures etc. New window treatments will be the bigger project, for I have been researching “DIY curtains” and will be tackling them shortly once I find the perfect fabric.

LIVING ROOM/FAMILY ROOM:

Our living room, or we call it our family room, is definitely the space in the house we utilize the most.  Until that is, our basement is complete.  And since paint was on sale a few weeks back, of course we picked up two more gallons to repaint the room and hallway.  These were the contenders…

The left contender won, we labeled the shades with their initials, if you’re wondering what the “UG” & “L” were, some visitors thought we were writing ugly. Haha…

Our fireplace looks the exact same, besides seasonal decor.  We are still trying to find that perfect piece for the wall.

SUNROOM:

Clearance french doors, thank you Home Depot

This sunroom was completely gutted just a few months before Owen was born.  We tossed around many ideas as to what the purpose of this room will be, and to be honest, we still do not know.  For now, it is simply an office.

UPSTAIRS BATHROOM:

We've painted this room 2x, and still do not like it. The lighting is off in this picture, it is a very soft neutral color. Spring project 2012 is redoing the tiling, and painting. It should probably be our new years resolution to LEARN how to tile first. Haha.

BRODY’S ROOM:

I'm painting his dresser this week, excited to share the results.

Owen’s Room:

Our Room:

“This is where the magic happens..” HAHA.  Anyone who grew up watching MTV Cribs? Had to say it..

His and Her closets which is nice, even though Dan could probably use mine, he has quiet the wardrobe.  I think I have lived in maternity/post maternity clothes for 4 years.

BASEMENT:

Our BIG project, just had the cement floors poured, and the electrical work is being done.  We will do a another post dedicated to our basement.

So, overall, our house is being turned into a home.  Now that we have lived here we are figuring out our “style” and changing just about everything, or at least adding to it.  We are definitely learning as we go, and trying to figure out what fits us best.  Being young, and with kids, we need our house to be functional and fun.  We’ve found our style tends to be more traditional, but with a slight twist.  We are so excited to find art work, window treatments, more furniture, and customize the rooms even more.  So far so good!

Filed Under: Our Projects

Granola Bars

November 14, 2011 by thethomehome

Granola Bars

These granola bars are a great to keep around as a ready to grab snack in your house. We make these every week, and I am not ashamed to say I graze on these throughout the day.  The great thing about this recipe is it’s versatility with ingredients.  The original recipe called for an entire stick of butter, and I used applesauce instead.  Feel free to swap the type of nut you use, or raisins instead of cranberries, even white chocolate chips instead of dark chocolate.  The options are endless.  Mix it all by hand, all in one bowl.  Love that! Hope you enjoy these as much as our family does!

INGREDIENTS: 

  • 2 Egg Whites
  • 1/2 Cup Peanut Butter (crunchy or smooth)
  • 1/3 Cup Brown Sugar
  • 1/4 Cup Honey
  • 1/2 Cup Applesauce (plain or cinnamon)
  • 1/4 Cup chopped Almonds
  • 1/4 Cup Dried Cranberries
  • 1/4 Cup chopped Dark Chocolate
  • 2 Cups Old Fashioned Oats
DIRECTIONS:
Preheat oven to 350*
Spray an 11×7 baking dish.  Line the dish with parchment paper, allowing enough for 2 to 3 inches to hang off the sides for an easier removal of the bars.
In a large bowl, whisk the egg whites until they are light and frothy.  Stir in the peanut butter, brown sugar, and honey.  Add your applesauce, along with the almonds, cranberries and dark chocolate, stir until incorporated.  Add the oats just until combined, do not over mix.
Pour into the baking dish, pressing down to make an even layer, and bake for 15-20 minutes, or until the edges are a nice golden brown.  Let the granola bars cool for at least one hour before you cut them.  Store in an airtight container and enjoy!
Slightly Adapted From: Giada at Home

Filed Under: Nav Right

Pumpkin Doughnuts

November 9, 2011 by thethomehome

Pumpkin Doughnuts

These doughnuts are to die for! Everything you love about the season all rolled up into one sweet dough.  The warmth of the pumpkin pie spice, and the cake like texture of the doughnuts are an amazing pair.  I have made this very recipe a few times, once with dairy, and the other with dairy substitutes (almond milk..etc) both have turned out great.  My favorite piece of this recipe was the time I spent making them.  Brody is always by my side when baking and cooking.  He has a specific chair he pulls up to the countertop in excitement, and always says either “Mom, what you making?” Or my favorite, “Okay now we need…” As I list off what ingredient comes next.  He melts my heart, and I encourage every parent to cook with their children.  Yes, I had a two year old AND a kitchen floor covered in flour, but it is so worth it when he gets to see the end result of what HE made.  We will definitely be coming up with seasonal inspired doughnuts in our house from now on!

INGREDIENTS: 

For the Doughnuts…

  • 3 1/2 cups all-purpose flour
  • 4 tsp baking powder
  • 1/2 tsp baking soda
  • 1 tsp salt
  • 1 Tbsp pumpkin pie spice
  • 1 tsp cinnamon
  • 1 cup sugar
  • 3 Tbsp butter at room temperature/or dairy free butter.
  • 1 large egg
  • 2 large egg yolks
  • 1/2 cup buttermilk/or vanilla almond milk
  • 1 cup pumpkin puree
  • canola oil for frying.
For The Icing…
  • 1 cup powdered sugar
  • 2 Tbsp milk/or vanilla almond milk
  • 1/2 tsp cinnamon
For The Sugared Doughnuts…
  • 1/2 cup sugar
  • 2 tsp cinnamon
DIRECTIONS:
First you make the dough.  Whisk together the flour, baking powder, baking soda, salt and spices into a bowl.  In another bowl, with an electric mixer, mix the sugar and butter until it is combined.  Mix in the egg, and two egg yolks until incorporated.  In a measuring cup, put the pumpkin puree and milk, whisk together until smooth.  With your mixer on low, add the dry ingredients in three batches, alternating with the pumpkin mixture, and ending with the dry.  Once mixed, cover with clear wrap and let sit in the fridge for 3 hours, or overnight.  You want the dough to be firm.
On a floured surface, roll the dough into a circle approximately 1/2 inch thick.  Use a circle cutter, 3 inches, or a plastic cup similar size, with the edge dipped in flour to cut your doughnuts circles.  Use a smaller circle cutter to cut a hole in the center, these will be the doughnut holes.  I put all the doughnuts onto a baking sheet, so I could keep them on the stove top for an easier reach while frying.
Add canola oil to a large saucepan, or a dutch oven, you want the oil 2-3 inches deep. Heat the oil over Medium heat, if you have a thermometer you want it to reach 365-370*.  I did not have one handy, so I simply waited about 10 minutes and dropped a doughnut hole to test if the oil was ready.  The oil should be hot enough to create bubbles almost instantly around the dough, causing it to float.  Do the doughnuts in small batches, they will take 3-4 minutes total to cook, turn over once until golden brown.  Give the oil a minute to come back to temperature between batches.  Remove doughnuts with a skimmer, or slotted spoon, and put on a wired rack covered with paper towel to soak up any excess oil.
The doughnuts you chose to cover in the spiced sugar, do while doughnuts are still slightly warm.  The glaze, you can do once they have cooled more.
Slightly Adapted from:
Pumpkin Doughnuts » Annie’s Eats  Originally from: Bon Appétit  | October 2004

Filed Under: Nav Right

Where It All Began …

November 7, 2011 by thethomehome

Where It All Began …

Three years ago Dan and I were in a bit of a pickle.  We were expecting our oldest son Brody, and we had to figure out quickly whether or not we wanted to continue renting, or “grow up” and take the plunge into purchasing a home.  Well, courageously and gracefully my in-laws took us under their roof until we came to a decision.  We knew fairly quickly we wanted to buy, it was just finding the right home.  It took us a year total, looking in every city imaginable besides the one we were living in.  Only to go looking at Christmas lights one evening with Brody and pulled into the drive of this colonial home that needed some TLC.  Tis’ the season right? Of course we wanted it, the minute we pulled into the driveway it just felt right.

The next day we looked at it with our realtor, and the most important deal breaker opinion of them all, Dan’s father John.  John has years of experience as a general contractor, and was a HUGE factor in helping us flip.  We took a deep breath when we opened the door, knowing it had been empty for at least 2 years.  It was exactly what we expected – OLD OLD, GROSS, and OLD.  What were we thinking wanting to buy a home that needed so much work when we had a little one? We made sure to remember that it was the bones of the house that mattered most, and the potential of what it could be.  We knew we could do it, and with Dan and John ready to roll up their sleeves, we purchased the home that very week and got to work just weeks following.

Here are some pictures of what the house looked like when we first purchased it, and the work we did along the way …

KITCHEN:

Original Game Plan : Paint cabinets & lay laminate.

SURPRISE! There was mold behind the sink & cabinets so everything had to go. Including our next pay check to purchase cabinets that we had not budgeted! Ah!
Once the dry wall was up, our new cabinets were painted and put into place.  The countertops we chose were cheap and simple, yet another item on our replace list. The paint color we chose we were completely unsure about at first, so glad we kept it, we still love it.

We laid new laminate flooring, that does not match our original hardwood floors (we know).  At the time we preferred laminate over tile, and it has worked out great with the kids, easy to keep clean!

The kitchen was renovated from floor up practically, so no need to ramble about the details!

DOWNSTAIRS (DINING ROOM/LIVING ROOM/SUN ROOM):

Our dining room, wish we would have known how much Brody would grow to love golf, would have kept the turf.

The living room, the bay window had us at hello.  We had to paint, tear up carpet, fix outlets, and lighting.

The green carpet was the least of our worries after we pulled a corner up to find original hardwood underneath.  HAHA.. Well, as the tug of war began we came to find this wonderful layer of glue/padding/practically cement laying underneath the rest of the dining room, living room, and hallway stairs.  Nevertheless, we were determined! Soaking and scraping by hand until our knuckles were bleeding! So dramatic I know, but it was a PAIN!!…

Almost there…

Much better.

The rest of the living room work to do, was paint.  The woodwork had to be painted 3x throughout the entire house because it was all oil based paint.  The walls were easy, we had a blank canvas downstairs.


And then we had our sun room, these pictures are so strange to look at.  We kept it this way, for a year, threw a curtain over the door so we could try to forget it was there! We were afraid to tackle it, knowing what a project it would turn into.  Now that it is done, I cannot believe it’s the same room!

When we were ready to start, Dan stripped down the ENTIRE room.

One fine sunday afternoon while I was working, Dan called me from Home Depot, all excited that he found these french doors on clearance that would look great in our sun room.  Anyone who knows me, sales are just my thing, and something I can RARELY pass up.  Of course I said yes, however, I, for some reason thought they were going in the entry way from the dining room to sun room.  Then I came home to this …

I was not a happy girl, if I do recall, Dan got an earful of confusion from me at first. Comments like, “Oh great, so it’s going on the back of the sun room? For what? Guests to open the doors and jump out into our backyard?” Only to be reassured that a deck/patio would be in the near future.  Just another project on our list =)

Never noticed how the snow had melted by the time we got the doors in, so funny.  Just goes to show how we do things, with two boys, and a very helpful father, we do things when we can! We ended up doing flooring, electrical, dry wall, lighting, paint, carpet, and heating.

1/2 BATHROOM:

We love this little bathroom, we always joke with our guests to use the airport bathroom.  Where you can go to the bathroom and wash your hands at the same time. Tiny, but a convenient first floor bath.

We kept the sink, and then dry walled select areas, painted, replaced the mirror, flooring and toilet.

UPSTAIRS: ( 3 bedroom, 1 bath)

Going up … We tore the rest of the carpet up, and painted the entire landing upstairs.

Brody’s Room, we painted, and replaced light fixtures.

Our Bedroom, we painted and replaced light fixtures.

Owen’s Bedroom, we painted and replaced light fixtures.

HAHA. Our bathroom, there is a handle incase anyone needs to jump out the window to spare themselves from staring at these curtains! In this room, we painted, replaced the floor, electrical, vanity, mirror, toilet and select tiling on the wall.

BASEMENT:

This is how the basement looked when we purchased the home.  It is currently our main project that we are breaking down slowly but surely.

Okay folks! So that is where it all began.  Hate to leave it all on a cliff hanger, but over the past two years we have re-decorated SO many times that we would bore you with all the pictures.  So, stay tuned.  We will be posting our current home tour pictures this week, to fast forward you to where we stand today.  Our style is forever evolving, we even repainted our dining room this evening.  OOPS.  We cannot stop, and we wont!

Filed Under: Our Projects

Apple Cinnamon Rolls

October 30, 2011 by thethomehome

Apple Cinnamon Rolls

There is something to be said about waking up in the morning to a breakfast out of the ordinary.  In our home, we are always running out the door, so our meal usually consists of waffles, cereal or oatmeal.  When Dan and I share a day off together though, we love to make breakfast special.  Whether it’s going out eat with the grandparents, or stirring up Brody’s morning favorite, pancakes.  Now, these too are becoming a special request in my household.  One that I now make extras of to surprise family members with.  It is not a “make on the run breakfast”, but make the day ahead and you’ll be rolling out of bed and running to the counter!

P.S. I have made this recipe with Soy milk, and Soy butter and both have turned out scrumptious for those with milk allergies. 🙂

INGREDIENTS:

DOUGH:

  • 1/4 – ounce package of yeast
  • 1/2 cup warm water
  • 1/2 cup scalded milk
  • 1/4 cup sugar
  • 1/3 cup butter
  • 1 tsp salt
  • 1 egg
  • 3 1/2 to 4 cups of all-purpose flour

APPLES:

  • 3 Granny smith apples
  • 1 tsp cinnamon
  • 1/8 tsp nutmeg
  • 2 heaping spoonfuls of brown sugar, additional for bottom of pan
  • 2 Tbsp orange juice
FILLING:
  • 1/2 cup melted butter
  • 3/4 cup sugar
  • 2 Tbsp cinnamon
DIRECTIONS:
Preheat oven to 350* F
In a bowl, dissolve the yeast in the warm water.  In a large bowl, mix together milk, sugar, melted butter, salt and the egg.  Add 2 cups of flour until combined, add the yeast mixture, and then the additional flour until it reaches a consistency that it easier to work with.  Heavily flour your work surface, and knead the dough for 5 minutes.  Place the dough in bowl that is greased with butter or cooking spray, cover with clear wrap and let it rise for 1-1/2 hours. It will double in size.
In the  meantime, peel and cube the granny smith apples.  Bite size pieces, approximately 1/4 inch cubes. Place in a sauce pan over medium heat.  Add cinnamon, nutmeg, brown sugar and orange juice and let it simmer until apples tenderize.  (About 20 minutes) Turn off the heat and let the apples cool in another bowl.
When your dough is ready, roll it out on a floured surface.  If you do not have a rolling pin, no fear, I couldn’t find mine and took out my clear wrap roll and used that! Roll into a large rectangle approximately 1/4 inch thick, no need to be exact.  Spread the melted butter all over the dough, sprinkle the cinnamon and sugar on top.  Scatter the apples leaving the juices from cooking in the bowl, leave an inch border without apples.  Roll up the dough and pinch the edges shut.  Cut into slices, it will make 12-15 rolls.
In a greased baking pan (2 circle cake pans), use the juices from the apples and add to the pan, sprinkle a few pinches of brown sugar.  Add rolls, placed close together, and let rise a second time for 30-45 minutes.  Bake for 30 minutes, or until the edges are golden.
For a glaze mix 2 cups powdered sugar, 1 Tbs cinnamon, 3-4 Tbs milk, until you reach the consistency you prefer.  Pour over warm rolls.
Source: Slightly adapted from Recipe courtesy Paula Deen

Filed Under: Nav Right

Via Coffee Brownies

October 28, 2011 by thethomehome

Via Coffee Brownies

Hi my name is Abby, and I am a starbucks addict. This slight problem of mine started five years ago when Dan and I lived in Columbus, Ohio and I worked at Starbucks during the mornings before my shift at a salon. Some may have thought I was crazy to of worked at 5 am, only to work until 9pm at night, but an addict will do anything for free latte’s! These brownies are something I came up with when I stumbled across a packet of Via Carmel Coffee in my cupboard. Coffee instantly enhances the flavor of chocolate and these brownies will wake you up with just the smell! Easy recipe, amazing results!

INGREDIENTS:

  • 8 Tbsp butter
  • 8 oz milk chocolate chips (nestle)
  • 4 oz semi sweet chocolate chips (nestle)
  • 2 large eggs
  • 1 1/4 cup sugar
  • 1/2 tsp salt
  • 1 cup flour
  • 1 package of via coffee, any flavor, I used carmel.  If you do not have Via coffee at hand, use 3 Tbs of espresso powder.
DIRECTIONS:
Preheat oven to 350* F. Line a 11×7 dish with parchment paper and coat it with butter or a nonstick spray.
In a microwave safe bowl, put all the chocolate chips in and the butter cut into cubes. Place in your microwave for 30 seconds at a time until completely melted.  It took 3x for me, make sure to stir well after each time, little bits will melt once stirred and you do not want to overheat the chocolate.  Set aside.
In a seperate bowl, whisk together the eggs, sugar, salt and via coffee until combined. Mix in warm chocolate until incorporated.  Add in the flour and stir until it is all combined, do not worry about small lumps.
Pour into a 11×7 dish, spread into an even layer.  Bake for 35-40 minutes or until a toothpick comes out with few crumbs attached.  Let the dish cool on a wire rack, at room temperature for approximately 2 hours.
Cut into desired size, and store in an air-tight container.
Source: Inspired by
Chewy, Fudgy Triple Chocolate Brownies » Annie’s Eats

Filed Under: Nav Right

Our Story

October 27, 2011 by thethomehome

We’re Abby and Dan Thome, married for two years with two wildly entertaining little boys Brody and Owen. We live in a suburb of Cleveland, Ohio. Dan is a sales consultant, and I am a hair stylist who is currently taking on the role of stay at home mom. My love for baking and cooking is a passion that started a few years back, and has snowballed ever since. Dan and I purchased our first house together two years ago, an old house that needed a ton of work. We intended on flipping the house, staying for a few years and selling. Well, we fell in love with our flip, and plan on raising our boys in the house we put so much heart into. So here we are, two years later and ready to roll up our sleeves again and tackle every project we would have done if we knew we were staying! This blog, were hoping, will one day be a modern “baby book” for our boys to look back on. To document our projects, keep track of mom’s recipes, and funny stories of their lives growing up. We invite you too, to be a fly on the wall, in The Thome Home.

Filed Under: Our Life

  • « Previous Page
  • 1
  • …
  • 65
  • 66
  • 67

LETS BE SOCIAL

  • Email
  • Facebook
  • Instagram
  • Pinterest

Articles

Categories

Archives

Heinens

Visit The Thome Home 's profile on Pinterest.

Recent Posts

  • Pork Schnitzel
  • It’s time to book your vacation with Oasis Vacations!
  • Oasis Vacations at Ocean Isle Beach, North Carolina
  • JUS-ROL Crescents
  • Back to School Safely
  • Chicken Tender Charcuterie Board
  • Lillie’s Q Spicy Cheddar Sausage Pizza Bagel
  • Max’s Bedroom

Copyright © 2025 · Tasteful theme by Restored 316