• Home
  • About
  • LIFE
  • HOME
  • FOOD

The . Thome . Home .

Family Room Makeover with Sheely’s

July 21, 2020 by Abby Thome

Family Room Makeover with Sheely’s

This post is in collaboration with the incredible Sheely’s Furniture. As a Brand Ambassador I will be showcasing a few makeovers to give you all ideas on how to transform your home with everything you need from Sheely’s!

I have some exciting news to finally expand on!!

Earlier this year I spoke about how I was chosen to be a the Brand Ambassador for Sheely’s Furniture, and I just about fell out of my chair. To be honest – I cried, happy tears. It was a year long process of being “looked at”, and I really did not think in a million years I would be chosen. When I received the call that I wast the blogger chosen, I thought I was being pranked. Waiting for Ashton Kutcher to jump out and tell me I’ve been punked!

I am beyond honored to showcase Sheely’s and all that they have to offer!

So, what does this mean? Well, my friends – if you have not heard of Sheely’s yet – I’ll be doing some introductions over the next few months. I’ll tell you all about how they are family owned for over 60+ years and they ooze old-fashioned superior customer service, that will leave you wondering why you shop anywhere else. Their staff is highly knowledgable, and they are immensely detailed on executing your order and ensuring it is perfect from shipping to your doorstep. From appliances, mattresses, outdoor furniture, decor, furniture and more – Sheely’s has it all!

Sheely’s is located in North Lima, Ohio – and a second location opening up at The Shops at Marketplace in Aurora! So locals, get ready to shop till you drop!!

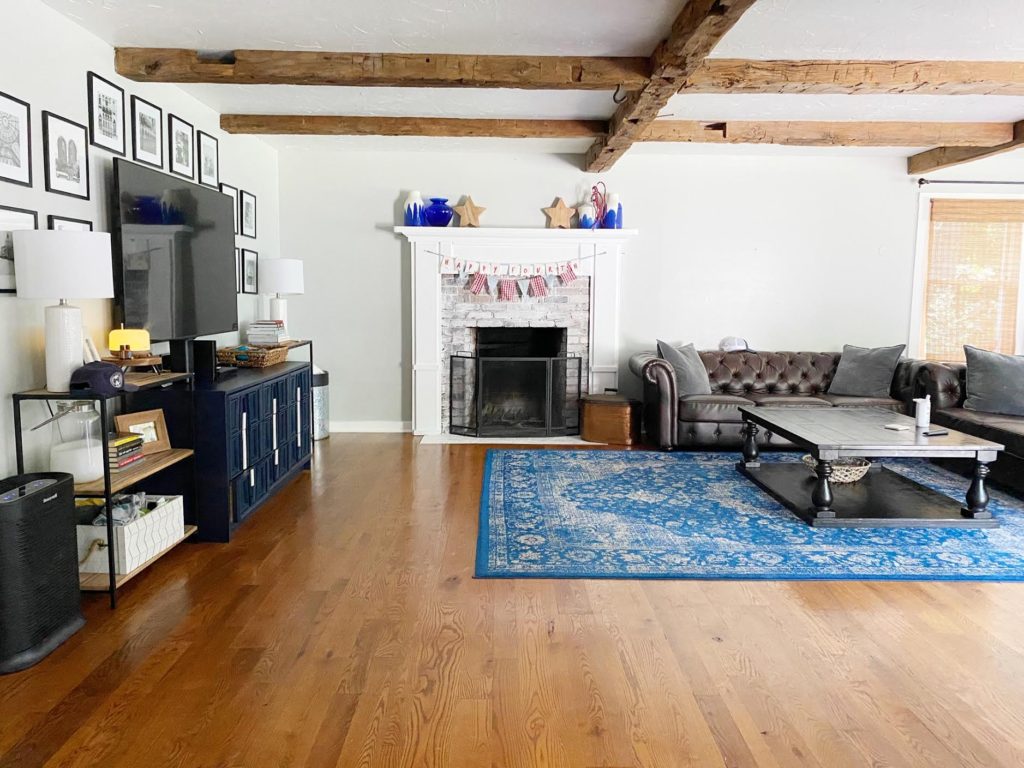
We are currently working on two amazing projects with Sheely’s, first one up is our family room makeover. Yes! The massive room with the amazing ceiling beams.

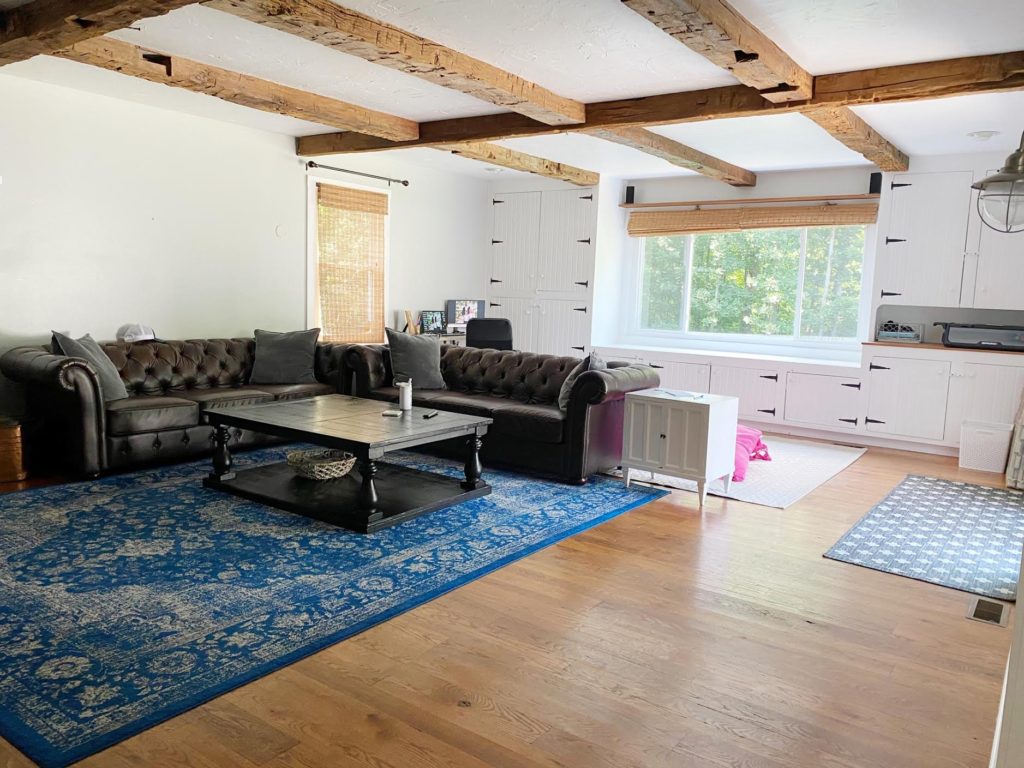
This space has always stumped me, as it is a very large room, with an off centered fireplace and more space than I know what to do with.

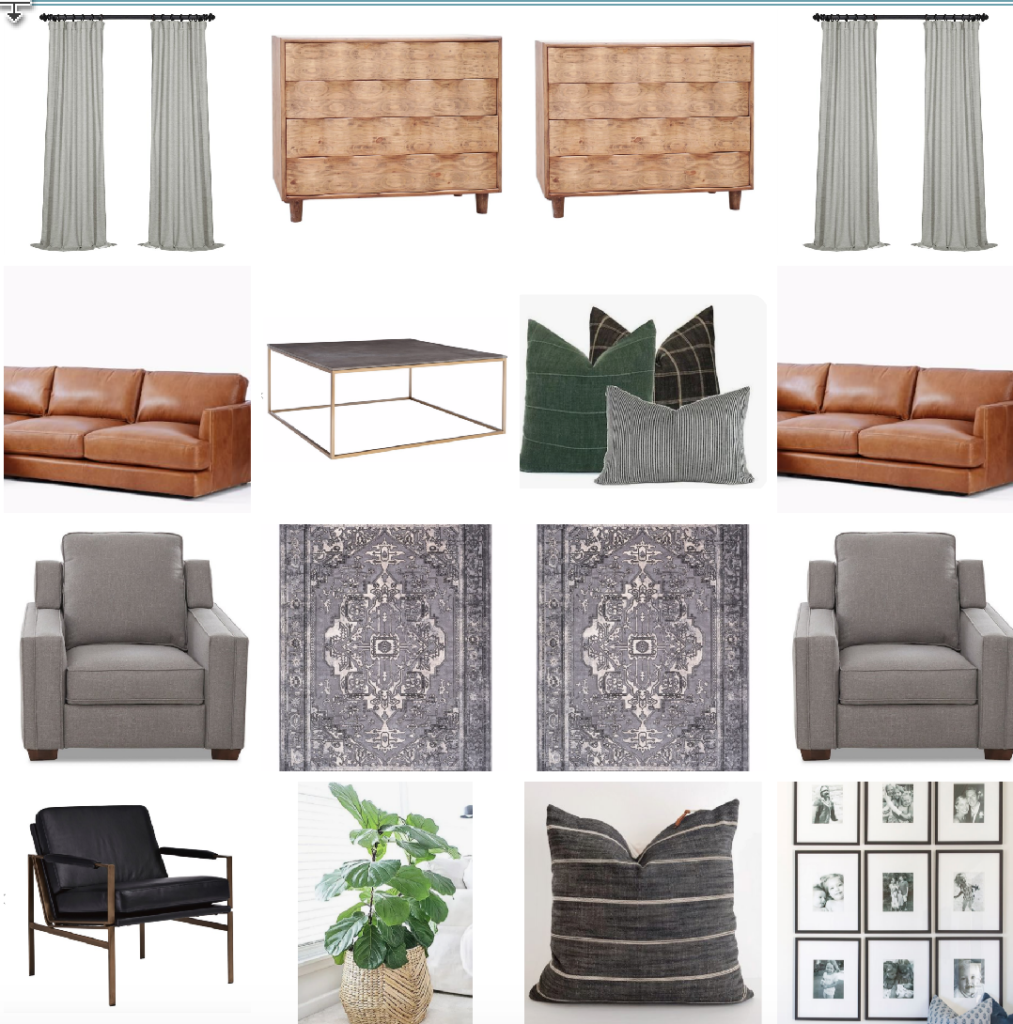
While we are about 8-10 weeks out on the furniture being delivered, I just could not hold back anymore – I have to show you guys our mood board and what our plans are for this room!!

Are you ready?!

I can barely look at it without squealing!! You guys, I knew shopping with Sheely’s would be smooth sailing, but I truly underestimated the extreme variety of styles and pieces that they offer. We ordered two buttery Carmel leather sofas – the fabric/leather options for this sofa are SO beautiful! We chose leather because it just stands the test of time with the kiddos! Oh! and we picked out two neutral recliners. Recliners??! YES! Believe it – listen, I firmly believe that comfort is just as important as style – a room must be lived in and these recliners will get plenty of use!

We will be keeping our favorite dresser/media console that we’ve had from our first home, and giving it a fresh coat of white paint. I love keeping some old with the new, and then we’ll be flanking the sides of it with these gorgeous accent cabinets – can you handle it?! Pulling this space together with this rug, accent chair, coffee table – and then I’ll be taking you guys with my (virtually, of course) to Sheely’s to show you all their insane variety of accessories and decor!

Last but not least, always remember – add pieces into your home that you LOVE. Your style will, and should, constantly evolve. Don’t pin yourself down, let yourself be drawn to a variety of styles. It’s YOUR home, decorate your spaces with what brings you JOY!

If you are in the market for new furniture, appliances, mattresses and more – head to Sheely’s! Support your family owned businesses that go above and beyond to provide you the best service!

Filed Under: Our Projects

Walnut Pesto Pasta with Arugula + Tomato Sourdough

July 15, 2020 by Abby Thome

Walnut Pesto Pasta with Arugula + Tomato Sourdough

Behold, the power of a delicious pesto.

Remember my insanely delicious walnut pesto I made last summer?

I paired it with grilled shrimp, and skewered raviolis! Such a light and delicious summer meal. You can find the recipes, here

For Dan’s birthday yesterday we were kind of lost on what to have for dinner. Usually for special occasions we’ll order in, or go out to eat, but seeing as were not going anywhere and we ordered in twice this weekend our take-out threshold was hit. I immediately thought of this pesto, and decided to kick it up a notch and coat some cavatappi pasta in it, and pair with a grilled buttery sourdough bread that is covered with arugula and tomatoes that have been tossed in garlic expressions dressing.

Delicious!

Within 20 minutes, you can make the pesto, boil the pasta, grill the bread and have a fresh healthy dinner ready for your crew!

Walnut Pesto

  • 2 oz. Basil Leaves
  • 1/3 cup Heinen’s grated parmesan cheese
  • 1 garlic clove (or two if you love garlic like me)
  • Zest and juice of 1 Lemon
  • ½ cup walnuts
  • ½ cup extra virgin olive oil
  • 1 tsp. kosher salt
  • ½ tsp. pepper

Simply place all of the ingredients above into a food processor and blend together for 3 minutes until smooth. I usually double my recipe because I love to have it on hand to add to sandwiches. Also, if you double it is incredibly delicious if you do the 2oz of basil, and then do 2oz of arugula too!

Boil your pasta of choice…. and reserve one cup of pasta water before you drain it!

And then simply add 1 to 1 1/2 cups of the walnut pesto to the hot pasta, and 1/2 cup of the pasta water to loosen the pesto up. Toss, toss toss! If you need another 1/2 cup of pasta water, add it – and toss until it is a creamy consistency.

For the Sourdough Bread

Simply spread butter across a halved loaf of sourdough. Place onto a grill pan, and sear. Next, take arugula and halved grape tomatoes and toss in garlic expressions dressings. Once the bread is nice and golden, take it off the grill pan and pile it high with the arugula and tomatoes. YUM

We added some grilled chicken skewers that we had from Costco (they are pre cooked so you just warm them through) – Within 20 minutes, your dinner is done!

Filed Under: Our Bites

Hawaiian Ramen Campfire Packets

June 30, 2020 by Abby Thome

Hawaiian Ramen Campfire Packets

this post is in collaboration with Heinen’s –

edited on 7/13 – the more liquid the better in your packets babe, so add the sauce, and then add as much water needed until your ramen noodles are shoulder deep in liquids!

Put down the hot dogs and back away from the campfire. Let’s re-think this. Oregon trail style. Do you think that all they were roasting over the fire was beans and weiners? Sure, maybe the occasional squirrel, haha – but the thing is they cooked a wide variety of food over campfires and YOU CAN TOO!

Let me introduce to you my Hawaiian Ramen Campfire Packets – these bad boys are stuffed with ramen noodles (not cooked!) shrimp, pineapple, mushroom, green onion and a killer Island Soy Sauce by Heinen’s Two Brothers. Do not run away if you do not have a campfire to cook these over, I tested them in the oven too and they were perfection too!

 The foil packets are folded up tight and while over the heat, the simmering sauce and steam will cook the noodles and vegetables perfectly.  Use your imagination and switch up the ingredients, and if you are wishing you had a campfire to cook this over and do not, don’t sweat it – this dish can be made in the oven too! 

For the recipe, the only measuring is for the sauces.  This is intended to be a “make it your own” by adding as many mushrooms, shrimp, pineapple or whatever toppings you would like to this dish! 

Just look at these beauties when they are done ….

Hawaiian Shrimp Ramen Campfire Packets 

(Recipe is for 4 servings)

You need heavy duty foil for this recipe if cooking over a campfire

  • 5 Ramen Noodle packages, omit the seasoning packet
  • Baby Bella Mushrooms, sliced
  • Pineapple, diced
  • Frozen Shrimp, thawed
  • Green Onion, chopped into 3 inch pieces
  • 1/4 – 1/2 cup water depending on how much you fill the packet, the more liquid the better for steaming the noodles!

For the SAUCE:  Shake all of these ingredients together in a mason jar, or whisk in a bowl 

  • 3/4 cup Two Brothers Island Soy 
  • 1 cup Water 
  • 3 Tbsp Lime Juice
  • 1/2 tsp garlic powder
  • 1 tsp Sesame Oil 
  • 1 tsp Apple Cider Vinegar 

For the Spicy Mayo Drizzle: Whisk these ingredients together, and set in fridge until ready to use

  • 1 cup Mayo
  • 1 Tbsp Honey
  • 1/2 tsp Garlic Powder
  • 1/4 tsp Onion Powder
  • 3 Tbsp Sriracha 
  1. Take two large sections of foil, roughly  x   and place one horizontal, and lay the second on top vertically
  2. Picturing a square in the middle of the foil, raise each side and pinch four corners to create a packet that has all sides standing straight up with the square foil as the base
  3. Inside this packet, take 1 and 1/4 ramen noodles, and break them apart into the foil square
  4. Add the sliced mushrooms, pineapple chunks, thawed shrimp and green onion
  5. Next, distribute the sauce evenly amongst all four foil packages and ADD an additional 1/2 cup of water to each – you want the liquid to be nearly up to the top of the ramen!
  6. Take each side of the foil that is standing and gather it into the middle creating a tight pouch with no openings, pinch the tops to ensure this
  7. Over a campfire, indirect heat on a grill grate, safely place the packets on for 25-30 minutes
  8. When removing, let cool for a moment and be careful when breaking the seal for steam will escape.
  9. Give it all a good stir, add an extra drizzle of the Two Brothers Island Soy sauce. 
  10. Top with as much or as little of the Spicy Mayo Drizzle on top, and extra green onion to granish! 
  • If you are making these and want to cook in the oven, pre heat the oven to 400*
  • Bake for 25-30 minutes and follow the steps above for finishing.  Enjoy! 


Filed Under: Bites, Our Bites

Mango Shrimp Salsa

June 29, 2020 by Abby Thome

Mango Shrimp Salsa

Bring on the heat, because I am ready to cool down with these drool-worthy Mango Shrimp Salsa! My mom made this salsa, my goodness, probably over 8 years ago and it is truly one of the most refreshing and filling salsas to enjoy all summer long!

Mango Shrimp Salsa

  • One 16oz bag of Frozen Shrimp, thaw according to package and cut each shrimp into thirds
  • 3 Avocado, diced 
  • 2 cup Mango, diced
  • 2 cup Tomato, diced
  • 2 cup Pineapple, diced
  • 1/2 Medium Red Onion, minced
  • 2 Limes, zest + juice
  • 2 Tbsp Extra Virgin Olive Oil
  • 1 1/2 tsp Heinen’s Chili Salt
  • 1/4 tsp Black Pepper
  • 1 tsp Garlic Powder
  • 1/2 tsp Kosher Salt
  1. In a large bowl, simply add the shrimp, avocado, mango, tomato, pineapple and onion.  
  2. Zest two limes over the top, and squeeze out all of its juices.  Drizzle in the olive oil, and then add the chili salt, pepper, garlic powder and salt. 
  3. GENTLY stir to coat all of the ingredients with the spices.  Store in the refrigerator until you are ready to serve (3-4 hours max)

Filed Under: Bites, Our Bites

No-Bake Key Lime Cheesecake

June 21, 2020 by Abby Thome

No-Bake Key Lime Cheesecake

This no-bake key lime cheesecake dessert is such a fantastic treat during hot summer days. Make it in advance! In a parfait dish, mason jar or layer everything in a 9×13 – keep it simple, make it delicious!

Slightly sweet, a little tart, and a buttery crust – OoOoO wee, friends, this one is a good one!

No-Bake Key Lime Cheesecake 

  • 3 8oz Blocks Heinen’s Cream Cheese, at room temperature
  • 1/2 cup Sugar
  • 1/3 cup Sour Cream
  • 1/4 cup Key Lime Juice
  • 1 tsp Vanilla Extract
  • 1/2 Tbsp Key Lime Zest 
  • 1/2 tsp Salt
  • 1 1/4 Heavy Whipping Cream
  • 4 Tbsp powdered sugar
  • 2 Sleeves of Graham Crackers (roughly 18-20 crackers)
  • 1 Stick Unsalted Butter, melted
  • 1/2 cup Brown Sugar
  1. In a large bowl, with a handheld mixer, whip together the heavy whipping cream and powdered sugar for 4-5 minutes, until the whipping cream has become thick and creamy.  It should create light fluffy peaks when lifted from the bowl. 
  2. In a separate bowl, with a handheld mixer, mix together the cream cheese, sugar, sour cream, key lime juice + zest, and salt.  Whip together just until everything is nice and creamy, about 3 minutes.  
  3. Next, gently fold in the whipped cream into the cream cheese mixture.  

Set to the side –

  1. To make the crust, place the graham crackers into a ziploc bag and crush them until they are the consistency of sand.  
  2. Next, pour the crushed crackers into a bowl, and stir in the melted butter and brown sugar.  Stir together until everything is fully incorporated and the crackers are all coated with the butter and feel a bit wet.
  3. Assembly: You can make this in a 9×13 baking dish, a classic parfait bowl, or into individual mason jars as shown.  Regardless of the vessel, simply layer the graham cracker crust on the bottom and push down gently, and then pour on the cream cheese filling.  Spread out the cream cheese filling evenly and decorate with fresh cut key limes and a few pieces of the crust to finish!

Store in the fridge until you are ready to serve! 


Filed Under: Bites, Our Bites

Sweet n’ Spicy Pretzels

May 26, 2020 by Abby Thome

Sweet n’ Spicy Pretzels

Warning : these pretzels, once bitten will forever change your life. You will quickly grow to rely on making a batch every week, if you are lucky to have them last that long! xoxo abby

I like these pretzels with a KICK! Give me all of the spice. If you do not want these as spicy, simply use only 1/2 a tsp of cayenne pepper –

All you need …

  • 1 Bag of Pretzel Twists (16oz bag)
  • 1 Stick Unsalted Butter
  • 1 tsp Cayenne Pepper
  • 1 tsp Garlic Powder
  • 1/2 cup Brown Sugar
  • Handful of brown sugar for topping, explained below

Pre heat the oven to 250* Line two baking sheets with parchment paper

In a small sauce pan, melt the butter, 1/2 cup brown sugar, cayenne and garlic until butter is completely melted and you’ve whisked everything so that it is fully incorporated.

Split the bag of pretzels between the two baking sheets, pour the spiced butter sauce over each pan of pretzels. Use a spatula to toss together, until the pretzels are completely coated. Lastly, sprinkle a bit of brown sugar over the tops of the sticky pretzels

Bake at 250* for 10 minutes, stir a bit and bake an additional 10 minutes

The pretzels will not change in color, the brown sugar will bubble a bit. Pull the baking sheets out of the oven and let sit on for 20 or so minutes. Stir the pretzels up with your hands to break apart the sugar that has crystalized (the yummiest part1) and store in an airtight container for up to 2 weeks.

I LOVE these jars, we have them all around the house. Perfect for cereal, candy, or any snack!

This is the jar we use at our house, and we keep them on our counter!

Filed Under: Bites, Our Bites

Dark Chocolate Pretzel S’mores Bars

May 26, 2020 by Abby Thome

Dark Chocolate Pretzel S’mores Bars

The campfire called, and it’s jealous it got the boot for this recipe. Ditch the wooden sticks and pick up a few bags of pretzel sticks and you are well on your way to making this sweet n’ salty twist on the classic S’more!

Taking a classic summer-time treat and giving it a little spin is exactly how this fun and funky S’mores bar was born.  A S’more is not complete without the marshmallow and chocolate, two components for this recipe-twist that would not be left out.  However, swapping a bland graham cracker for salty pretzels, and adding dark chocolate covered with flaky sea salt took this twist on the classic S’more over the edge!  A fantastic make-ahead dessert that you can cut into bite size squares right before guests arrive.  No campfire needed! 

Dark Chocolate Pretzel S’mores Bars

  • 1 Stick Unsalted Butter
  • 2 16oz Bag of Jet-Puffed Marshmallows
  • 2 1lb Bag of Rold Gold Pretzel Sticks, crushed slightly in a ziploc bag
  • 1 20oz Bag of Dark Chocolate Chips
  • 1/2 tsp Flaky Sea Salt
  • Non-stick spray for setting the bars

Line a 9×13 baking pan with parchment paper – you know I love lifting any dessert bar with ease –

  1. Pour pretzels into a ziploc bag and use your hands to crush the pretzels slightly, just to break them up a bit.
  2. In a large saucepan over medium-low heat, melt the entire stick of butter.   Pour in all of the marshmallows, and turn the heat down to low, stirring until all the marshmallows are melted completely.  
  3. Turn off the heat – 
  4. Add the crushed pretzels to the melted marshmallows and stir rigorously until all of the pretzels are completely coated with the melted marshmallow.
  5. Pour sticky pretzel mixture into the prepared baking pan, spritz your hands with non stick spray and press the pretzels into the pan.
  6. After a few minutes, once bars start to set, spray the bottom of a glass with nonstick spray and push every inch of the pretzels mixture harder into the pan, creating one flat later – this will help create dense bars.

Melting Chocolate Chips in the Microwave – 

In a microwave safe bowl, at 45 second intervals, melt the dark chocolate chips.  This should take no more than 2 rounds of the 45 seconds.  Once 70% of the chips are melted, remove the bowl from the microwave and continue to stir to melt the remainder of the chips.

7. POUR the melted dark chocolate over the bars and spread it into one layer.

Decorate – 

Place any shape of pretzel you’d like on top for decoration, and finish with a pinch of flaky sea salt over the top. Let sit for the chocolate to harden, or place in fridge for 30 minutes for a rapid set. Lift parchment paper corners, for easy removal of the bars and cut into any desired size and shape, ENJOY!


Filed Under: Bites, Our Bites

Watermelon Panzanella

May 25, 2020 by Abby Thome

Watermelon Panzanella

Watermelon panzanella is the perfect summer bite! Fresh cold watermelon, cucumbers, mint, feta cheese, red onion and crusty bread all tossed together in a bright lime vinaigrette.   House-made croutons soak up the vinaigrette and watermelon juices, turning the crust croutons into these delightful chewy, yet still crunchy bites.  Colorful and light, nothing beats serving this watermelon panzanella as a refreshing side dish for any summer-time meal.  

This dish is best served cold, and within a few hours of stirring all of the ingredients together.  Let’s be honest though, anyone would happily eat the leftovers the next day! I love how colorful and light this side dish is, and personally think it pairs perfectly with anything you grill out this summer season.

Let’s whip this beauty up!

Here is what you’ll need …

House-made Croutons

  • 1/2 Loaf of Sourdough bread, cut into 1” cubes
  • 1 Tbsp Extra Virgin Olive Oil
  • Pinch of Kosher Salt
  • Pinch of Black Pepper

Lime Vinaigrette

  • 1/4 cup Extra Virgin Olive Oil
  • 1 Lime, zest + juice
  • 2 Tbsp Honey
  • 1 tsp Kosher Salt
  • 1/2 tsp Black Pepper

Components

  • 2 Watermelon Wedges, cut into 1” cubes (roughly 5 pounds each)
  • 7oz Mt. Vikos Traditional Feta (in block form)
  • 1 Cucumber, seeded and chopped 
  • 1/2 Red Onion, sliced thin
  • 4 Tbsp Mint Leaves, chopped

For the croutons …

  • Pre heat the oven to 425*
  • Toss sourdough cubes with olive oil, salt and pepper
  • Bake on baking sheet for 10-12 minutes, turning halfway through
  • Remove when golden brown

For the Lime Vinaigrette…

Whisk together the olive oil, lime zest and juice, honey, salt and pepper.  Keep in fridge until you are ready to put the watermelon panzanella together

How it all comes together …

  • In a large bowl, add the watermelon cubes, cucumber, red onion, mint leaves and croutons.  Toss together with the lime vinaigrette.  Gently crumble the feta cheese over the panzanella, and fold in gently.  
  • Keep in the fridge and serve within 3-4 hours

Filed Under: Bites, Our Bites

A New Path – Equilibria Introduction

May 19, 2020 by Abby Thome

A New Path – Equilibria Introduction

This post is in collaboration with Equilibria. I was gifted my first months trial to share my experience with you all.

I reached a fork in the road, I cannot think of a better analogy at the moment, other than I have been on a really long road with taking Celexa for my anxiety, and after years of walking on the road with obvious bumps and turns, I just got tired.

Tired of relying so heavily on a drug that was giving me side effects (shall we dive into that?) Side effects were minor, except when I would try to wean, even the slightest decrease in dosage would cause shakiness – withdrawal like symptoms and these weird brain zaps. Not to mention that this medicine in particular made it a little harder to reach climax (tmi) and let’s face it – getting off is 99% of the fun during those intimate moments.

It worked, yes – for sure. For over 5 years I felt like an entirely new woman. You can read about my first panic attack HERE. With my celexa, I felt calmer, more in control of my fight or flight response and definitely overall felt more at ease. My anxiety attacks were few and far between, but during stressful seasons (cough, Covid-19) you wouldn’t even know I was on medicine to help control those pop ups.

I started to wonder …

Was it my medicine helping my anxiety? Or was it because I was really diligent on taking good care of my diet, exercise, sleep and social activity. When I put those top on the list, I felt my absolute best.

With that all being said, during this Covid-19 pandemic, changes in work, home schooling kids, hubby working from home 24/7, finances etc – I felt, well, anxious. Heavy chest, shakiness, anxious bouts, waking up all the time at night with anxiety, just overall not feeling my best. The restlessness and anxiety in the middle of the night was a new one for me, and perhaps the most annoying to be honest. As for any adult, getting good nights rest is key to feeling balanced during the day. I spoke with my doctor about potentially weaning from my anxiety medicine to start a new routine CBD products, and when he was on board, I felt like I got a nod to “GO!”

Let’s mention this, I am not stopping my Celexa, yet. I will be on a long journey of weaning! Please speak with your doctor if you are currently on any type of medication.

Finding MY fit –

  • I knew immediately the company I would turn to for purchasing CBD products. Let me introduce – Equilibria, an incredible female ran company focusing on premium CBD products that are a total game changer.
  • Premium grade CBD, organically grown, free from GMO’s, solvent, heavy-metals, pesticide and herbicides.
  • Dosage specialists, there to consult and guide you throughout your entire journey

Stop it right there, Linda. I’m not lighting a joint and smoking pot with my kids around.

Here is info directly from their site –

“Hemp, not High.

Industrial hemp is a cannabis sativa plant grown specifically to exhibit 0.3% THC content or less — this is why there’s no intoxicating effect, but also why it’s legal. Any industrial hemp plants that cross the 0.3% “line in the sand” become marijuana plants, federally illegal, and (after approximately the 5% THC mark) intoxicating.

With our industrial hemp-grown CBD, you get a huge portion of the clinically-observed benefit of medical cannabis plants, with none of the illegality or impairment. Equilibria’s CBD is farm-to-home, at the highest quality available in the US market (straight from our 1,100 acre partner farm in Colorado!). All of our products are lab-tested with results readily available.”

So, here I go – moving forward with CBD as a daily part of my life

Just the quality of Equilbria’s CBD products gets me so excited, and then toss in that they offer dosage specialists that you can speak with to find the right dose for you – is exactly what I was looking for. Guidance, support and a company that knows their shit!

Oh, did I mention Dan is starting it too??

Last night, Dan and I started our first dose together. We were both so excited, as Dan has developed anxiety since his U.C. diagnosis and was looking for something that could potentially help the inflammation and pain from suffering from U.C. After 5 days, we’ll chat with our dosage specialist and see what is working for us. And guess what? I’ll be sharing my entire month-journey on Instagram stories, and here!

If you’d like to try Equilibria for yourself, I have discount code!

We started with the Balance Box, so I take the dropper at night, and one daily soft gel in the morning!

enter : abbythome at checkout for 15% off! I highly recommend subscribing for the extremely discounted rate on top of my 15% off!

xoxo, abby

Filed Under: Family, Our Life

Mini Fruit Sugar Cookies

May 12, 2020 by Abby Thome

Mini Fruit Sugar Cookies

Who else imagined that by Memorial Day we’d be clanking glasses of Rose with our loved ones? Eek … we’re not there yet. BUT – that does not mean that we should not still celebrate how fortunate we are to have so many selfless Americans serving our country keeping us safe!

These mini fruit sugar cookies are not only beautiful, but versatile. They are a cross between a buttery sugar cookie and a short bread! This sugar cookie is frosted with a delicious cream cheese frosting and topped with any fresh fruit you like. Forget the fruit and just add sprinkles if you’d like, there is no wrong way to decorate these!

Finding the perfect sugar cookie recipe over the years left me feeling like goldilocks trying out all of the porridge.  Too dry, flimsy, or sweet.  Dozens of recipes later, my adaptions to the “Swig” sugar cookie has become my “go-to” for over a year, and turns out perfect without fail every time! This buttery sugar cookie is the perfect platform to frost and top with fresh berries for a bright and fruitful summer twist.  With Memorial Day right around the corner, adorning these sugar cookies with a “Red, White + Blue” theme fruit is the perfect fit.  Once frosted, keep these cookies chilled in the fridge for the ultimate sweet bite when ready to enjoy!

Classic Sugar Cookie 

  • 2 sticks unsalted butter, at room temperature
  • 1 1/4 cup sugar
  • 3/4 cup powdered sugar
  • 3 eggs, at room temperature
  • 3/4 cup vegetable oil 
  • 2 tsp vanilla extract
  • 1 tsp cream of tartar
  • 1 tsp kosher salt
  • 5 1/2 cup unbleached, all purpose flour

Preheat oven to 350* 

Line two baking sheets with parchment paper

  1. In a large bowl, with a handheld mixer, mix together the butter and sugars until light and fluffy (3 minutes)
  2. Add the eggs, oil, and vanilla to the bowl, and continue to mix until everything is incorporated
  3. Pour in the flour, cream of tartar and salt, and mix together until everything is evenly distributed and fully incorporated
  4. Using your hands, scoop out roughly a large golf ball-sized piece of dough and roll into a ball.  Place onto the baking sheet
  5. With the bottom of a drinking glass, press down on each of the cookie balls, to flatten them out to be 1/4” thick.  The edges will appeared crinkled, and that is just right! 
  6. BAKE at 350* for 10-16 minutes, depending on size of cookie.  Bottoms should be barely golden, let cool on a wire rack before frosting.

Frosting

  • 1 stick unsalted butter, at room temperature
  • 4oz cream cheese, at room temperature
  • 1 1/2 tsp vanilla extract 
  • 3-4 cups powdered sugar
  1. In a large bowl, with a handheld mixer, whip together the butter, cream cheese and vanilla until light and fluffy.  
  2. Add the powdered sugar, one cup at a time until frosting starts to come together and is smooth and creamy.  
  3. If your frosting is too thick, add a tablespoon of milk to thin it out.  You want it to be spreadable, and creamy.

Simply frost each cooled sugar cookie with the frosting, and then adorn each cookie with fresh fruit of choice! Blueberries and raspberries hold up wonderfully in the fridge on top of the frosting, fruit like strawberries will start to bleed out once paired against the sugary frosting.  So, if you choose strawberries, serve within a few hours to maintain appearance! 

Filed Under: Bites, Our Bites

  • « Previous Page
  • 1
  • …
  • 6
  • 7
  • 8
  • 9
  • 10
  • …
  • 67
  • Next Page »

LETS BE SOCIAL

  • Email
  • Facebook
  • Instagram
  • Pinterest

Articles

Categories

Archives

Heinens

Visit The Thome Home 's profile on Pinterest.

Recent Posts

  • Pork Schnitzel
  • It’s time to book your vacation with Oasis Vacations!
  • Oasis Vacations at Ocean Isle Beach, North Carolina
  • JUS-ROL Crescents
  • Back to School Safely
  • Chicken Tender Charcuterie Board
  • Lillie’s Q Spicy Cheddar Sausage Pizza Bagel
  • Max’s Bedroom

Copyright © 2025 · Tasteful theme by Restored 316