• Home
  • About
  • LIFE
  • HOME
  • FOOD

The . Thome . Home .

Salmon B.L.T. with Candied Bacon

May 4, 2020 by Abby Thome

Salmon B.L.T. with Candied Bacon

This recipe is in collaboration with Heinen’s. Thank you for supporting the brands that The Thome Home loves so much!

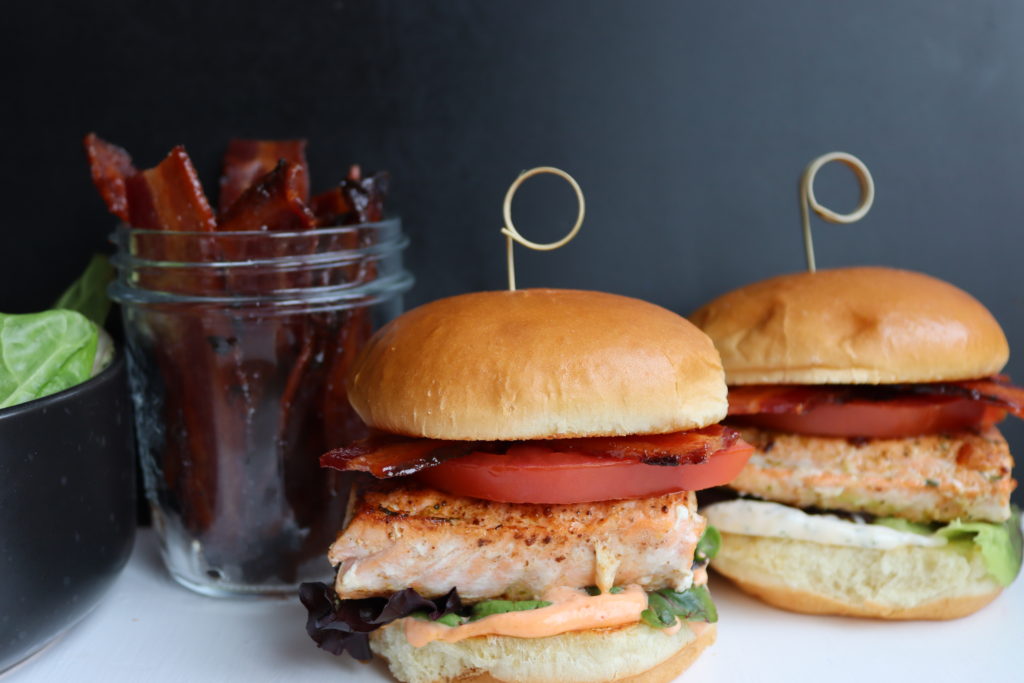
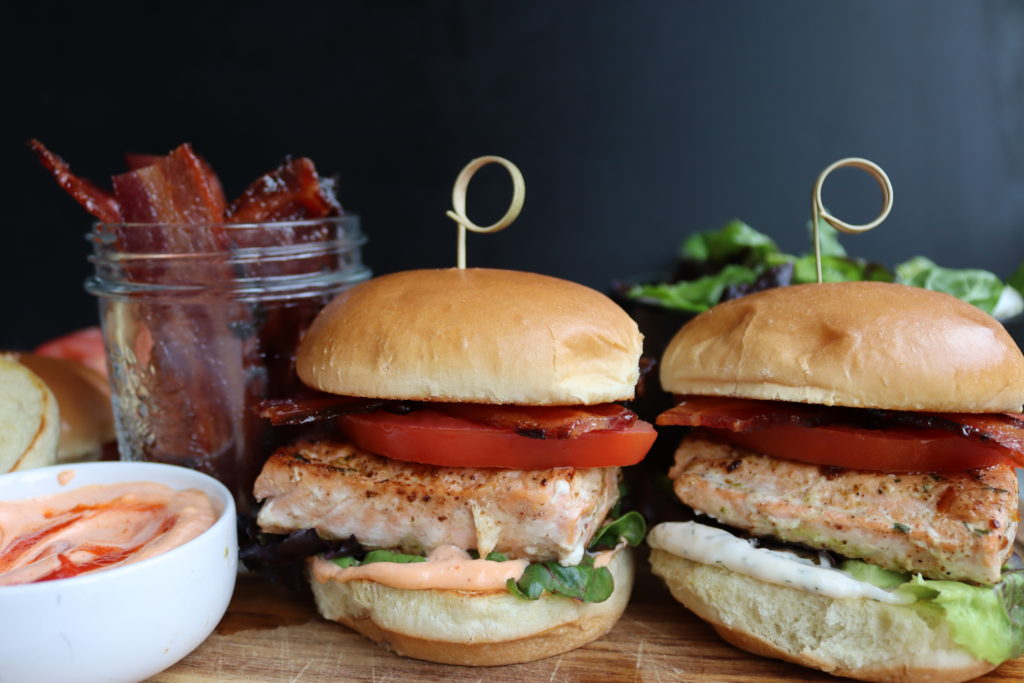
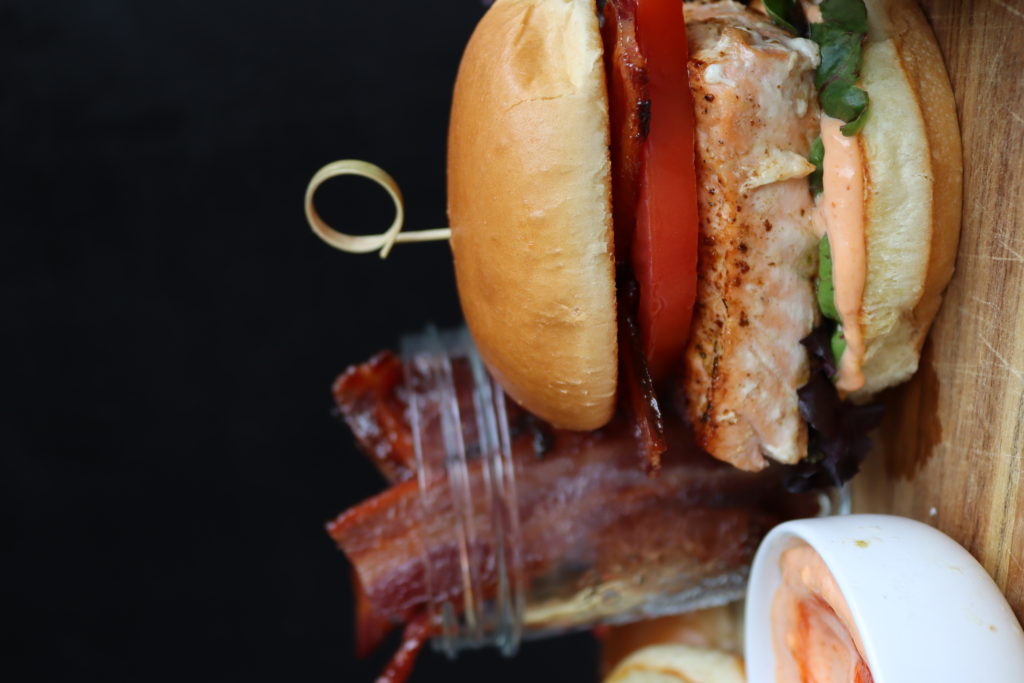
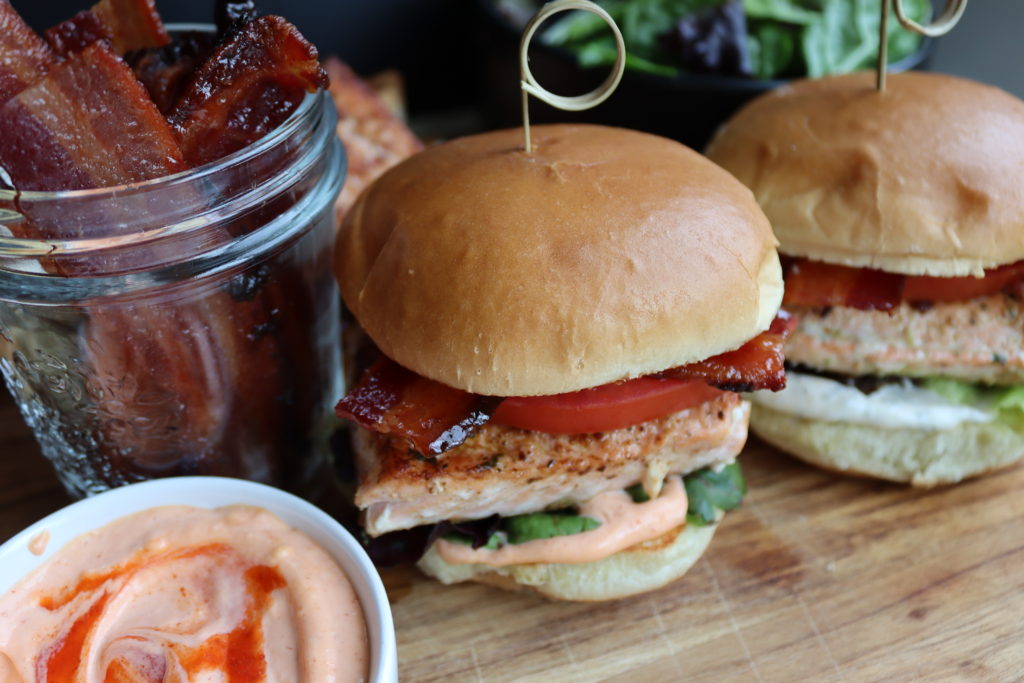
Savory salmon paired with sweet and spicy candied bacon, piled high with sauce and a brioche bun. Yes, please!

You know I love a good spread, and this sandwich is the perfect example on how to turn a standard sandwich into a “choose your toppings” board! I paired our sandwiches with a spicy sriracha mayo, and a garlic dill mayo – both of which might I add are out of this world!

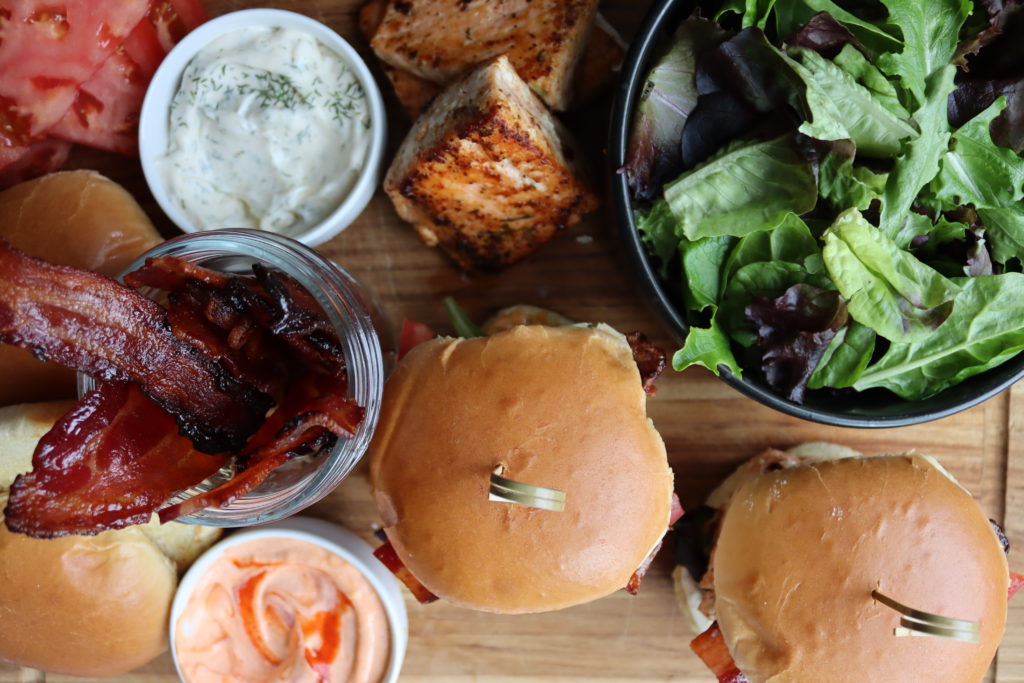
Make the bacon and salmon and the rest is just piling up toasted brioche buns, lettuce, tomato and sauces. Voila! Impress your family, impress your friends, heck – impress yourself! YOU can make this!

Here is what you will need…

  • 2 6oz Salmon Fillet, cut in half (4 pieces of salmon)
  • 2 Tbsp unsalted butter
  • 1/2 tsp dill weed
  • 1/2 tsp garlic powder
  • Kosher Salt
  • Pepper
  • 4 Brioche Hamburger Buns
  • Spring Salad Mix
  • Beefsteak Tomato, sliced into 1/4” slices
  • Sauce of Choice ( Sriracha Mayo or Dill Mayo – recipes below)

Candied Bacon

  • 1 – 1.5lb thick cut bacon
  • 1/2 cup brown sugar
  • 1/4 tsp cayenne

Let’s make the candied bacon first …

Preheat oven to 375* 

Line two baking sheets with parchment paper 

  1. Lay bacon onto the baking sheets, make sure not to overlap
  2. In a small bowl, whisk together the brown sugar and cayenne pepper
  3. Top each bacon slice with the sugar mix, pat it down to adhere 
  4. BAKE at 375* for 20-28 minutes, or until bacon is crispy
  5. Pull bacon off of sheet with tongs, and place onto a wire rack to cool and harden

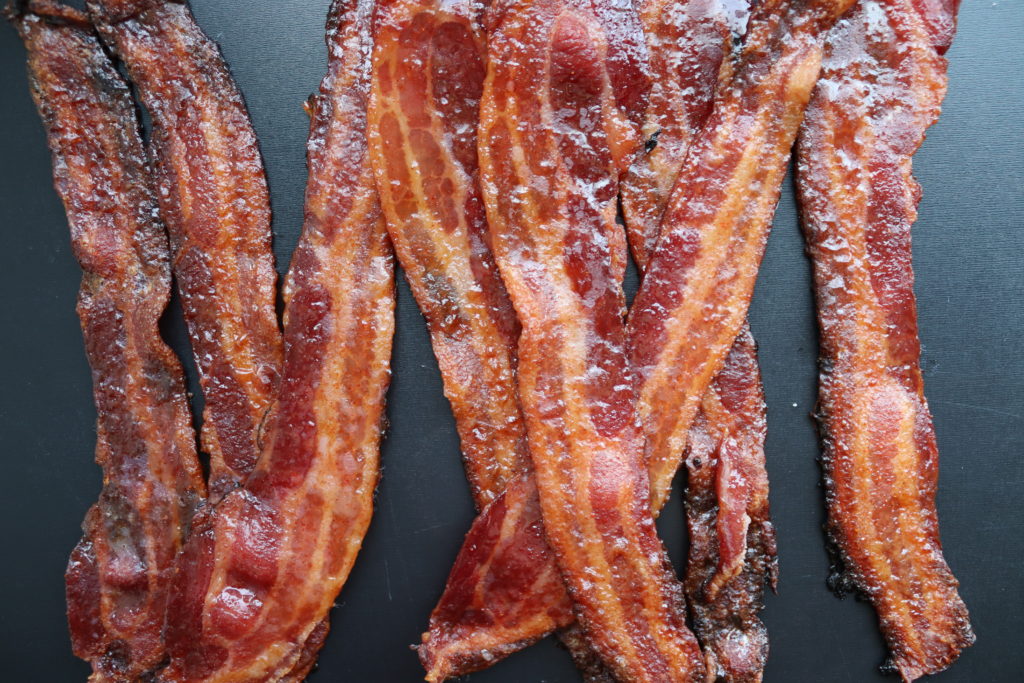
Set bacon aside, if you can resist, while we focus on the salmon!

You can choose to cook your salmon two ways, on the grill, or inside in a pan.  Whichever is more convenient for you!

If you are grilling …

  1. Season your salmon fillets with a good pinch of kosher salt, and ground pepper
  2. OIL your salmon, both sides with olive oil
  3. OIL the grates of your grill 
  4. On medium-high heat, place the salmon onto the grill and cook for 3-5 minutes.  You will see the pink start to change to white as the fish cooks on the bottom.  
  5. FLIP the salmon fillet, and close the lid of the grill.  
  6. Let it cook for an additional 5 minutes, or until (depending on the thickness) your salmon is cooked all the way through.
  7. Take off of heat, let rest of a plate until you are ready to assemble the sandwich

If you are cooking the salmon inside …

  1. Mix the two tablespoons of butter with dill and garlic – set this aside, this will be used to melt into the pan as you cook your salmon for extra flavor
  2. Season the salmon fillets with a good pinch of kosher salt and ground pepper
  3. In a sauté pan, over medium-high heat add 1/2 of the seasoned butter
  4. Immediately place the salmon into the pan 
  5. Let cook for 3-5 minutes
  6. FLIP – add the remainder of the butter and cook for another 5 or so minutes, until the salmon is cooked all the way through
  7. Take the salmon off of the heat, and let rest on a plate until you are ready to assemble the sandwich 

Let’s assemble the sandwiches! 

You can use any sauce you wish for your sandwiches, but I highly recommend either of these that are put together in seconds!

  • Sriracha Mayo: 3/4 cup mayonnaise + 1 Tablespoon Sriracha + 1/4 tsp garlic powder
  • Dill Mayo: 3/4 cup mayonnaise + 1 heaping teaspoon dried dill + 1/4 tsp garlic powder

Toast the brioche buns, slather on the sauce of choice, place spring salad mix on top, and then salmon fillet, tomato, candied bacon, more sauce and final bun! 

That is it, my friends.  This sandwich is hands down one of the best things I have eaten in months.  Our entire family had their jaws on the table after one bite, simply delicious! 

Filed Under: Our Bites

Looks fancy, but it’s simple – Coconut Cake with Raspberry Filling

April 27, 2020 by Abby Thome

Looks fancy, but it’s simple – Coconut Cake with Raspberry Filling

Don’t let those three layers fool you, this cake is not difficult to make! Sometimes, adding a bit of flare and layering and frosting a different way will take your cake making skills to new heights. This cake is a buttery, slightly dense like a pound cake, coconut cake. Three layers stacked tall with cream cheese frosting and a good spread of raspberry preserves. It is delicious, and by far one of the prettiest cakes to set down at the center of a table (Mother’s Day, perhaps?)

Isn’t she a beauty?

Let’s Bake!

Coconut Cake:

  • 3 sticks unsalted butter, at room temperature
  • 2 cup sugar
  • 5 eggs, at room temperature
  • 2 tsp vanilla extract
  • 1 1/2 tsp almond extract
  • 3 cup unbleached all purpose flour
  • 1 tsp baking powder
  • 1/2 tsp baking soda
  • 1/2 tsp kosher salt
  • 1 cup buttermilk, at room temperature
  • 1 cup shredded coconut 

Cream Cheese Frosting:

  • 2 8oz cream cheese, at room temperature
  • 2 sticks unsalted butter, at room temperature
  • 2 tsp vanilla extract
  • 4-5 powdered sugar 
  • 1/2 cup Raspberry Preservers for layers 

Pre heat oven to 350* 

Line the bottom of  three 9 inch cake pans with parchment paper to keep cake from sticking

In a large bowl, with a handheld mixer – 

  1. Whip together the butter, sugar, vanilla, and almond until light and fluffy (3+ minutes)
  2. Add the eggs, one at a top, whisking together until each egg is fully incorporated 
  3. In a separate bowl, whisk together the flour, baking soda, baking powder and salt
  4. Add half of the dry ingredients into the wet, and mix together
  5. Pour in 1/2 cup buttermilk, stir in
  6. Add the remainder of the dry ingredients, stir, and follow with the rest of the buttermilk
  7. Lastly, fold in 1 cup of shredded coconut
  8. Evenly distribute the cake batter into the three cake pans 
  9. BAKE at 350* for 20-28 minutes, until cake is cooked through 

Let the cake cool completely! While the layers cool, make the cream cheese frosting

In a large bowl, with handheld mixer – 

  1.   Mix together the cream cheese, butter and vanilla until light and fluffy (3 minutes)
  2.   Add the powdered sugar, one cup at a time until frosting is creamy and light

One cake layers have cooled – take a sharp knife and trace around the outside of the cake to help remove the cake from pan easier.  Flip cake layers out of the pan, remove the parchment circles, and you are ready to assemble!

  1. Take the cream cheese frosting and spread on top of one layer, about 1/2 inch thick
  2. Sprinkle a little shredded coconut on top of the frosting
  3. Take 1/4 cup of the raspberry preserves and spread in the center of the cake, staying away from the outer edge
  4. Add the next layer of cake, and follow the same steps above
  5. For the final layer, simply frost with cream cheese frosting and sprinkle with shredded coconut

Enjoy! 

Filed Under: Bites, Our Bites

Basement Bathroom Details

April 22, 2020 by Abby Thome

Basement Bathroom Details

Months have gone by and I completely forgot to share with you all of the details about our basement bathroom renovation! Gah, my bad! This bathroom renovation was built completely from the ground up, finding the spot where we could actually put a bathroom in this space and then taking it from there. It quickly turned into the boys bathroom where they are enjoying the new shower and tv that dad put behind the door (insert eye roll here)

Before…

This space in our basement is directly next to our stairs. We had a large area of free space between the stairs, furnace and what would be a hallway to finally be able to add another bathroom to our house. At first we were just going to do a half-bath, but the more we talked about it we knew the wisest return on our money would be to put a full bath in.

After …

Isn’t she pretty?! You can easily shop this bathroom, the majority of the pieces are from Wayfair –

Vanity : Mirror : Shower Door : Black Hexagon Tile : Black Shower Head :

The pink rug was a total score from HomeGoods for only $15. I knew it would likely get a lot of wear and tear, spills and such, so I wanted a piece that I would not feel guilty throwing away if ruined.

I am so happy with the way this space turned out, we have two of the four bathrooms complete in our house now and that feels great to have behind us! Master bedroom and half bath to go and we can check those off of our to-do list!

Paint color : Gallery White by Behr

Filed Under: Home, Our Projects

One-Pot Spinach Artichoke Pasta

April 21, 2020 by Abby Thome

One-Pot Spinach Artichoke Pasta

This post is in collaboration with Heinen’s – thank you!

Ever look at a recipe and immediately have that Avril Lavigne song running through your head? “Why’d you have to go and make things so complicated??” That’s exactly how I feel about dishes during the Stay at Home order. Listen, the majority of us are doing our best to stay at home, which means that meals are being cooked sun up until sun down and that can be exhausting. Recreating my Spinach Artichoke Pasta recipe to make it a one-pot-wonder was a no brainer, and I am so excited to share this recipe with you all!

Just like the classic spinach artichoke dip, but in pasta form. It is rich, and creamy – Dan and I both thought it was reminiscent of hamburger helper nostalgia – it is SO good! I added chicken breasts to this recipe because I was cooking it for a neighbor. If you choose to make it vegetarian, simply start the recipe by sautéing the onion and go from there!

One-pot wonder in 45 minutes!

Here is what you will need ….

  • 1lb Boneless Skinles Chicken Breast, cut into 1 inch chunks
  • 6 oz Heinen’s Organic Baby Spinach
  • 1 Medium Onion, diced
  • 15oz Marinated Artichoke Hearts, roughly chopped
  • 1 12oz Box of Cavatappi Pasta (or pasta of choice)
  • 1 Pint Heavy Whipping Cream
  • 32oz Heinen’s Low Sodium Chicken Stock
  • 1 cup Shredded Mozzarella Cheese
  • 1 tsp Garlic Powder
  • 1/2 tsp Kosher Salt 
  • 1/4 tsp Black Pepper
  • Optional Red Pepper Flakes for garnish 

Let’s Cook!

*Heat a large pot over medium heat*

1. Coat the chunks of chicken breast with 1/2  tsp kosher salt, 1 tsp garlic powder and 1/4 tsp black pepper

2. Add chicken to the pot, with a tablespoon of olive oil and cook until chicken is cooked through

3. Add diced onion and stir until onion is translucent

4. Next, pour in the chicken stock, heavy cream, artichokes and pasta

5. Simmer over medium heat for 30 minutes, stirring occasionally

6. Once the majority of the liquid is absorbed, and the pasta is cooked through, add in the spinach and let it wilt for just a minute, stirring it into the pasta

7. Finally, stir in the shredded mozzarella cheese

Serve while warm, and garnish with crushed red pepper flakes for a little heat – Enjoy!

Filed Under: Bites, Our Bites

Carrot Cake Sandwich Cookies

April 6, 2020 by Abby Thome

Carrot Cake Sandwich Cookies

This post is in collaboration with Heinen’s. As a Heinen’s contributor, I am honored to bring you into our kitchen and introduce to you all recipes you can recreate with your loved ones.

Wipe the drool off of your chin and get yourself together. Easter is one week away and if there is one thing you need on your Easter menu it is these Carrot Cake Cookie Sandwiches. Remember the beloved oatmeal cream pies you enjoyed as a child (and maybe even indulge in today)? Well, these cookies have the exact same soft fluffy cookie exterior and rich creamy frosting that will leave you forgetting all about the candy in your kids easter baskets.

Grocery shopping is extremely difficult right now, and these next few weeks it is so important to minimize your exposure and stay home. That is what I love this recipe SO much! These are everyday ingredients that we’ve all stocked up on for quarantine and if you are running low on anything, turn to Heinen’s pick up – or get groceries delivered from Heinen’s via Instacart. Thats our game plan for our entire Easter menu, delivered to our door!

Back to the cookies!

Don’t sweat it if you are not in the mood to whip up a scratch made frosting after you just made cookies from scratch. NO ONE will judge. Simply purchase a store-bought cream cheese canned frosting and add 1/2 tsp of cinnamon, stir it up and continue to pipe these sandwiches with just as much pride. After all, everyone gets an “A” for effort

Let’s Bake!

Get a bowl, and let’s do this thing!

Pre heat oven to 350* Line two baking sheets with parchment paper

  1. In a large bowl, with a handheld mixer, mix together the butter and sugars until light and fluffy (1 minute) Add the two eggs and vanilla, mixing until fully incorporated.
  2. Next, add flour, baking soda, baking powder, salt and cinnamon 
  3. Mix until just barely together
  4. Add the oats and shredded carrots, mix until everything is evenly distributed and cookie dough is combined
  5. Using a cookie scoop (or roughly 1 1/2 Tbsp) place cookie dough onto prepared baking sheets.  Bake at 350* for 12-14 minutes, until the bottoms are slightly golden brown. 
  6. Let COOL on wire rack before assembling with frosting

Cinnamon Buttercream

1 stick butter at room temperature + 8oz cream cheese at room temperature + 1 tsp cinnamon + 4 cup powdered sugar + 1/2 tsp vanilla

Simply mix all ingredients together until light and fluffy, approximately 3-4 minutes.

Remember, if you don’t have those ingredients on hand… 1 can of cream cheese frosting + mix in 1/2 tsp cinnamon

When cookies have completely cooled, dollop a heaping tablespoon into the center of the bottom of one cookie, take another cookies and press it on top of the frosting cookie, pressing gently to push the frosting to the edges.  

Enjoy!

Filed Under: Bites, Our Bites

Sheet Pan Shrimp Tacos

April 4, 2020 by Abby Thome

Sheet Pan Shrimp Tacos

I know that it can be tough to get to the grocery store, right now. When thinking ahead for dinners for the week I always do my best to make sure that the ingredients I purchase will stretch, and stay fresh as long as possible! These sheet-pan shrimp tacos are made with frozen, already cooked shrimp that simply need tossed in spices and baked until warmed through. A quick-coleslaw is a favorite of mine, because bags of pre-made coleslaw will last up to two weeks in your fridge! Keep pre-made guacamole cups, sour cream and tortillas in your fridge and you are ready to have a light and delicious dinner in under 20 minutes!

In our house, we eat seafood more than any other meat. Our boys LOVE fish tacos in particular and these shrimp tacos are in high demand during quarantine! Minimal ingredients and made so quickly, this is sure to become a household favorite for you too!

Let’s make the SHRIMP:

This is what I usually purchase – make sure you get either the medium or large shrimp, the small size reduces even further when baking.

Frozen, already cooked shrimp, if all the stores have is frozen RAW shrimp, simply thaw according to package and cook to my directions for an additional 5 minutes.

Preheat oven to 450* Thaw frozen, already cooked shrimp according to package. Place onto a paper towel to remove any excess water. In a small bowl, mix together the seasoning: 1 tsp paprika + 1 tsp chili powder + 1 tsp garlic powder + 1/4 tsp cumin + 1/4 tsp dried oregano

Toss shrimp with the seasoning and place onto a baking sheet that is spritzed with non-stick spray. Bake at 450* for 8-12 minutes.

For the COLESLAW:

It’s SO simple, babes!

To assemble, smear avocado on the bottom of a warm tortilla. Top with shrimp, coleslaw and then drizzle sour cream and sriracha too!

Filed Under: Bites, Our Bites

Managing Anxiety During Difficult Times

April 2, 2020 by Abby Thome

Managing Anxiety During Difficult Times

I am in no way a medical professional, my experience and tips are not to be followed without consulting your doctor first.

We all experience some kind of anxiety, on some level. Some more often than others. Daily, weekly, hourly or through big life changes. Some experience anxiety that seem like minor blips on the radar, butterflies in their stomachs and nervous feelings for a brief moment. Others experience anxiety on a daily level, one that brings out physical symptoms or constant state of anxiousness.

I had my first real panic attack nearly 6 years ago. We had just moved into our home in Hudson, and were just coming off of a six-month long journey with our oldest son being diagnosed (and very sick) with Ulcerative Colitis. We too, had our youngest son at the time who was in and our of hospitals left and right for chronic asthma issues. Pile that high with a father who had a massive heart attack that left him on life support, and a sweet momma who had not one but two cancer diagnosis’ – to say the least, there was a lot of things to be fearful of in that time.

My anxiety rose like a roller coaster – unable to grasp fully that my anxiety was causing all of my stomach issues, shakiness and heavy chest. Convinced something more was wrong with me, doctors tested everything under the sun. Not ONE doctor thought perhaps it was anxiety that was manifesting in other ways. After all, I am a very bubbly optimistic girl, so that can be a mask for what anxiousness existed underneath. It was very early one morning getting the kids ready for school when my heart felt like a drum beating out of my chest. I swore I couldn’t breathe. I walked out of the laundry room and quickly found myself laying the family room floor, gasping for air. Before I knew it my hands, arms and legs were completely tingly and numb, I couldn’t feel anything and each breathe felt like it was my last. Dan called 911… It was horrifying.

The paramedics walked in and immediately accessed me and said “Miss, are you on any anxiety medication?” The knew immediately that I was suffering from a panic attack. My first (and last) massive one ever, and I was so embarrassed to mumble “No.” in return. For an entire year I did not want to start any type of anxiety medication. I associated it with being weak, and the term “mentally ill” just scared the shit out of me. But it was in that moment that I realized that the help I needed, the help I avoided all along was to accept the fact that I needed to start anxiety medication.

Since starting, and stopping my anxiety medication for my pregnancy with Max, and restarting – I recognized my need for the medication and how it helped me in a multitude of ways. Medication is not for everyone, but I highly suggest if you are suffering from anxiety or depression to seek help. Do not wait – it will not fix itself. Over the years I have developed multiple coping mechanisms. I have learned triggers, and am able to harness my anxiety and either avoid or approach a situation differently to help dissolve those anxious feelings.

Fast forward to 6 years later, I wish I could have pull myself aside and tell a few things.

  1. Seeking help for anxiety is one of the bravest and smartest things you will ever do for yourself.
  2. Taking mediation to help out your serotonin levels is NOT abnormal, nor something to be embarrassed about. In fact, it’s needed – and it’s okay.
  3. Your anxiety will NEVER conquer you. Mindset is everything. And when those anxiety attacks happen, and anxious thoughts arise, YOU can learn how to walk yourself out of that head space. It takes time.

Right now, in this moment – what we are experiencing as a nation is beyond uncharted. Mental health is so important during this crisis. We have to remind ourselves to take our fear and turn it into faith. When we feel anxious and overwhelmed to seek help – whether that looks like talking to someone you love, removing yourself for alone time, working out, deep breathing etc. Re-set, and know you will be OKAY. YOU will get through this and YOU have the power to change your mindset. Even if you find yourself doing it multiple times okay, that is OKAY. We are all scared during these uncertain times and the lack of socializing and increasing groundhogs-day-like days can be exhausting.

SEEK JOY – take time for yourself and keep reminding yourself that this WILL PASS. Here is one of my favorite affirmations to speak during the day, right before I do deep breathing and stretching…

Sending my love, well wishes, and patience to you all. As we will get through this together, stronger than ever.

xoxo, abby

Filed Under: Uncategorized

Loaded Baked Potato Quiche

March 30, 2020 by Abby Thome

Loaded Baked Potato Quiche

Potatoes, bacon, cheese … need I say more?

No matter which shape you make a quiche, you cannot go wrong. Use a pie dish, create mini versions in a muffin tin, or use twice the crust and make it in a baking dish. I don’t care, and neither should you! The fact is, using store-bought pie dough and a dozen eggs and some milk you can create a delicious quiche at home. Now, if you are feeling yourself you can take it over the edge and add whatever mix-in’s that tickle your fancy.

Basic Quiche Ingredients: For ONE circular pie, you’ll need ONE refrigerated pie dough, thawed. Roll it out a bit, and place it into the pie pan. Press the dough into the dish to give it some grounding. Bake at 400* for 12 minutes. In a bowl, whisk together 12 eggs and 3 cups milk, with salt, pepper and garlic powder. Take pie out of the oven, and pour in the egg mixture (top with some shredded cheese if you’d like!) BAKE again for 45-60 minutes, until the egg is cooked all the way through.

If you want to use up both of the refrigerated pie dough crusts in the package, let’s do it. just press them into a 9×13 baking dish. Follow along with the same directions, only this will have to cook for 30-45 minutes. It will make delicious petite squares of quiche!

NOW – if you want to make a quiche for a special occasion, my Loaded Baked potato Quiche is the perfect dish for Easter or brunch.

Loaded Baked Potato Quiche

1 Refrigerated pie crust, thawed 

1 1/2 cup thinly sliced ruby and gold potatoes

1/3 cup cooked crumbled bacon

1/4 cup shredded cheddar cheese

3 Tbsp green onion, chopped

12 eggs

3 cup whole milk

1/2 tsp kosher salt

1/4 tsp pepper

1 tsp garlic powder

1 Tbsp extra virgin olive oil

Let’s whip it up!

Pre heat the oven to 400* Place pie pan of choice on top of a baking sheet, it will make for easier handling when removing in and out of the oven.  

1. On a well floured surface, roll out the pie crust dough until it is 1-2 inches larger in diameter to your pie dish you are baking in.

2. Place pie crust into dish, press firmly along the bottom and sides to adhere to pan, crimp edges if you wish.

3. Layer the sliced potatoes onto the bottom the pie crust.  

4. Brush with olive oil, and sprinkle a pinch of kosher salt and pepper on top

5. BAKE for 12 minutes

In the mean time, prepare the filling:

Whisk together 12 eggs, milk, salt, pepper and garlic powder

6. REMOVE quiche from oven

7. Layer bacon, cheese and green onion on top of the potatoes

8. POUR egg mixture over the top

9. BAKE for 50-70 minutes until the quiche is cooked through completely, (no wet giggly middle). If you notice your crust getting “too brown”, take the quiche out and simple cover the edges gently with foil for the remainder of baking time.

Let cool for 45 minutes before slicing

Filed Under: Bites, Our Bites

Master Bedroom Update

March 27, 2020 by Abby Thome

Master Bedroom Update

This is a blog post in collaboration with and sponsored by Wayfair. As a Wayfair Homemaker I am thrilled to show you all how to makeover rooms on a budget! Make sure to check out their incredible variety of bedroom furniture, here.

Remember this mood board? Being able to put together a room piece by piece, price by price helps to keep your vision on track and your budget too!

There she is, in all of her in-between glory. And you know what? It’s OKAY!

Did I think that 6 weeks ago that we’d be on week two-and-a-half of lock down in our home? Nope, not in the least. With that being said, all of my last minute errands to pick out wall art and accents for this space had to go onto the back burner. At first, I did not even want to show this space until everything was perfect. But, after all is said and done, in the stage we are as a nation – you come to realize really quickly how lucky you are to have what you have NOW. So, with that being said – let’s celebrate where this master bedroom makeover stands, because …

I love it!

There was one piece in particular that I knew I had to have for this space. This stunning pink rug had my heart racing from the second I saw it, and let’s face it, with a house full of boys, this momma deserves a splash of pink. It is one of the softest rugs I have ever felt, and the detailing is twice as stunning in person as it is in picture.

Dan and I both decided it was worth rolling the dice on this dresser. We loved the look of it, but we were weary of the low price. We were shocked to find that it is a heavy, substantial dresser! Only negative was putting it together, bless Dan’s heart – ever last inch of that piece needed put together. But, for less than $300 I think it was worth a few hours of labor. Ours is currently sold out, but check out what was our runner up – here.

I was completely smitten with the curtains we purchased for Max’s room makeover with Wayfair, and had to have them in our master bedroom too! You guys, these curtains are thick, luscious, weighted curtains that will stand the test of time. They are stunning! I will definitely be replacing our entire house with these beauties.

Last but not least, we purchased new lamps for the accent tables next to our beds. They are beautiful, and so well priced!

Listen my loves, during this difficult season our country is going through, let us all focus on what we are so lucky to have. Our master bedroom may not be done to the “T” and have every accessory and decor piece I envisioned, but it feels so fresh and relaxing in this space now. A room that once felt very unorganized and dated, is now a room I look forward stepping into.

A big thank you to Wayfair, for collaborating on this space. As a Homemaker for nearly 5 years with Wayfair I am forever grateful to work with brands that are so thoughtful and kind. This room will still have a round two of additions happening, so keep your eyes open for a master bedroom phase two!

Filed Under: Home, Our Projects

Broccoli Cheddar Burgers

March 19, 2020 by Abby Thome

Broccoli Cheddar Burgers

Hearty, healthy + perfect for storing in the freezer. You bet your sweet ass you will love these burgers.

Lately, with all that’s swirling around us, I keep racking my brain for recipes that I can make that can be freezer friendly. Taking the time to whip something up, and set it aside for a rainy day is really important right now. Nothing gives me a lady boner more than when I can create healthy, hearty bites to serve my family on a whim. Yes, I am feeling feisty today. Day #6 of quarantine has me feeling all sorts of wild.

Broccoli Cheddar Burgers

  • 2 cup onion, diced
  • 2 cup celery, diced
  • 2 can cannellini beans
  • 1/4 cup cold water
  • 5 cup riced broccoli
  • 2 eggs
  • 1/2 cup panko breadcrumbs
  • 1 1/2 tsp garlic
  • 1 tsp kosher salt
  • 1/2 tsp pepper
  • 1 cup shredded cheddar cheese
  • 1 cup panko + 2 Tbsp melted butter
  1. Saute onion + celery with a tablespoon of olive oil, pinch of salt and pepper until translucent (3-5 minutes)
  2. In a food processor, add the onion + celery. Toss in the cannellini beans and cold water. Blend until just nearly smooth
  3. In a large bowl, add the bean mixture – AND 2 eggs, riced broccolli, 1/2 cup panko, garlic powder, salt and pepper and cheddar cheese.
  4. STIR the heck out of it, until everything is combined evenly
  5. SHAPE AND BAKE!
  6. In a small bowl, set to the side, mix the 1 cup panko breadcrumbs with 2 Tbsp melted butter
  7. SCOOP 1/2 cup of the burger mixture, and shape into thick burger patties
  8. DIP into the buttery panko breadcrumbs, on each side
  9. PLACE onto a parchment lined baking sheet
  10. BAKE at 375* for 45 minutes
  11. PAN SEAR on each side to “finish them off” this is optional

LET COOL COMPLETELY – if you are going to freeze them. TO FREEZE: place into a freezer safe gallon ziplock bag, in a single layer.

WARM: in oven at 350* until warmed through, or microwave

Filed Under: Bites, Our Bites

  • « Previous Page
  • 1
  • …
  • 7
  • 8
  • 9
  • 10
  • 11
  • …
  • 67
  • Next Page »

LETS BE SOCIAL

  • Email
  • Facebook
  • Instagram
  • Pinterest

Articles

Categories

Archives

Heinens

Visit The Thome Home 's profile on Pinterest.

Recent Posts

  • Pork Schnitzel
  • It’s time to book your vacation with Oasis Vacations!
  • Oasis Vacations at Ocean Isle Beach, North Carolina
  • JUS-ROL Crescents
  • Back to School Safely
  • Chicken Tender Charcuterie Board
  • Lillie’s Q Spicy Cheddar Sausage Pizza Bagel
  • Max’s Bedroom

Copyright © 2025 · Tasteful theme by Restored 316