• Home
  • About
  • LIFE
  • HOME
  • FOOD

The . Thome . Home .

Pan Seared Scallops

October 8, 2019 by Abby Thome

Pan Seared Scallops

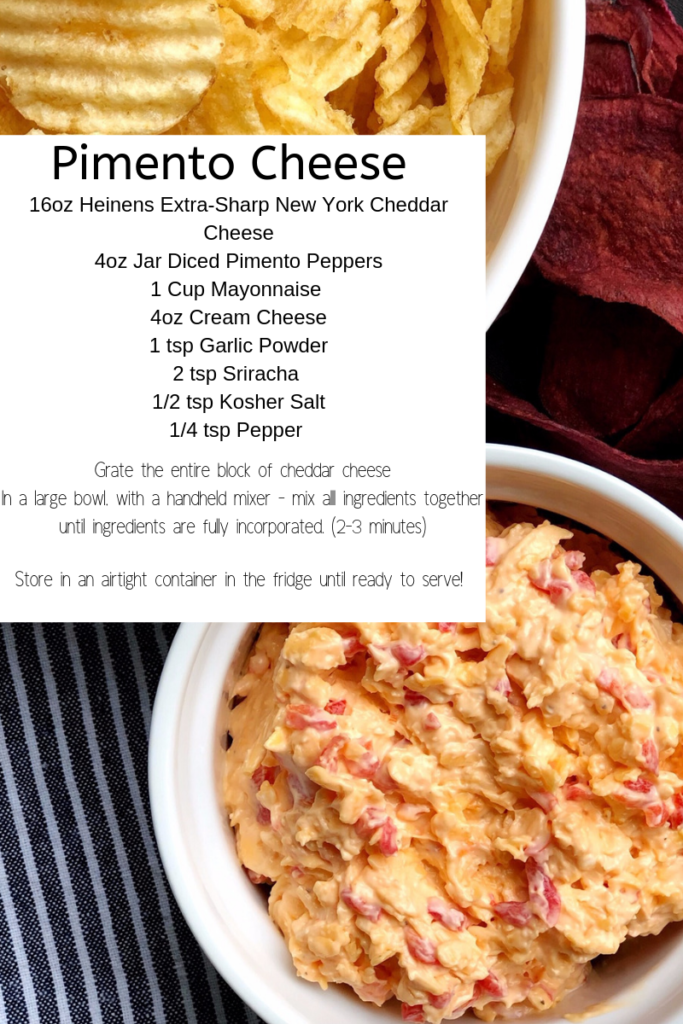
This post is sponsored by Heinen’s. As a Heinen’s Contributor I am honored and excited to bring you all so many incredible recipes that will quickly become family favorites!

Pan seared scallops – a seafood that intimidated the heck out of me to cook. Why?! Well, first and foremost they are a little pricier than your average make-at-home meal. So, the thought of screwing up $30 worth of scallops made me sweat. Until I watched a few tutorials on YouTube, because you can learn everything and anything from YouTube! And within 3 minutes, I knew I could not only handle the task, but create a dish worthy of the price tag and more. It’s THAT easy – let me teach you!

Pan Seared Scallops
Pan Seared Scallops

Where do I buy scallops?

Listen, you definitely need to make sure you are purchasing not only your scallops, but any raw seafood for that matter from a trusted grocer or fish monger. Thankfully, right down the road we have Heinen’s Grocery, where quality should be their middle name. There are very few places I trust seafood from, Heinens is my number one choice!

A little goes a LONG way …

Surprising to me, you only need 3-4 scallops per guest. Especially if you purchase nice thick, juicy scallops – they are very filling when paired with the right sides. Think, risotto, pasta, salad, purees … etc.

Pan Seared Scallops
Pan Seared Scallops

Ready to make a dinner that will not only knock your guests socks off but leave you pinching yourself that YOU, yes YOU made it?!

Prepare the scallops:

Take two kitchen towels, lay one flat, and place all of the scallops onto the towel.  Place the remaining towel on top and let all excess moisture be absorbed into the kitchen towels.  You want your scallops nice and dry before you pan sear them, this will ensure that you get a golden crust on the scallop! 

Once your scallops have been pat dry, it is time to get ready to cook!

This process moves swiftly, so it is best to have a station set up with everything you need to cook scallops successfully!

  1. Place your scallops onto a small baking sheet, season generously with kosher salt and pepper on both sides.  
  2. Have a tablespoon of unsalted butter per 5 scallops ready to go on your baking dish in a small bowl.
  3. In a sauté pan, over medium-high heat, pour in two tablespoons of avocado oil.  Let the sauté pan and oil heat until it is nice and hot!
  4. Using tongs, place 5-6 scallops into the hot pan.  DO NOT MOVE THEM! Let the scallops sear for 2-3 minutes on one side, once 3 minutes is up – flip the scallop to cook the other side for another 90 seconds.  
  5. Once scallop is cooked through (less than 5-6 minutes total) Push scallops to one side of the pan, add the tablespoon of butter to the other side of the pan to melt.  Take a spoon, and baste  the melted butter over the seared scallops for an additional minute.  

That is it! Remove the scallops from heat, and enjoy with your pairings of choice.  You can take your scallops to new heights with adding additional flavor to your scallops during the basting portion of cooking. Try these combinations below to really elevate your dish! 

Let’s add some flavor!

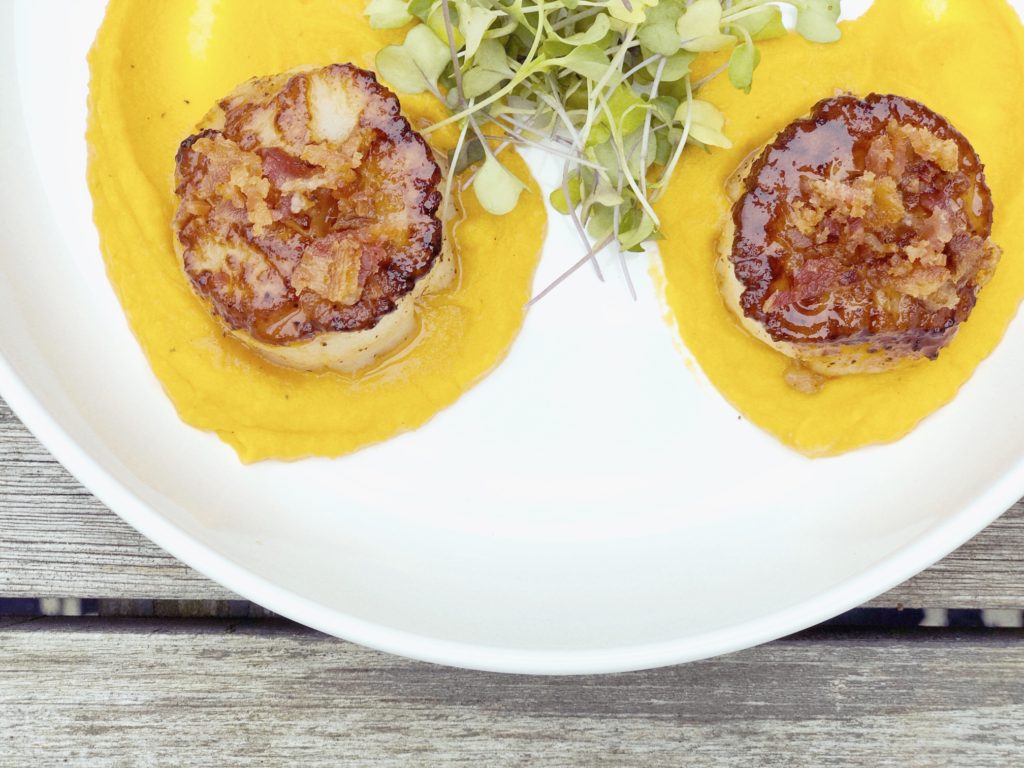
Honey Sriracha Scallops

1 Tablespoon Sriracha + 1 Tablespoon Heinen’s Organic Honey + 1 Tablespoon Heinen’s Unsalted Butter

Rosemary + Thyme Scallops

1/2 Tablespoon finely chopped Rosemary + 1/2 Tablespoon finely chopped Thyme + 1 Tablespoon Heinen’s Unsalted Butter

When your scallops are pushed to the side of the sauté pan, add the butter and seasoning of choice to the side of the pan opposite the scallops. Proceed to spoon over the melted butter and seasonings over the scallops for just a minute to add incredible flavor!

It’s just that simple, scallops in a multitude of flavor combinations under 6 minutes!

Pan Seared Scallops
Pan Seared Scallops

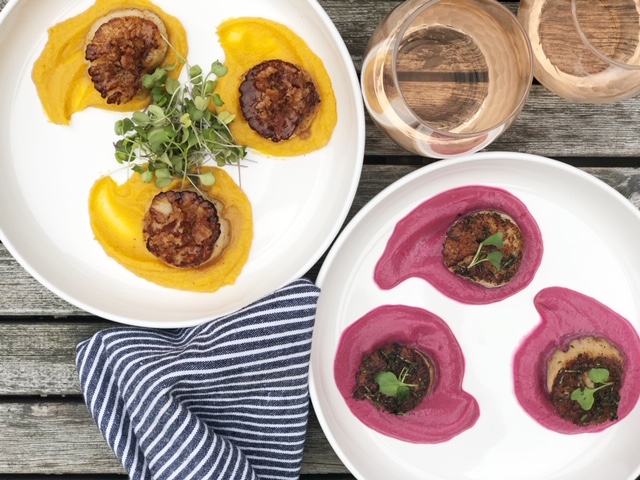
Want to make these two beautiful puree’s to pair with your scallops?
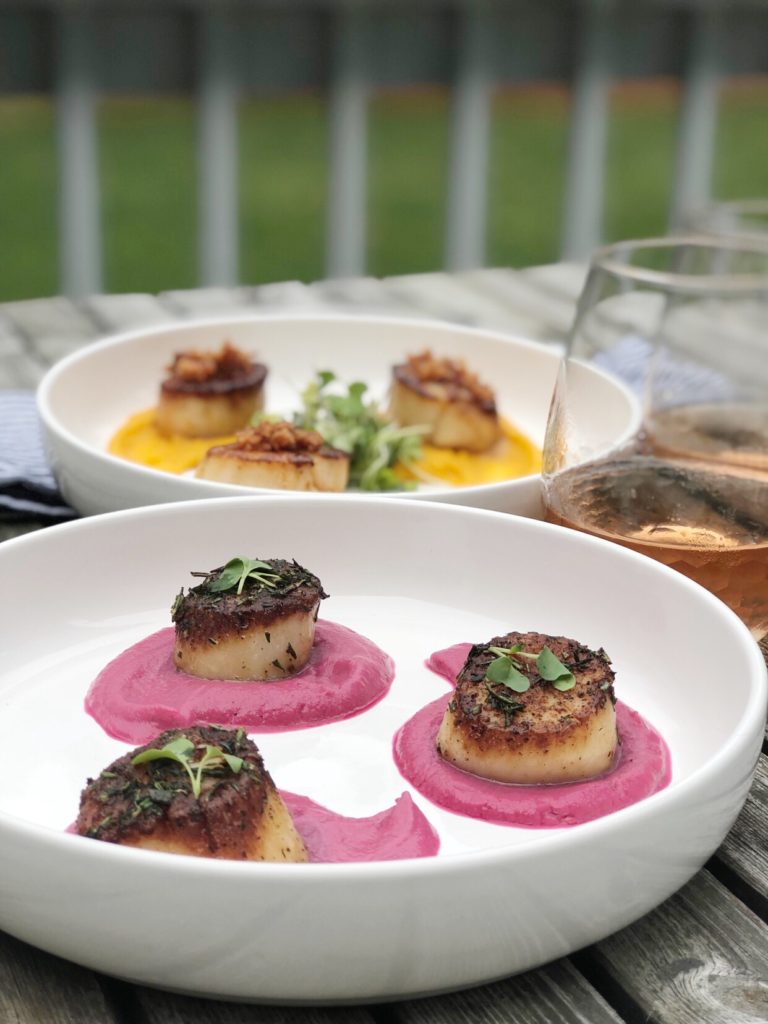
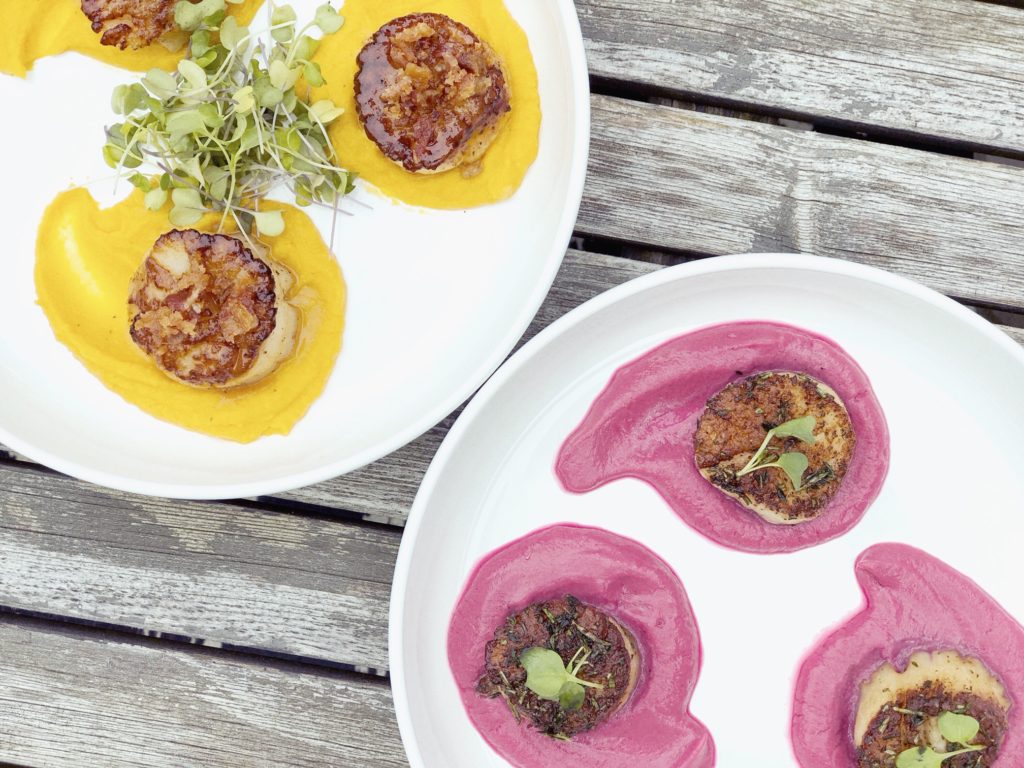
Beet Puree

1 can Heinen’s Beets + 1/4 cup Heinen’s Cannellini Beans + 1 Roasted Garlic Clove (or 1/4 tsp garlic powder) + Pinch of Kosher Salt  + Pinch of Ground Pepper+ 2 Tablespoons Avocado Oil (or Extra Virgin Olive Oil)

Sweet Potato Puree

2 Roasted Sweet Potatoes, skin removed + 1/4 cup Heinen’s Cannelini Beans + 1 Roasted Garlic Clove (or 1/4 tsp garlic powder) + 2 Tablespoons Avocado Oil (or Extra Virgin Olive Oil) + 2-3 Tablespoons water (to loosen the puree when blending)

Roasted Garlic

Pre heat oven to 375* 

Take an entire bulb of garlic, and turn it onto its side.  With a sharp knife, cut the top of the garlic bulb off – exposing the tips of all of the garlic cloves inside.  Place garlic bulb onto a square of foil, cover the exposed area of the garlic bulb with olive oil, pinch of salt and pepper.  Fold the foil all around the garlic so that it is completely covered.  Place onto a small baking dish

Bake at 375* for 45 minutes, remove foil packet from oven and let the roasted garlic cool for 20 minutes before opening the package (it will be piping hot!)

To remove the roasted garlic cloves, simply squeeze the base of the garlic bulb and all of the delicious roasted garlic will slide out and be ready to add to any dish! 

You just can’t go wrong!

Whether you choose to make the beet puree, or sweet potato, the process is so simple you will fall in love with creating these delicious puree’s to create a color base for any dish! 

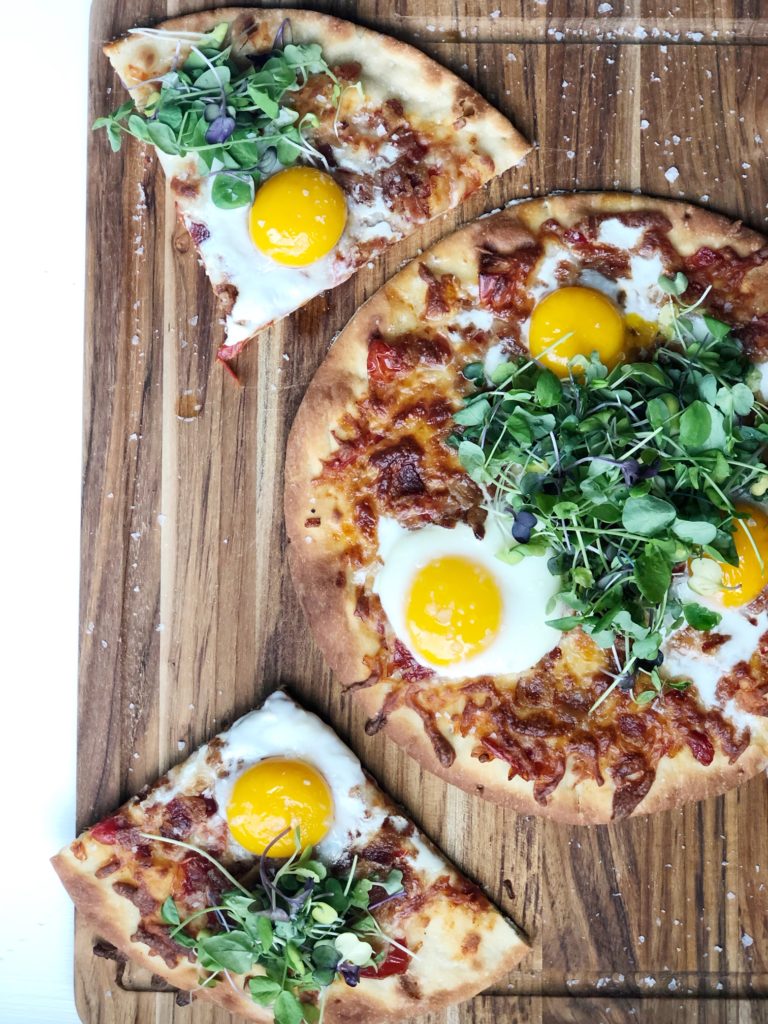
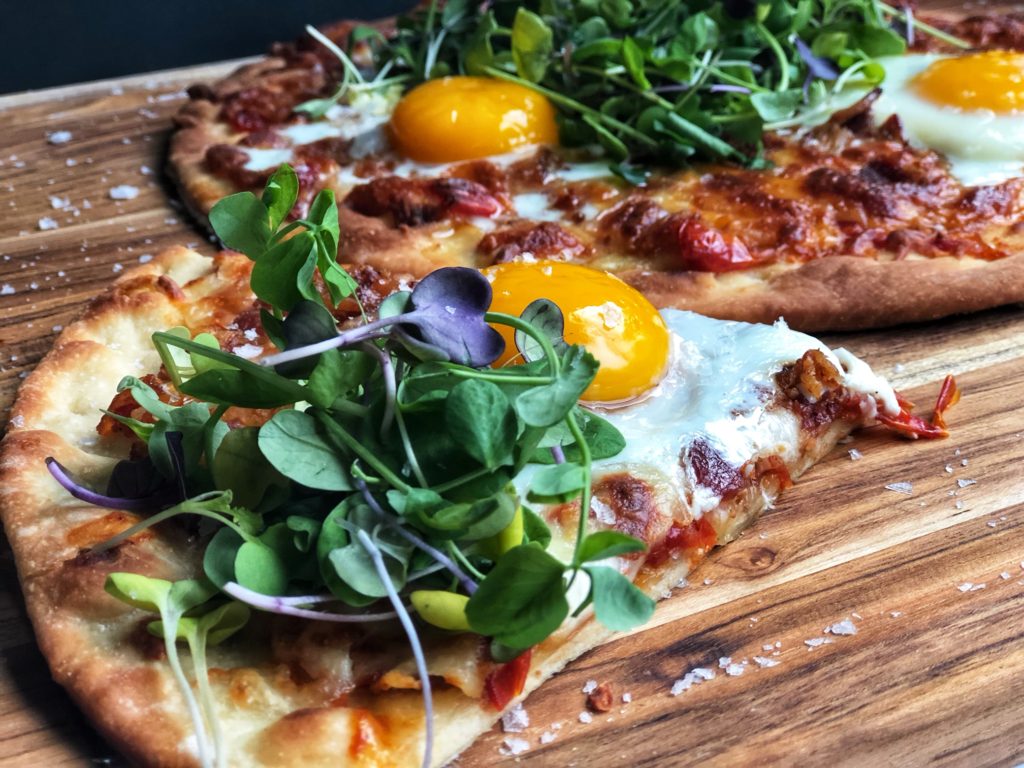
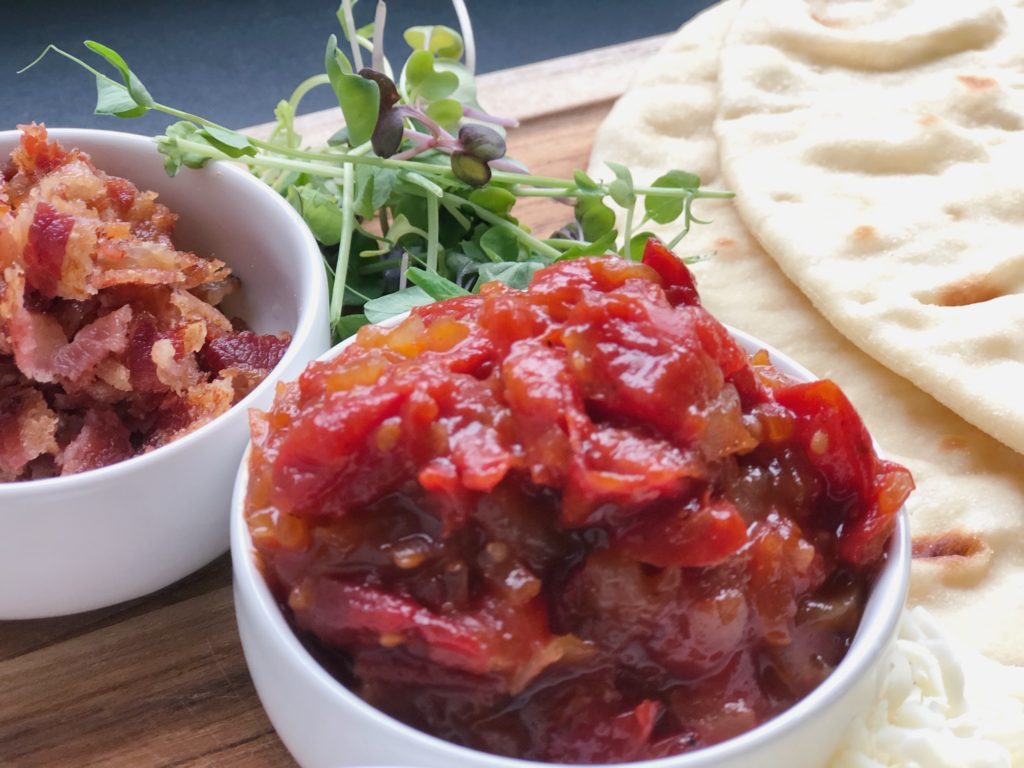
Simply put all ingredients for the puree of choice into a ninja blender, or food processor and blend until all ingredients are fully incorporated and the puree is silky smooth!  I paired the beet puree with a herbed butter scallop, topped with mirco-greens.  The sweet potato puree paired with the sriracha honey scallop, topped with crumbled bacon.  Both of which were absolutely delicious!


Filed Under: Bites, Our Bites Tagged With: scallops

Fall Family Fun at Luther’s Farm Market!

October 4, 2019 by Abby Thome

Fall Family Fun at Luther’s Farm Market!

Luther’s Farm Market is an incredible family owned farm tucked away in Richfield, Ohio that is a total hidden gem for family fun! We’ve had the joy of visiting throughout the year for over five years. The boys favorite time of year to go, though? FALL! Fall Fest is held at Luther’s Farm every weekend in October from 10am-6pm, and it will instantly become one of the best places you go to with your crew during the fall season.

What do they have to do there?

Well, well, I am glad you asked! From a GIANT corn slide (your kids will lose their minds) face painting, hay + corn maze, hay rides and a petting farm – there is so much to do at Luther’s all set in the most charming environment. Speaking of hay ride, this is not your average tractor. Think monster truck of tractors ….

Go big or go home, they say.

Let’s take a peek at the barn, where you will meet all of my friends –

who’s a pretty bird?
little miss piggy stole my heart from the second she waddled up to the gate

The animals at Luther’s are so social, expect to have a few followers just begging to be pet. My heart exploded a million times over when the boys would call for a pig or goat and they came trotting right to them!

Not only does Luthers have family fest during the month of October, they also have an incredible little market stocked full of local made goodies.

From honey, jams, salsa and more – OH! And I must not forget their incredible assortment of meat you can find in their deep freezers. So pick your pumpkins and mums, head to the market and pick up a snack for the car ride home!

I had to yank the boys out last weekend, and with October Fall Fest just days away I better set aside a solid afternoon to be spent at Luther’s. Fun to be had, memories to be made!

Filed Under: Family, Our Life

Kitchen Makeover!

October 3, 2019 by Abby Thome

Kitchen Makeover!

Is a kitchen makeover in your future? Kitchen’s are the heart of most homes. The space that guests gather, loved ones pour a glass of wine and chat the night away. The room that fills so quickly during parties and it is the last place you planned on guests settling in. Kitchens tend to be the number one room to renovate on the list of importance, and yet, it can be the most expensive, and subsequently the last room that actually gets renovated.

How many times a day do you find yourself lusting over images on Instagram or Pinterest of someone elses home?

From the perfectly pitched ceilings, larger than life black cased windows draped with the most luxurious drapes. That leather couch that stopped you in your tracks, and then proceeded to give you a stroke when you click “like it to know it” and it is $20,000. No big deal right?

Not many families can pull the trigger on a $30-$60,000 kitchen renovation.

There are a lot of homeowners just sucking up the ugly, spending their days wishing they hit the lottery as their fingers continue to scroll, screenshot and save images. I know the feeling all to well! Here I stand, 5 years later in a kitchen that is still original to the house, and yet, I love it. Yes, I want to renovate it ONE day. BUT, I am so glad that we took the steps to make the changes we needed to, to love the space until we were ready for such a larger investment.

Just take a look at the transformation from our kitchen makeover!

Kitchen Makeover before + after

We lived with those orange countertops for over a year. Until we turned to our trusted Giani Granite Countertops to transform them with their incredibly easy countertop kits. We loved the counters for 3 years! Just recently we replaced them with a faux marble laminate.

The lucky kitchen makeover recipients …

Just a few months ago, my brother and sister-in-law purchased a home just a stone throws away from our house (EEK! THE EXCITEMENT!) Of course we are over the moon to have them so close. They are newlyweds, and first time homeowners all within a year. So much to celebrate, and so many changes to embrace.

The home they purchased is a gorgeous colonial, that they are dying to put their own style into. The kitchen in this home is massive, in the best of ways. The ultimate gathering spot, and perfect for a couple who loves their time in the kitchen. The cabinets are well built, so there is no need to tear them apart. They are just an off shade of peachy cream., with scrapes and stains that need tended too!

kitchen makeover before

Insert ME! The annoying, over-the-top sister who knows all to well how to transform a kitchen on a budget. Knock, knock – I’m here! So, here is the game plan! Over the next few days you can follow along with me on my Instagram account @abby_thome to see the behind the scenes journey of this incredible kitchen makeover! It is going to be WILD

Stay tuned!

I am working with Giani Granite, and their Nuvo Cabinet Paint line to give their kitchen a modern, more customized finish. Now go RUN to my Instagram account @abby_thome and make sure you are following me so you too can see how simple it is to makeover your kitchen on a budget!

Filed Under: Our Projects

Avocado Oil Banana Bread

September 24, 2019 by Abby Thome

Avocado Oil Banana Bread

Avocado Oil Banana Bread that will quickly become a household favorite!

Banana bread, Abby? Really? How creative – NOT.

Listen, I’m not here to impress (haha) The classics stand the test of time for a reason, and when I can find a healthier twist to The Thome Home’s #1 Banana Bread recipe, you bet your ass I am going to share it!

Have you brought Avocado Oil into your kitchen, yet?

Babes, do it now! Here are a few impressive facts about this amazing oil:

Over the past year I have worked really hard to get vegetable oil and canola oil out of our house. There are still a few cake recipes here and there that I just cannot seem to swap for.

Every other swap – from frying, sautéing , dressings and more has elevated our food to a healthier and far more delicious level!

You can find Avocado Oil just about anywhere these days, and with a high smoke point (up to 520*) it is no wonder cooks are turning to this oil to take over their kitchen creations.

So whether you are pan frying breaded chicken, or using avocado oil in my banana bread recipe – I could not recommend adding this to your arsenal. You’ll be so glad you did!

Now it’s time to make this incredible banana bread!

Preheat oven to 350* Prepare dish of choice (For bread pans – line with parchment paper. For muffin tin, line with muffin liners)

In a large bowl, with a handheld mixer, mix together the bananas, and both sugars until bananas are as smooth as you can get them (2-3 minutes). Add avocado oil, buttermilk, eggs and vanilla – mix together an additional minute or so until everything is completely incorporated. Next, put in the flour, baking soda + powder, salt and cinnamon. Mix until batter is smooth and creamy!

For banana bread, divide batter evenly amongst two bread pans.

Let’s Bake!

Bake at 350* for 50-60 minutes, until bread has cooked through – insert a toothpick, pull out and little to-no crumbs should be attached. Set bread pans on a wire rack to cool – Enjoy!

For muffins, fill muffin tins 3/4 of the way up. Bake at 350* for 13-17 minutes, just until when you insert a toothpick little to no crumbs are attached. When you push on the middle of a muffin, it should feel bouncy! You’ll know it is cooked through and ready to enjoy! Let muffin tins cool on a wire rack.

Enjoy this incredible banana bread any way you like! My boys love it smeared with a generous dollop of butter 🙂

Filed Under: Bites, Our Bites

10 Ideas for Fall Front Porch Decor

September 23, 2019 by Abby Thome

10 Ideas for Fall Front Porch Decor

10 Fall front porch ideas for inspiration that will give your home instant curb appeal by adding of mums and pumpkins a variety of sizes and colors!

Have you decorated the exterior of your home for fall yet?

Fall front porch decor is usually a project I am way ahead of the game on. But, this year – I’m glad I waited! Late nights swiping through Pinterest have given me so many new ideas on how I can elevate our seasonal decor choices for the exterior of our home! Make sure to click “follow” on my Pinterest page. I am always posting new ideas there! If you really want to get sidetracked, go check out the boys during the fall in years past, they were so little!

Here are a few of my favorite fall front porches to get you feeling inspired to decorate your home this season!

Kelly, from The Lilly Pad Cottage is SO talented, you could spend days on her blog. Just look at her home, so so beautiful!

I adore the simplicity of this front porch. It just goes to show that you do not need to have a sprawling porch or stair case to make the entrance to your home gorgeous for fall!

Orange you glad I featured this one?! Wow! I love the layered warm tones with the galvanized buckets for the mums, because sticking with the classic orange shade is timeless!

Muted mums, crisp white pumpkins paired with the sage green gourds. My goodness! What a classic combo that would pop against a wide variety of house exteriors, such a simple palette with a big impression.

Scared of adding color to your front porch? Let this set up prove to you that sticking with one color creates a seamless vibe full of texture! If your choosing one color to showcase, make sure to mix and match shapes and sizes of your pumpkins!

What a great idea to show your deck a little love! Perfect touch added to your patio or deck – this makes me want to cuddle up with a blanket and start a fire, stat!

Whether you use votives, or twinkle lights – the idea of adding a little glow around your fall porch decor is such a beautiful touch! We are totally doing this!

Every year we add spiders and bats to our walls, to add a little spook to our decor. Our boys lose their minds with excitement! Adding a giant spider to the exterior of your home is such a fun way to add a little spookiness to the season!

So simple, so stunning! Who would have thought a couple twigs and pumpkins could look so incredible?! So smitten with this look!

The door mat – perfection!

If you are local, here are a few of my favorite places to go to pick our pumpkins and mums!

Pattersons Fruit Farm Their donuts are incredible!

Luthers Farm Market The cutest farm to walk your kids through! AND the boys favorite massive corn slide!

Beckwith Orchards Get. The. Apple. Pie. seriously.

Filed Under: Home

Nursery to BIG Kid Room!

September 20, 2019 by Abby Thome

Nursery to BIG Kid Room!

This blog post is sponsored by Wayfair. As a Wayfair Homemaker, I am so excited to bring you home decor inspiration! Thank you for supporting the brands The Thome Home loves so much!

The transition from nursery to big-kid room is beyond bittersweet. It officially marks that moment in time when your little one has moved out of their crib and transitioned into the stage of acting more like a big-kid. Max has been in a full size bed for over a year now, and yet the rest of his room has sat completely untouched.

Leaving a room in limbo for too long is a big NO for me. I start to not care, making it a space that I just close the door too and that is totally not okay. Max’s room is one that he is hardly in, he is the worse sleepover, and I think that that alone made it hard to put some effort behind.

So what made me decide to to finally give his room the attention it deserves? My vision boards – Babes! If you haven’t signed up to have a vision board created by me, for you – DO IT. Follow this link and you can see how you can get started! It was so easy to follow my vision board and pull the room together. Would you believe it if I told you I spent less than 24 hours making over Max’s room. Painting and all!

Here is a little glimpse of what a mess it ways just days ago ….

To say there was a lack of flow in his room is a total understatement! I made the choice to makeover Max’s room without breaking the bank. I kept his makeover at $400 – plus or minus ten dollars or so! It’s unreal what you can do to a space within budget and just one day worths of hard work!

A bright, modern and simplified room for Max!

I knew when picking pieces for the vision board that I wanted his room to be a space that he could continue to grow into. Choosing decor that can easily be swapped/or/added too was key!

The Bungalow Rose Rug stole my heart the second I scrolled past it. I liked the idea of having a dark rug to ground the space, and of course, to hide all of the stains that are sure to happen with 3 boys! Wayfair has thousands of rugs to comb through, check out all of the options here!

How many play tables have you guys gone through with each kid? I swear, we use them for a year and then they get donated or handed off to someone. Well, it has been years since we have had one in the house – and now I remember exactly why we always bought one. Because the kids actually USE them! Max has been obsessed with having a table that is just the right size for him to do his art work on! This play table was such an insanely low price! So many great play tables to choose from, colors/size/style!

I have such a love/hate relationship with curtains. It is SO hard to tell the quality of a curtain online. Wayfair makes it so much easier to shop, there are always tons of reviews and pictures to gage whether or not your purchase will end up turning into a return! We’ve all been there! These curtains BLEW MY MIND. They are thick, weighted at the bottom, black out, and so so beautiful I already have more in my cart for other rooms in my home. These CURTAINS are a winner – and on SALE big time! Wayfair, by far, in my experience has always had the best price for quality on curtains. Going through the reviews will help make a wise choice before you check out!

The thought of extra-long book shelves in Max’s room kept me up at night. It’s the one decor feature that I knew had to happen. When I stumbled across these stunning oak wood shelves, I knew I had to pick up two sets to make my dreams come true. They come in a pair, I lined them up side by side giving the illusion of one really long shelf! Whether you want one shelf, wood or white, modern or rustic – look at all Wayfair has to choose from. The Alphabet Print is such a cute touch! I chose to place the picture in front of the matting in the frame, and it looks great! SO many framed pieces to add to your home, check them out.

Max’s room has scratched an itch that I have been dodging for an entire year. I could not be happier with the results, and the look on his sweet face when he saw his room for the first time made me so so excited for him!

Last but not least, the BED!! Babes, this bed is SOOoOoOoO affordable I every single one of my kiddos has it. They are just as gorgeous in real life as they are in pictures!

Giving this room a rapid makeover was exactly the push I needed to not give up on other spaces that I feel are just SO dull feeling in our home right now. YOU can too decorate your space on a budget, and transform a room in a matter of days. Make sure to sign up for my customize vision board – and let’s make your dream room a reality!!

Filed Under: Home, Our Home Tour, Our Projects

Baked Soft Pretzels + Spicy Pimento Cheese

September 17, 2019 by Abby Thome

Baked Soft Pretzels + Spicy Pimento Cheese

This post is sponsored by Heinen’s, thank you for supporting the brands that I love to use in our home daily!

Making scratch-made baked soft pretzels and spicy pimento cheese will quickly become a super power you never knew you had!

Whether you create the classic twist, or chop the pretzel dough into bite-sized nuggets, these scratch-made baked soft pretzels are SO good you’ll pat yourself on the back for making them all on your own!

Ever met a soft bake pretzel you didn’t like?

I have! Ugh, the frozen store bought ones are the absolute worse. Microwave them up and they turn into this chewy hard bite that you’d be better off feeding the dog.

Let me teach you how to make these pretzels, no matter which shape you choose ( I do both!) so that you can be the bad ass appetizer-maker that I know you are!


Everything that you need …

9 cups Unbleached All-Purpose Flour ::: 8 Tbsp Unsalted Butter – melted ::: 3 cup Warm Water ::: 2 Tbsp Sugar ::: 2 tsp Kosher Salt ::: 2 (1/4 oz) Packages of Active Dry Yeast

For Pot of Boiling Water ::: 20 cups water + 1/2 cup baking soda

Egg wash ::: 3 egg yolks ::: 3 tablespoons water
Flaked Sea Salt 

The approach to making homemade soft pretzels can be broken down into a few simple steps: Rise. Roll. Slice. Boil. Egg Wash. Bake

In a small bowl, mix together 3 tablespoons of water and 3 egg yolks, this is the egg wash that will make your pretzels golden and shiny. In another small bowl, fill with 1/4 cup of flaked sea salt.  

Now it’s time to make the pretzel dough!

  1. Start with a large bowl, add the warm water, sprinkle over the yeast and sugar.  Let this sit for five minutes while it “blooms”. You’ll notice to dry yeast start to foam and bubble, this will let you know that indeed the yeast is activated and ready to go!
  2. Next, measure out your flour and add it to another large bowl.  Pour in the melted butter and warm water that has been activated with yeast.  
  3. Stir, stir, stir.  Until a sticky dough has formed.  Now it is time to use the best tools in the kitchen, your hands! 
  4. Knead the pretzel dough for a few minutes – just until all flour is incorporated and you have formed a beautiful dough ball that is stretchy and smooth!
  5. Take the ball of dough out of the bowl, pour a bit of extra virgin olive oil into the bowl, swirl it around the bowl and place the pretzel dough ball back into the bowl to rest.  Cover with a kitchen towel, and let rise for one hour (it will double in size!)
  6. Once your dough has risen, it is time to prep your water to boil and get the dough portioned to be rolled and cut into delicious little nuggets! 
  7. First, boil the water.  In a large pot, bring 20 cups of water and 1/2 cup of baking soda to a roaring boil.  
  8. While that is coming to a boil … 

Shape the pretzels …

Portion the pretzel dough into four equal portions.  With each quarter of dough, split into two balls additional balls of dough, you’ll have eight pieces of dough to work with.

  1. Roll each dough ball into a long rope, one-inch thick.  Using a sharp knife, cut one-inch pieces of dough and set aside on a baking sheet lined with parchment paper.  
  2. NOW that your dough is cut into little nuggets, and the water is boiling, let’s get an assembly line ready!

Time to bake …

Pre Heat the oven to 450* 

Have two baking sheets lined with parchment paper and a drizzle of extra virgin olive oil – set these trays to the side of the oven.  

Drop 15-20 pieces of pretzel dough into the boiling water for 30 seconds. With a slotted spoon, remove the dough and place on the oiled baking sheets.  Continue this process until the two baking sheets are full.  

BAKE at 450* for 10-15 minutes, until the pretzels are golden brown.  Remove from the oven, and enjoy warm! 

Just look at that perfect golden color!

Tip: Freezer Friendly!

You can also let the pretzel bites cool completely, flash freeze on a baking sheet for 2 hours and then place them into a gallon freezer bag.  Thaw in the fridge when ready to use, and then bake at 300* until just warmed through! This is such a fantastic way to make an entire batch and set them aside for special events or a football gathering!

Filed Under: Bites, Our Bites

Nursery to BIG BOY Room Vision Board

September 17, 2019 by Abby Thome

Nursery to BIG BOY Room Vision Board

It’s happening! We are only a few days away to revealing Max’s new BIG BOY room and I could not be happier for him. Will it help him sleep through the night? Absolutely-freaking-not. Will it make him light up and be excited to spend more time in his new special room? I think so!

Remember his big nursery reveal three years go? Read all about it, here. The shiplap wall was the best decision we ever made for his room, and the killer giant “M” we placed created a cozy modern vibe that I wanted to carry over – minus the crib.

It’s crazy how his nursery went from serene and clean, to pure odd-end chaos once the crib was removed.

See, WOOF! That mess escalated quickly – follow along on my Instagram HERE.

I cannot wait to show you all the reveal on Friday! I’ll make sure to take a picture of Max’s face when he sees his massive bedroom upgrade!

xoxo,

abby

Filed Under: Our Projects

B.L.T. Pizza with Tomato Jam

September 9, 2019 by Abby Thome

B.L.T. Pizza with Tomato Jam

B.L.T. Pizza

This is a sponsored post in collaboration with Heinen’s. Thank you for supporting brands, like Heinens that The Thome Home loves so much!

Our weeknights lately have looked like this :

4:00 Boys come home from school. 4:00-4:30 Homework + Snack. 5:00-8:00 Soccer + Hockey, or one or the other.

8:30 – The dreaded “What are we going to do for dinner?!”

Whipping up week night pizzas, at home, has become a Thome Home staple. Months ago I stumbled across Stonefire’s Artisan Thin Pizza Crust and I have been absolutely hooked ever since. One pack has two pizza crusts, which is perfect for us. Usually the boys request cheese or pepperoni, Dan and I tend to do a simple base and pile it high with a spring salad mix after baking. Either way, I have cooked with these crusts, dare I even say nearly 100x?? It’s pretty close, and I have never been disappointed. This fun twist on a B.L.T. sandwich is SO good, babes, you will not believe you made it yourself, promise!

B.L.T. Pizza with scratch made Tomato Jam has sky rocketed to a top 10 favorite.

Ready to whip this beauty up?? First, you’ll have to make the Tomato Jam, its a dump in the pot, bring to boil, reduce to simmer for 45 minutes breeze of a recipe. So, pour yourself a glass of wine and practice patience. It’s worth it!

Tomato Jam

1 cup Chopped Onion

2 cup Grape Tomatoes quartered 

1/4 cup Brown Sugar

1 tsp Ground Mustard

1 tsp Paprika

1 Tbsp sugar

1 tsp Kosher Salt

1/4 tsp Ground Pepper

Tomato Jam: 

In a sauce pan, combine all ingredients listed above for the Tomato Jam.  Bring to a boil, stirring the entire time, and reduce to a low simmer for 45 minutes.  The tomatoes will burst, and sauce will reduce and thicken greatly.  Once the jam has reduced and thickened at the 45 minute mark, remove from heat and let cool completely.  Store in an airtight container in the fridge, for up to a week to enjoy on pizza, or sandwiches! 

Now, for the B.L.T. Pizza of your dreams …

B.L.T. Pizza 

Pre heat oven to 450*

Line a baking sheet with parchment paper, OR use a pizza stone

Place pizza crust on prepared baking sheet, and proceed to brush the entire crust with the garlic expressions dressing.  This gives the pizza the most fabulous base to start with! 

Smear the homemade Tomato Jam onto the crust, leaving the outer 1/2 inch of crust alone.  

Sprinkle pizza with Mozzarella Cheese, and crumbled bacon.

Baking at 450* for 13-15 minutes.  Until the crust is slightly golden and the cheese has completely melted.  

Remove pizza from oven –

Crack 3 room temperature Eggs towards the mid center of the pizza, and immediately place back into the oven for an additional 3-5 minutes, until the egg whites are completely cooked and the yolk is still jiggly (perfect!). 

Remove pizza from oven, and top with a handful of Micro-Greens!

Slice, and ENJOY! 

Tag @Heinens +@abby_thome in all of your kitchen adventures! 

Filed Under: Our Bites, Uncategorized

Fall Fashion Inspo via Pinterest

September 4, 2019 by Abby Thome

Fall Fashion Inspo via Pinterest

Follow along!

If you asked to peek into my closet, what would you see? Well, a lot of the same pieces, in different colors. I am like that guy at Costco that finds one polo he likes buys it in 12 colors. I am so basic, I practically started the hashtag. Jeans, t’s, cardigans and jackets. I am a creature of habit, and wear what is comfortable to me – and I am learning after all of these years, that being basic is just fine!

Stopped Pinterest years ago? Babes, JUMP back in. I love pinning all of the best content to one place, where I can always go back to when I am in need of home, fashion, or food inspiration. I am constantly on there, you should follow along with everything I am loving lately, HERE. Make sure to click “FOLLOW” so you can stay up to speed with all of the posts I am saving to boards!

The temperatures have really taken a dip already, here in Hudson. I found myself sifting through many of my fall staples only to find them SO worn, covered in classic mom stains – beyond saving. So, here I am, left to find a few fall staples that I can carry throughout all seasons by mixing and matching. It has been years since I have blogged my favorite outfit inspo, but after scrolling through the gram’ and always seeing the same outfit over and over, I figured I’d share a few staple looks that you can put your own spin on. Here are some of my favorite looks!

Soft Olive Green Bottoms have been a staple of mine for years – and pairing it with blush creams just makes this girl HAPPY. (source)

Chunky knit neutral sweaters, paired with boyfriend distressed jeans = give me more. Definitely needing a cute pair of slides to add into my wardrobe this fall! {source}

I’m not a regular mom, I’m a cool mom. Black denim, basic white tee and a jean jacket will make any sleepy mom look like one hot pulled together momma. [source]

I think I am a few years behind on the camisole train, but I’m definitely all aboard if they are paired with a chunky cardigan like this one! Especially an oatmeal knit, with a dark jean — winning. [source]

How cute is this outfit?! I love a cozy jogger paired with a cute sneaker! [source] This is the perfect way to step out of leggings and get into something even more cozy!

Call me a copy-cat, but this look, or as the cool kids say “lewk” is headed straight to my closet. AH! So so cute! [source]

If your needing new outfits to stretch you through the upcoming months, take inspiration from these pins, and check out the dozens more I have on my page!

I love how you can mix and match all of these pieces, making your wardrobe so versatile! Tomorrow, my mission is to pick up a few staples I can play around with – I’ll share them with you ladies if I come across some amazing finds!

xoxo, abby

Filed Under: Our Life

  • « Previous Page
  • 1
  • …
  • 10
  • 11
  • 12
  • 13
  • 14
  • …
  • 67
  • Next Page »

LETS BE SOCIAL

  • Email
  • Facebook
  • Instagram
  • Pinterest

Articles

Categories

Archives

Heinens

Visit The Thome Home 's profile on Pinterest.

Recent Posts

  • Pork Schnitzel
  • It’s time to book your vacation with Oasis Vacations!
  • Oasis Vacations at Ocean Isle Beach, North Carolina
  • JUS-ROL Crescents
  • Back to School Safely
  • Chicken Tender Charcuterie Board
  • Lillie’s Q Spicy Cheddar Sausage Pizza Bagel
  • Max’s Bedroom

Copyright © 2025 · Tasteful theme by Restored 316